

 Rapid Ext JS (beta)


React Apps Development Using ReExt with Ext JS Components
May 1, 2024
152 Views
The world is moving fast towards online businesses. Businesses are established online via social media, mobile apps, and websites. In other words, an online presence has become a need for businesses to stay competitive. You will find many tools in the market to develop business apps. One of the most popular tools is Ext JS. People prefer React JS for the development process of their apps. Therefore, Ext JS Components by Sencha introduced ReExt into the market for creating React apps.
In this blog, we will introduce you to ReExt, explain how to get started with ReExt to build an enterprise application and demonstrate advanced ReExt techniques. Finally, we will discuss the benefits of choosing Ext JS components for your React components apps. Let’s begin our journey!

What Is ReExt?
Let’s explain ReExt in simple words. It integrates Ext JS components inside your React codebase, enabling you to develop data-intensive and modern React applications. ReExt is a comprehensive components library by Sencha Ext JS for ReExt. It comes with more than 140 pre-built components, including grids, forms, charts, and more. The best part? You can build tools with feature-rich interfaces within no time. It leads to development with incredible speed.
Here is why choosing ReExt can be your best decision:
👉Continuous updates and support
👉Cross-platform and cross-browser compatibility
👉Fully customizable
👉Reusable components
How Do You Get Started with ReExt?
Now that you have learned about ReExt let’s show you how to get started with it as a beginner.
First, open the web page https://www.sencha.com/products/reext/ It will help you learn about the ReExt. Make sure that it is fulfilling all your project requirements.
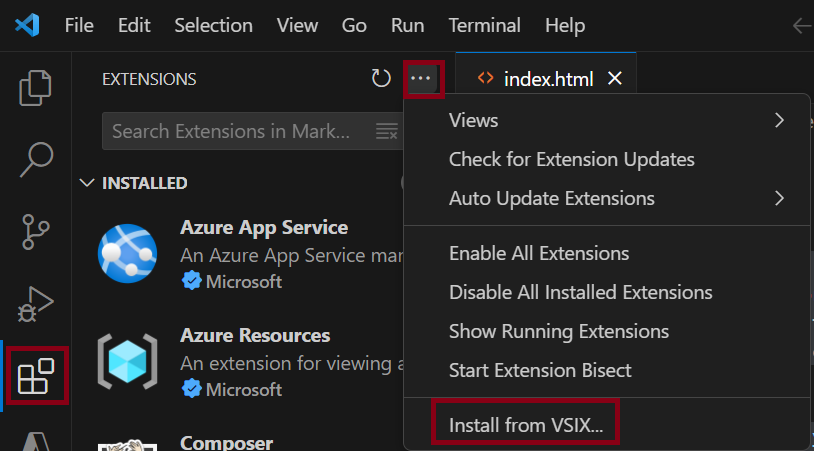
It is fascinating to know that there is a ReExt designer extension in Visual Studio Code. You should use it to get started building React applications with ReExt.
To add the ReExt Designer Extension to VS Code, open the Extensions Activity Bar, click the three-dot menu at the top right of the Extensions View, and choose ‘Install from VSIX…’.
Contact Sencha support today to have more guidance on using the ReExt JS.
Quick Start – Without Using VS Code Extension
This setup takes less than one minute to run. In this section, we assume that NPM is already installed on your system. The best part? You can run all the commands at once.
Setup on MacOS
Use the commands below in a MacOS terminal window.
Vite
npm create vite@latest reextvite -- --template react-swc
cd reextvite
npm install @gusmano/reext@latest
cp node_modules/@gusmano/reext/dist/example/ReExtData.json src/ReExtData.json
cp node_modules/@gusmano/reext/dist/example/App.jsx src/App.jsx
cp node_modules/@gusmano/reext/dist/example/main.jsx src/main.jsx
npx vite --open
Create Your React App
npx create-react-app reextcra
cd reextcra
npm install @gusmano/reext@latest
cp node_modules/@gusmano/reext/dist/example/ReExtData.json src/ReExtData.json
cp node_modules/@gusmano/reext/dist/example/App.jsx src/App.js
cp node_modules/@gusmano/reext/dist/example/main.jsx src/index.js
npm start
Setup on Windows
Use the commands below in Windows Command Prompt.
Vite
npm create vite@latest reextvite -- --template react-swc
cd reextvite
npm install @gusmano/reext@latest
xcopy node_modules\@gusmano\reext\dist\example\ReExtData.json src\ReExtData.json /Y
xcopy node_modules\@gusmano\reext\dist\example\App.jsx src\App.jsx /Y
xcopy node_modules\@gusmano\reext\dist\example\main.jsx src\index.js /Y
npx vite --open
Create React App
npx create-react-app reextcra
cd reextcra
npm install @gusmano/reext@latest
xcopy node_modules\@gusmano\reext\dist\example\ReExtData.json src\ReExtData.json /Y
xcopy node_modules\@gusmano\reext\dist\example\App.jsx src\App.js /Y
xcopy node_modules\@gusmano\reext\dist\example\main.jsx src\index.js /Y
npm start
How Do You Build a Simple Application with ReExt?
Here is the step-by-step guide on creating a React components web apps:
1. Create a React Application
Use the below command to create a new React application.
npx create-react-app reextcra2. Install Vite
Alternatively, you can use Vite to create a React application.
npm create vite@latest reextvite -- --template react-swc3. Installation
Use npm to install React ReExt.
npm install @gusmano/reext4. Installing the Sencha ExtJS SDK:
React ReExt depends on Sencha ExtJS. You need to have the ExtJS framework installed in the public folder of your React project.
For demo purposes, the Quick Start application is configured to run Sencha ExtJS version 7.0.0 GPL from a remote server.
👉Note that this configuration is not suitable for licensed development.
5. Configuring React ReExt
React ReExt can be configured to use any commercially available version of the Sencha Ext JS framework (7x and above). React ReExt has been tested with Sencha ExtJS version 7.8.0.
6. Usage – ReExtProvider
In your `main.jsx` or `index.js`, use the `ReExtProvider` component to wrap your application. Here is the example code:
   import { ReExtProvider } from '@gusmano/reext';

   const ReExtData = {

       "sdkversion": "7.8.0",

       "toolkit": "classic",

       "theme": "classic",

       "debug": false,

       "urlbase": "./",

       "location": "remote"

   }

   ReactDOM.render(

       <ReExtProvider splash={true} ReExtData={ReExtData}>

           <App />

       </ReExtProvider>,

       document.getElementById('root')

   );
7. Usage – Example Code:
   import React, { useState, useRef } from 'react';

   import ReExt from '@gusmano/reext';

   const App = () => {

       const [labelcmp, setLabelCmp] = useState(null);

       const labelcmpRef = useRef();

       labelcmpRef.current = labelcmp;

       const [labeltext, setLabelText] = useState('initial text');

       const [row, setRow] = useState(null);

       return (

           <div style={{ boxSizing: 'border-box', height: '100%', display: 'flex', flexDirection: 'column' }}>

               <ReExt xtype='logo' />

               <div style={{ display: 'flex' }}>

                   <ReExt xtype='button'

                       config={{ text: 'click me', width: 100, ariaLabel: 'demobutton' }}

                       onTap={() => {

                           labelcmpRef.current.setHtml('set using method call');

                           setLabelText('set using state');

                       }}

                   />

               </div>

               <ReExt xtype='grid'

                   style={{ height: 300 }}

                   config={{

                       title: 'grid',

                       columns: [

                           { text: 'Name', dataIndex: 'name', width: 200 },

                           { text: 'Email', dataIndex: 'email', flex: 1 },

                           { text: 'Phone', dataIndex: 'phone', width: 200 }

                       ],

                       data: [

                           { name: 'Lisa', email: 'lisa@simpsons.com', phone: '555-111-1224' },

                           { name: 'Bart', email: 'bart@simpsons.com', phone: '555-222-1234' },

                           { name: 'Homer', email: 'homer@simpsons.com', phone: '555-333-1244' },

                           { name: 'Marge', email: 'marge@simpsons.com', phone: '555-444-1254' }

                       ]

                   }}

                   onSelect={(grid, selected) => {

                       var row = selected[0].data

                       setRow(row)

                       var rowString = JSON.stringify(row)

                       labelcmpRef.current.setHtml(rowString)

                       setLabelText(rowString)

                   }}

               />

               <div style={{ flex: 1, padding: 20, border: '1px solid gray' }}>

                   {row !== null &&

                       <>

                           <ReExt xtype='label' config={{ html: `name: ${row.name}` }} />

                           <ReExt xtype='label' config={{ html: `email: ${row.email}` }} />

                           <ReExt xtype='label' config={{ html: `phone: ${row.phone}` }} />

                       </>

                   }

               </div>

               <div style={{ flex: 1, padding: 20, border: '1px solid gray' }}>

                   <ReExt xtype='label'

                       config={{ html: 'initial text' }}

                       ready={(cmp) => {

                           setLabelCmp(cmp)

                       }}

                   />

                   <ReExt xtype='label'

                       config={{ html: labeltext }}

                   />

               </div>

           </div>

       )

   }

   export default App;
8. Run the React Application
Use the following commands to run your React application:
Create React App
npm startVite:
npx vite --open
What Are the Advanced ReExt Techniques for React Apps?
Advanced ReExt Techniques come with more complex use cases. In other words, it offers powerful solutions for:
- State management
- Data binding
- Theming
✔️State management can be achieved through React’s Context API or Redux. Furthermore, it provides a centralized store for shared data.
✔️Data binding enables dynamic updates between the UI and the data model. In other words, it helps in ensuring consistency.
✔️Theming allows customization of the application’s look and feel. As a result, it can give us an excellent user experience.
Example of state management
// Define context

const AppContext = React.createContext();

// Provide context in App component

const App = () => {

    const [state, setState] = useState(initialState);

    return (

        <AppContext.Provider value={{ state, setState }}>

            <MyComponent />

        </AppContext.Provider>

    );

};

// Consume context in child component

const MyComponent = () => {

    const { state, setState } = useContext(AppContext);

    // Use state and setState here

};
React Apps: Example of data binding
// Define a model

Ext.define('MyApp.model.User', {

    extend: 'Ext.data.Model',

    fields: ['name', 'email']

});

// Create a store

const store = Ext.create('Ext.data.Store', {

    model: 'MyApp.model.User',

    data: [

        { name: 'John Doe', email: 'john.doe@example.com' },

        { name: 'Jane Doe', email: 'jane.doe@example.com' }

    ]

});

// Use data binding in a component

const MyComponent = () => {

    const store = Ext.getStore('MyStore');

    return (

        <ReExt xtype="grid"

            store={store}

            columns={[

                { text: 'Name', dataIndex: 'name', flex: 1 },

                { text: 'Email', dataIndex: 'email', flex: 1 }

            ]}

        />

    );

};
React Apps: Example of theming
// Define a theme

Ext.theme.addManifest({

    themeName: 'MyTheme',

    stylesheets: [

        'resources/css/my-theme.css'

    ]

});

// Apply the theme to the application

Ext.theme.setTheme('MyTheme');
What Are the Benefits of Using ReExt in Your React Apps Projects?
Using ReExt in your React projects offers several benefits. These benefits can enhance your development experience. Let’s explore those benefits one by one.
- One major advantage is improved developer productivity due to the seamless integration of Ext JS components into React applications.
- Additionally, ReExt enables faster development cycles by providing a familiar and consistent development environment for both Ext JS and React developers.
- Furthermore, ReExt simplifies the process of integrating Ext JS components into React projects. As a result, it can help us in reducing development time and effort.
React Apps: Conclusion
This blog was all about using Ext JS to create react apps in web development. We have introduced you to the modern React app interactive components using the ReExt JS. We showed how you could create a simple data-fetching application using the ReExt react component. By the end, we showed some ReExt techniques and the benefits of using ReExt JS for a React team. Create your web app today by integrating react by Ext JS.
Also Read: A Step-by-Step Guide To An Ext JS Tutorial For Beginners
React Apps: FAQs
Why Should We Prefer ReExt for Our React Apps?
Prefer ReExt for React apps to leverage Ext JS components seamlessly.
Why Are React Apps Useful?
React apps are useful for efficiently building interactive, dynamic user interfaces.
What is the Cost of Using ReExt?
There is a community edition for a free trial of Sencha ReExt. The enterprise plan and pro plan have more advanced features. The first one costs $1895, while the latter costs $1295.
Contact the sales team to know more about the cost of using ReExt.
Is It Easy to Use ReExt?
Using ReExt is a simple process if you follow the tutorials shared by Sencha on their website.
Unleash the full potential of your web applications with Sencha – get started now!

Did you find the content helpful?
 0
0

 0
0

Latest Content

Ext JS 7.8 Has Arrived!
The Sencha team is pleased to announce the latest Ext JS version 7.8 release. Following…
May 13, 2024

How to Write Unit Tests with Sencha Test
In modern software development, unit testing has become an essential practice to ensure the quality…
April 19, 2024
Highlights of Virtual JS Days 2024
Highlights of Virtual JS Days 2024 From February 20-22, 2024, we held the third Virtual…
March 12, 2024


