


7 Overlooked Features of Sencha Architect
May 8, 2013
141 Views
Sencha Architect is a visual development tool that can greatly boost your Sencha programming productivity. You can use it to rapidly create both Ext JS and Sencha Touch applications.
Knowing these 7 productivity-enhancing features can make you even more productive than you already are!
1. Property filter keyboard shortcut: Ctrl-E (⌘-E on Macs)

How it’s done
Type Ctrl-E (⌘-E on Macs) to place the cursor in the config/property filter field.
Discussion
I’m always using the property filter to narrow down what is often a huge list of config properties into three or four that I can quickly click on and edit.
Here’s the editing sequence that I use a lot:
- Click on a component in the Project Inspector
- Type Ctrl-E to put the cursor in the property filter
- Type two or three characters to narrow down the list of configs
- Edit the property that I want to change
2. Lock the filter
How it’s done
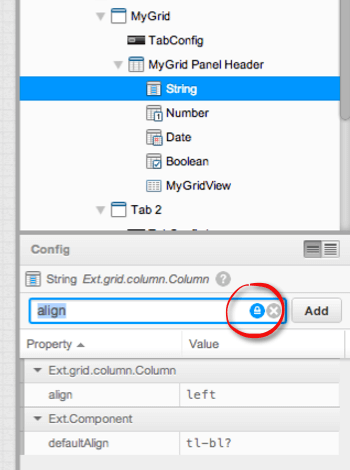
Click the “lock” icon in the config/property field. This will lock the current filter in place as you click on different items in the Project Inspector.
Discussion
You may have noticed that when you click on a new item in the Project Inspector or in design view, the filter is not applied until you type “Ctrl-E (or ⌘-E)” and then ENTER. However, if you click the “lock” icon in the filter area, your filter will be applied automatically as you change items.
You can use this feature to quickly edit the same feature on many similar items. For example, you can type “align” in the filter field (or even “al”), then click on the grid columns where you want to change the alignment.
3. Collapse the Toolbox categories or the entire Toolbox
How it’s done
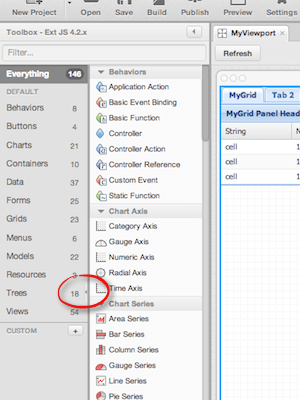
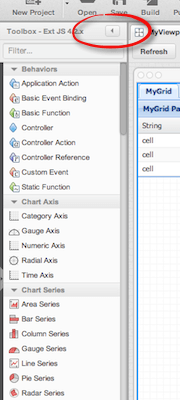
To close just the Toolbox categories, click the little arrow (barely visible) about halfway down the categories splitter. To close the entire Toolbox, click the arrow at the far right side of the Toolbox header.
Discussion
I almost always keep the Toolbox categories pane hidden. I keep “Everything” selected and then filter for what I need. After hiding the categories, you can then reduce the Toolbox’s width to give yourself more room.
If you need even more space, you can collapse the Toolbox completely by clicking on the collapse arrow on the right-hand side.
4. Add a reference to an external Third Party JavaScript API
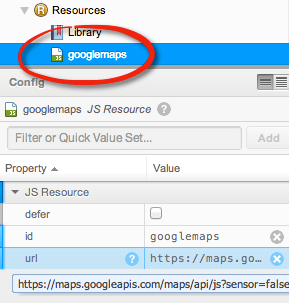
How it’s done
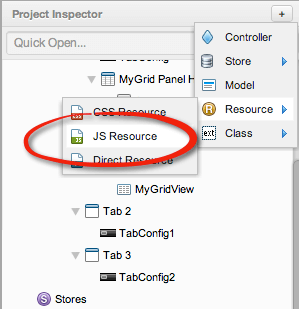
Click on the [+] button in the Project Inspector, click on “Resource”, then click the “JS Resource” sub-menu item.
Discussion
When you add a reference to an external JavaScript API in Sencha Architect, you can then call those library functions from anywhere in your Architect application. Some examples of the hundreds of third party JavaScript libraries available include Google Maps, Google Analytics and jQuery.
If you want to see a fully functioning Google Maps Tab Panel in an Architect app written in about 30 lines of code, add a comment below, and I’ll be happy to cover this in a future blog article.
5. Promote to Class

How it’s done
RIGHT-CLICK on the container or component that you want to promote (i.e., save to a separate class file). Choose “Promote to Class” from the context menu.
Discussion
When you first start building your Sencha Architect application, you add components to the viewport or to a Tab Panel. As you start adding more components, the items array of these containers becomes unwieldy, and at that point it’s best to create separate classes for your bigger components.
When you create a separate class, you assign it a custom xtype, which will be used to reference your class in the parent’s item array. You can also use the custom xtype in a ref selection or a ComponentQuery.query() call in your controller.
6. Add a Store without a Proxy attached
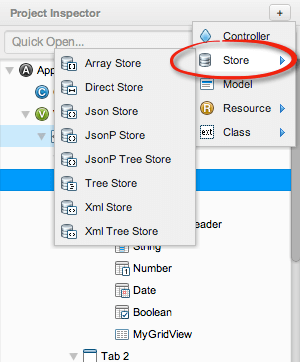
How it’s done
To create a Store with no proxy attached, click the top level “Store” after clicking the [+] button in the Project Inspector, as shown in the screen shot above.
Discussion
Normally, when you click the [+] button and then hover over the “Store” menu item, you will see a list of different Stores in the sub-menu. Whichever Store you choose will have a proxy attached to it.
Sometimes you’ll want to create a Store without a proxy attached, maybe because you already have a proxy attached to your model. Clicking on the top-level Store menu item adds a Store without a proxy attached.
Additional Notes
A “proxy”, when attached to either the Model or the Store, is how you define where the API resides. The “url” and “type” (json and xml types are built in) properties are required.
When would you attach a proxy to a Model versus a Store? If you are using the Model.save() method and creating Models instances individually, then you would attach the proxy to the Model.
7. List Tabs keyboard shortcut: Ctrl-L (⌘-L on Macs) – New for version 2.2!
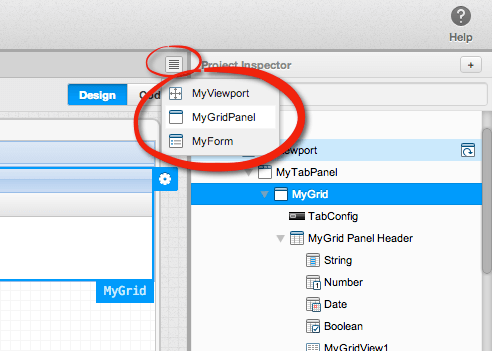
How it’s done
Type Ctrl-L (⌘-L on Macs) to see a list of currently open tabs. Arrow up and down to move within the listing, and hit ENTER to select and focus a tab.
Discussion
New for Sencha Architect 2.2: each class in your Architect application can be placed in its own tab. This allows you to quickly edit different areas of your application (for example, a grid and its associated store) without having to scroll back and forth in your Project Inspector. You can close tabs at any time.
The problem arises when you have more tabs than can fit in the tab area. The solution is to type “Ctrl-L (⌘-L on Macs)” to list all open tabs. (You can also click on the “List Tabs” icon on the right side of your tab area.)
Then, using your up and down arrow keys, you can quickly navigate to a tab and hit ENTER to focus that tab. For now, you can’t move tabs by dragging them, but you can close and re-open tabs if you want to change the order and put related tabs near each other.
Conclusion
I hope that some of these features are new to you, and that this article helps to save you some time.
The Sencha Architect features covered here are only a tiny fraction of what’s available. Sencha Architect is covered in great detail in the 5-day Ext JS and Sencha Touch classes offered all over the world through Sencha Training, taught by Sencha-certified instructors. Visit our Training web page for more details.
If you have any feedback, please add it to the comments section.
Did you find the content helpful?
 0
0

 0
0

Latest Content
Introducing Rapid Ext JS: The Ultimate Low-Code Editor for Ext JS Development
We’re excited to announce the official release of Rapid Ext JS 1.0, a revolutionary low-code…
August 21, 2024
Sencha Architect 4.3.6 Has Arrived!
The Sencha team is pleased to announce the availability of Sencha Architect version 4.3.6. Building…
August 20, 2024

Introducing ReExt: A Game-Changer for React Developers
Sencha, a leader in JavaScript developer tools for building cross-platform and enterprise web applications, is…
August 20, 2024


