


Developing Mobile Applications with Force.com and Sencha Touch – Part 2
September 17, 2012
173 Views
Overview
In the first part of our series we introduced you to the Sencha Touch mobile framework and built the foundation for a simple mobile application hosted in a Visualforce page that displays lead data served from an Apex controller. We reviewed the basics of the Sencha class system and MVC data package by constructing model, view, controller and store components in Javascript.
In this second part of the series, we continue to enhance the features of the PocketCRM application as follows:
- Introduce event handling to manage screen transitions and respond to user actions and add some new controls and events to the Lead list.
- Build a form view for displaying, creating, updating, and deleting leads.
- Add event handling logic to manage screen transitions and data management for all data operations.
- Rebuild our Apex class to support Visualforce Remoting, and introduce the Sencha proxy component in our model to bind our JavaScript controller logic to the @RemoteAction methods in our Apex controller. We’ll also add sync refresh and data entry validation logic.
Introducing Event Handling
We’ll pick up where we left off and introduce the concept of event handling in Sencha Touch. We want the user to be able to navigate from the Lead list to Lead details in a form view as well as to be able to add new Leads. To do this, our app needs to respond to user interaction by capturing an event when the user taps a button or list item.
Fire up your development environment for the PocketCRM app that you built in Part 1 (if you’re just tuning in to the series, go to Part 1 and build the first part of the app.). As a reminder, use Safari as a desktop emulator and development environment for your tracing and debugging.
You need to use the Safari Developer tools, such as the Web Inspector and Error Console, to see and trace client side output as you work with events. Launch Safari and open the console from the Develop menu Show Error Console item.
Step 1: Add Controls and Event Handling For View Transition
We’re going to add a few new user interface controls in our list view that fire events to support our new functionality. First we’ll turn on a feature of the list component that lets a user select an item and drill down to another view. The disclosure feature also renders an icon on the list item to act as the button for the user to tap to fire the associated event. Next we’ll add a New button in the list view title bar, add a Sync button that resyncs data with the server on demand, and wire up event listeners for all three that call functions to write messages to the console, which proves the events are firing correctly.
Open the PocketCRM_APP Visualforce component and replace the `PocketCRM.view.LeadsList` with the following code:
Ext.define(“PocketCRM.view.LeadsList”, {
extend: “Ext.Container”,
//It uses the base list class.
requires: “Ext.dataview.List”,
alias: “widget.leadslistview”,
config: {
//Take up the full space available in the parent container.
layout: {
type: ‘fit’
},
//Add the components to include within the list view.
items: [
{
xtype: “toolbar”,
title: “PocketCRM”,
docked: “top”,
items: [
{
xtype: ‘spacer’
},
{
xtype: “button”,
text: ‘New’,
ui: ‘action’,
itemId: “newButton”
}
]
},
{
xtype: “toolbar”,
docked: “bottom”,
items: [
{
xtype: “button”,
iconCls: “refresh”,
iconMask: true,
itemId: “syncButton”
}
]
},
{
//The main list and its properties.
xtype: “list”,
store: “Leads”,
itemId:”leadsList”,
onItemDisclosure: true,
indexBar: true,
grouped: true,
disableSelection: false,
//The template for display if the Store is empty of records.
//Note the style to control visual presentation.
loadingText: “Loading Leads…”,
emptyText: ‘
No leads found.
‘,
//The template for the display of each list item representing one record.
//One row will display for each record in the data Store.
//The fields referenced are from the entity’s Model.
itemTpl: ‘
{LastName}, {FirstName}
‘ +
‘
{Company}
‘ +
‘
{Title} – Phone: {Phone}
‘ +
‘
{Email}
‘,
}],
listeners: [{
delegate: “#newButton”,
event: “tap”,
fn: “onNewButtonTap”
}, {
delegate: “#syncButton”,
event: “tap”,
fn: “onSyncButtonTap”
}, {
delegate: “#leadsList”,
event: “disclose”,
fn: “onLeadsListDisclose”
}]
},
onSyncButtonTap: function () {
console.log(“syncLeadCommand”);
this.fireEvent(“syncLeadCommand”, this);
},
onNewButtonTap: function () {
console.log(“newLeadCommand”);
this.fireEvent(“newLeadCommand”, this);
},
onLeadsListDisclose: function (list, record, target, index, evt, options) {
console.log(“editLeadCommand”);
this.fireEvent(‘editLeadCommand’, this, record);
}
});
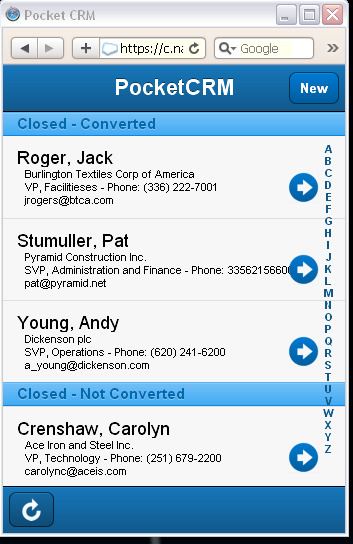
The new code appears above. You’ll notice we’ve modified the list view in a few ways. First we removed the titlebar and replaced it with top and bottom toolbar components. These are better suited to manage buttons that we add in two item collections. We then turned on the onItemDisclosure property in the list component that will automatically display a disclosure icon on each item. Further, we provided an event to trigger a transition to the form view. Last, we turned on an indexBar property that will display a vertical alpha index in the list for rapid navigation.
We added three listeners and their associated functions to fire events from the view for each associated user action. Down the road these events will be handled by the controller. As we haven’t added that logic yet, when the events fire from the view, it’s as if no one’s listening. That’s fine, there’s no harm to add only the code to emit the events as Sencha lets you code logic to fire an event before you may have coded logic to process it; the class system is designed with loose coupling in mind. We will add the logic in the controller later to listen for the view events and act accordingly. In the meantime, firing these events here simply outputs messages to the console and verify that they are working.
After you have added the code, refresh your Visualforce page and make sure it displays without errors. You should now see a New button in the top toolbar and a Sync icon button on the bottom toolbar. Also, each item in the list should show the disclosure icon. When you tap each, you should see messages in the console that prove the events are firing.
Take care to include all commas and curly braces as needed or your JavaScript may break. It’s best to change your code in small iterations and verify that everything works after each change rather than making lots of code changes before testing.
Step 2: Add A Lead Form View
Now that the list view event logic is in place, we’re going to add a new form view to the application for creating and updating Leads. This view will also contain buttons to manage saving and deleting a lead record. It will aslo include a Back button to return to the list view. We’ll also add listener logic and handler functions for each to emit the events which will eventually be processed in the controller.
Open the PocketCRM_APP Visualforce component and add the code for this new view beneath the PocketCRM.view.LeadsList. The fields on the form match the Lead model schema including required indicators on the three required fields for the Leads object, namely “LastName”, “Company”, and “Status”. The associated validation logic will be added later to the controller:
extend: “Ext.form.Panel”,
requires: “Ext.form.FieldSet”,
alias: “widget.leadeditorview”,
config: {
scrollable: ‘vertical’,
items: [{
xtype: “toolbar”,
docked: “top”,
title: “Edit Lead”,
items: [
{
xtype: “button”,
ui: “back”,
text: “Home”,
itemId: “backButton”
},
{
xtype: “spacer”
},
{
xtype: “button”,
ui: “action”,
text: “Save”,
itemId: “saveButton”
}]
},
{
xtype: “toolbar”,
docked: “bottom”,
items: [
{
xtype: “button”,
iconCls: “trash”,
iconMask: true,
itemId: “deleteButton”
}]
},
{ xtype: “fieldset”,
title: ‘Lead Info’,
items: [
{
xtype: ‘textfield’,
name: ‘FirstName’,
label: ‘First Name’
},
{
xtype: ‘textfield’,
name: ‘LastName’,
label: ‘Last Name’,
required: true
},
{
xtype: ‘textfield’,
name: ‘Company’,
label: ‘Company’,
required: true
},
{
xtype: ‘textfield’,
name: ‘Title’,
label: ‘Title’
},
{
xtype: ‘selectfield’,
name: ‘Status’,
label: ‘Status’,
required: true,
value: ‘Open – Not Contacted’,
options: [
{text: ‘Open – Not Contacted’, value: ‘Open – Not Contacted’},
{text: ‘Working – Contacted’, value: ‘Working – Contacted’},
{text: ‘Closed – Converted’, value: ‘Closed – Converted’},
{text: ‘Closed – Not Converted’, value: ‘Closed – Not Converted’}
],
},
]
},
{ xtype: “fieldset”,
title: ‘Contact Info’,
items: [
{
xtype : ‘textfield’,
name : ‘Phone’,
label : ‘Phone’,
component: {type: ‘tel’}
},
{
xtype : ‘textfield’,
name : ‘Mobile’,
label : ‘Mobile’,
component: {type: ‘tel’}
},
{
xtype: ’emailfield’,
name: ‘Email’,
label: ‘Email Address’
},
]
},
],
listeners: [
{
delegate: “#backButton”,
event: “tap”,
fn: “onBackButtonTap”
},
{
delegate: “#saveButton”,
event: “tap”,
fn: “onSaveButtonTap”
},
{
delegate: “#deleteButton”,
event: “tap”,
fn: “onDeleteButtonTap”
}
]
},
onSaveButtonTap: function () {
console.log(“saveLeadCommand”);
this.fireEvent(“saveLeadCommand”, this);
},
onDeleteButtonTap: function () {
console.log(“deleteLeadCommand”);
this.fireEvent(“deleteLeadCommand”, this);
},
onBackButtonTap: function () {
console.log(“backToHomeCommand”);
this.fireEvent(“backToHomeCommand”, this);
}
});
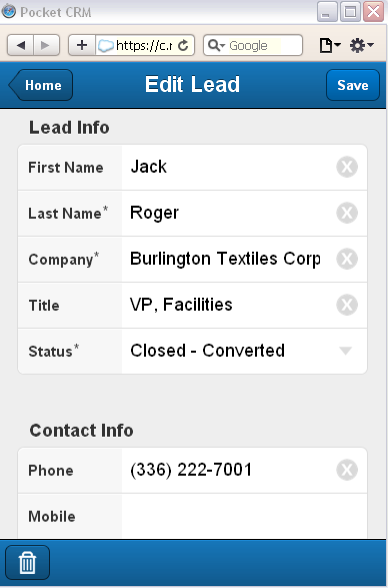
The leadEditor view is a Form Panel component. Notice the requires properties at the very beginning where we identify a dependency to the Ext.form.FieldSet component from the Sencha library. The requires property tells the Form Panel to pre-fetch any dependent Sencha library components upon instantiation. Also notice that we add both a top and bottom toolbar to contain action buttons.
Between the toolbars, the view will display FieldSet components that let the lead fields be grouped logically. Each field is configured with an xtype to identify what kind of field control displays, as well as a name property that maps each control to a field in the Model schema. The required property simply adds the display of an indicator after the field label. Take note of the Status field, which is an example of a selectField, and the additional component property identifying telephone fields that control the display of the keyboard when users are entering phone numbers. You should read up on field configuration in the Sencha docs to learn all about the rich set of field types and configuration options available.
We’ll finish by adding the listeners and associated event handling functions. Again, for now, these will simply cause messages to display in the console as no logic has yet been built in the controller to respond.
After you have added the code, refresh your Visualforce page and make sure it displays without error. You won’t be able to navigate to the edit view from the list just yet since you haven’t wired up what is necessary for transitions in the controller. You just want to insure that you haven’t introduced any errors in the JavaScript.
Step 3: Add The Form View To the Application
Before we wire up the events, we must first configure the application to include the new form by telling the application to include the LeadEditor view. We’ll change the views property at the top of our application code to add it. Then we declare an instance of the new view and add it to the application’s viewport when launched. Your application component should now look like this:
name: “PocketCRM”,
//Load the various MVC components into memory.
models: [“Lead”],
stores: [“Leads”],
controllers: [“Leads”],
views: [“LeadsList”,”LeadEditor”],
//The application’s startup routine once all components are loaded.
launch: function () {
//Instantiate your main list view for Leads.
var leadsListView = {
xtype: “leadslistview”
};
var leadEditorView = {
xtype: “leadeditorview”
};
//Launch the primary fullscreen view and pass in the list view.
Ext.Viewport.add([leadsListView, leadEditorView]);
}
});
Again, refresh your Visualforce page and just make sure it displays without errors.
Step 4: Add Controller Event Handling
Now we’ll add logic to the controller to configure how views transition during navigation and to handle the transitions and user actions. We’ll build out the config section of the controller to provide references to our view components so we can hear their events when emitted. We add refs and control properties inside the config section that provide this capability (being careful to follow each property with a comma).
Go find the controller component and change the config section to match this code:
refs: {
// We’re going to lookup our views by alias.
leadsListView: “leadslistview”,
leadEditorView: “leadeditorview”,
leadsList: “#leadsList”
},
control: {
leadsListView: {
// The commands fired by the list container.
syncLeadCommand: “onSyncLeadCommand”,
newLeadCommand: “onNewLeadCommand”,
editLeadCommand: “onEditLeadCommand”
},
leadEditorView: {
// The commands fired by the note editor.
saveLeadCommand: “onSaveLeadCommand”,
deleteLeadCommand: “onDeleteLeadCommand”,
backToHomeCommand: “onBackToHomeCommand”
}
}
},
The refs configuration allows each of our view components to be selected by their alias, but the selector can also find components by xtype, id, class, or DOM type. Once a view component ref is configured, we can use it in the subsequent control section to associate a local function with any view events fired. The framework also conveniently provides a getter method on each ref to allow instantiating a local var to access the referenced component’s properties and functions; we’ll see this used below in the event handling functions.
Again, refresh your Visualforce page and just make sure it displays without errors.
Step 5: Configure View Transitions
We need to define how our views will transition as we navigate from the list to the form and back. While Sencha Touch supports many kinds of transitions, we’ll choose a simple left-right slide between our list and form. Add properties for each transition beneath the config section, along with functions to activate each view. Notice in the activateLeadeditor function that a record is passed as an argument. When editing, this will contain the record being acted on; when adding, this will contain an empty record.
Here’s the code that should be beneath the config section:
slideRightTransition: { type: ‘slide’, direction: ‘right’ },
//View Transition Helper functions
activateLeadEditor: function (record) {
var leadEditorView = this.getLeadEditorView();
leadEditorView.setRecord(record);
Ext.Viewport.animateActiveItem(leadEditorView, this.slideLeftTransition);
},
activateLeadsList: function () {
Ext.Viewport.animateActiveItem(this.getLeadsListView(), this.slideRightTransition);
},
Again, refresh your Visualforce page to make sure it displays without errors.
Step 6: Add Controller Event Handling Functions
Add the remaining controller functions to manage the sync, new, edit, save, delete, and back events. Note the functions that contain logic to prepare and/or pass the appropriate Lead data for processing, as well as transitioning to the appropriate view. The delete function includes a confirmation message prompt for the user, and the save function includes validation logic.
Add the following code beneath the transition code from above:
console.log(“onSyncLeadCommand”);
//Get a ref to the store and remove it.
var leadsStore = Ext.getStore(“Leads”);
//Resync the proxy, reload and activate the list.
leadsStore.sync();
leadsStore.load();
this.activateLeadsList();
},
onNewLeadCommand: function () {
console.log(“onNewLeadCommand”);
//Set a default value for the Status selectfield.
var newLead = Ext.create(“PocketCRM.model.Lead”, {
Status: “Open – Not Contacted”
});
this.activateLeadEditor(newLead);
},
onEditLeadCommand: function (list, record) {
console.log(“onEditLeadCommand”);
this.activateLeadEditor(record);
},
onSaveLeadCommand: function () {
console.log(“onSaveLeadCommand”);
//Update the field values in the record.
var leadEditorView = this.getLeadEditorView();
var currentLead = leadEditorView.getRecord();
var newValues = leadEditorView.getValues();
this.getLeadEditorView().updateRecord(currentLead);
//Check for validation errors.
var errors = currentLead.validate();
if (!errors.isValid()) {
var msg = ”;
errors.each(function(error) {
msg += error.getMessage() + ‘
‘;
});
console.log(‘Errors: ‘ + msg);
Ext.Msg.alert(‘Please correct errors!’, msg, Ext.emptyFn);
currentLead.reject();
return;
}
//Get a ref to the store.
var leadsStore = Ext.getStore(“Leads”);
//Add new record to the store.
if (null == leadsStore.findRecord(‘id’, currentLead.data.id)) {
leadsStore.add(currentLead);
}
//Resync the proxy and activate the list.
leadsStore.sync();
this.activateLeadsList();
},
onDeleteLeadCommand: function () {
console.log(“onDeleteLeadCommand”);
//Get a ref to the form and its record.
var leadEditorView = this.getLeadEditorView();
var currentLead = leadEditorView.getRecord();
//Get a ref to the store and remove it.
var leadsStore = Ext.getStore(“Leads”);
leadsStore.remove(currentLead);
//Resync the proxy and activate the list.
leadsStore.sync();
this.activateLeadsList();
},
onBackToHomeCommand: function () {
console.log(“onBackToHomeCommand”);
this.activateLeadsList();
},
Refresh your Visualforce page and make sure it displays without error. Tapping the New button should now bring up an empty form with a default status selected. Tapping the disclose icon on a list item should navigate to the form populated with the selected lead data. And tapping the Sync button will refresh the list. On the form, tapping the Back button should return you to the list, but the Save and Delete buttons won’t work properly just yet. Notice the icons for the Sync and Delete buttons; they come from the framework’s rich icon library.
Step 7: Add Apex Remoting
You might recall that we created logic to fetch the list of leads from your Salesforce.com org via an Apex controller using standard Visualforce data binding. We simply bind a public Apex getter method to the data property in our Store component, which looks like this in the code below:
extend: “Ext.data.Store”,
requires: “Ext.data.proxy.LocalStorage”,
config: {
model: “PocketCRM.model.Lead”,
//Fetch the data from the custom Apex controller method
//which will return a simple list of Leads as JSON on load.
data: {!Leads},
autoLoad: true,
pageSize: 50,
//Create a grouping; be certain to use a field with content or you’ll get errors!
groupField: “Status”,
groupDir: “ASC”,
//Create additional sorts for within the Group.
sorters: [{ property: ‘LastName’, direction: ‘ASC’}, { property: ‘FirstName’, direction: ‘ASC’}]
}
});
When the JavaScript in the Visualforce component is rendered by the Force.com application server, the data binding expression is replaced with the full JSON data string containing an ArrayList[] of lead records as served up by the Apex controller.
Data binding is a simple and powerful way to bind data to our Sencha app for display, but it only works in one direction. Now that we want to add full CRUD capability, we need to swap it with something more sophisticated for data transport.
We’ll introduce the data proxy, another Sencha component that is part of the data package in the class system. It integrates with both model and store and supports a variety of connection types to push and pull data from either a local data store or backend server.
Many mobile apps are built to use REST Web Service API calls for the transport layer, and the proxy supports it as well. However, with Salesforce it is important to keep in mind that there is a limit on the number of API calls that can be made in a 24-hour period, which scales by licensed seats. As our JavaScript is hosted in a Visualforce page running on the Salesforce.com servers, we have the advantage of leveraging an alternate transport technology — Visualforce JavaScript Remoting with an Apex controller. Not only is this technology fast and efficient, there are no call limits imposed.
There are a number of proxy types provided by the framework. They support a variety of technologies, including REST API calls using JSON or JSONP, and there is also a version to support local storage. We’re going to use a server side direct proxy to call Apex @RemoteAction methods.
However, before we add the proxy, we must redesign the Apex controller and build out the @RemoteAction methods to bind to the proxy API. Open the PocketCRMController Apex class and replace the existing code with the following:
public PocketCRMLeadController(){}
//========================================================================
//INNER CLASSES
//These support data request/response transport for remoting.
//========================================================================
// One of the parameters supplied by the DirectProxy read method.
public class QueryRequest {
Integer start;
Integer recordCount;
List
Public QueryRequest() {
start = 1;
recordCount = 1;
}
Public QueryRequest(Integer pStart, Integer pRecordCount) {
start = pStart;
recordCount = pRecordCount;
}
}
// The server response expected by the ExtJS DirectProxy API methods.
public class Response {
public Boolean success;
public String errorMessage;
public List
public Integer total;
Response() {
records = new List
success = true;
}
}
//=======================================================================
//PUBLIC CRUD REMOTE ACTION METHODS CALLED BY THE SENCHA PROXY
//=======================================================================
@RemoteAction
public static Response Query(QueryRequest qr){
Response resp = new Response();
List
try {
LeadList = getAllLeads();
} catch (Exception e) {
resp.success = false;
resp.errorMessage = ‘Query failed: ‘ + e.getMessage();
return resp;
}
//Supply only the requested records
for (Integer recno = qr.start;
recno < (qr.start + qr.recordCount) && recno < LeadList.size();
++recno) {
resp.records.add(LeadList[recno]);
}
resp.total = LeadList.size();
resp.success = true;
return resp;
}
@RemoteAction
public static Response Edit(List
return updateLeadList(LeadData);
}
@RemoteAction
public static Response Add(List
return insertLeadList(LeadData);
}
@RemoteAction
public static Response Destroy(List
return deleteLeadList(LeadData);
}
//=======================================================================
//PRIVATE HELPER METHODS
//=======================================================================
private static List
return [SELECT
FirstName
,LastName
,Company
,Title
,Phone
,Email
,Status
FROM Lead LIMIT 50];
}
private static Response insertLeadList(List
Response resp = new Response();
resp.success = true;
try {
INSERT LeadData;
} catch (Exception e) {
resp.success = false;
resp.errorMessage = ‘Insert failed: ‘ + e.getMessage();
}
return resp;
}
private static Response updateLeadList(List
Response resp = new Response();
resp.success = true;
try {
UPDATE LeadData;
} catch (Exception e) {
resp.success = false;
resp.errorMessage = ‘Update failed: ‘ + e.getMessage();
}
return resp;
}
private static Response deleteLeadList(List
Response resp = new Response();
resp.success = true;
try {
DELETE LeadData;
} catch (Exception e) {
resp.success = false;
resp.errorMessage = ‘Deletion failed: ‘ + e.getMessage();
}
return resp;
}
}
Other than a default no-argument constructor, the controller class contains three sections of code.
The first section of Apex code contains two inner classes that support the proxy calls from Sencha. The QueryRequest class must match the structure of the JSON object sent on the request by the Sencha proxy for the read operation. It must contain any info required by the @RemoteAction method called. We use the default properties primarily to support paging and batch size, but later we can add additional properties to support anything required by our Apex methods. An example might be a value to perform filtering on the list of records returned; we’ll see how they map to the proxy below.
The Response object wraps information that the proxy expects to be returned after a call is made to any of the @RemoteAction methods. It contains properties to indicate success or failure and to pass back a list of records being fetched.
The second section of Apex code contains four public static methods decorated with the @RemoteAction annotation. These are the methods mapped to the Sencha proxy’s CRUD actions, and each returns a Response object with results of the called method.
The third section of Apex code contains helper methods which are called by the @RemoteAction methods to manage the CRUD logic. Not included here is the unit test class, but that code is available with the final project on GitHub. Remember that it is always a wise practice to develop your Apex tests as you build your code.
Step 8: Adjusting the Model and Adding a Data Proxy
Now that the Apex controller is in place, we can add our proxy to the model. The proxy maps each of the four basic CRUD operations (read, create, update, and destroy) to the associated @RemoteAction method on the Apex controller in its API property configuration. In addition, it allows us to configure the data format for a reader and writer, and in our case we’ll use JSON for our data transport.
We’ve tweaked the model in a number of ways, so it should be entirely replaced, (including the new proxy code,) with the following:
Ext.define(“PocketCRM.model.Lead”, {
extend: “Ext.data.Model”,
config: {
idProperty: ‘Id’,
fields: [
{ name: ‘Id’, type: ‘string’, persist: false},
{ name: ‘Name’, type: ‘string’, persist: false },
{ name: ‘FirstName’, type: ‘string’ },
{ name: ‘LastName’, type: ‘string’ },
{ name: ‘Company’, type: ‘string’ },
{ name: ‘Title’, type: ‘string’ },
{ name: ‘Phone’, type: ‘string’ },
{ name: ‘Email’, type: ‘string’ },
{ name: ‘Status’, type: ‘string’ }
],
validations: [
{ type: ‘presence’, field: ‘LastName’, message: ‘Enter a last name.’ },
{ type: ‘presence’, field: ‘Company’, message: ‘Enter a company.’ },
{ type: ‘presence’, field: ‘Status’, message: ‘Select a status.’ }
],
//Bind each CRUD functions to a @RemoteAction method in the Apex controller
proxy: {
type: ‘direct’,
api: {
read: PocketCRMLeadController.Query,
create: PocketCRMLeadController.Add,
update: PocketCRMLeadController.Edit,
destroy: PocketCRMLeadController.Destroy
},
limitParam: ‘recordCount’, // because “limit” is an Apex keyword
sortParam: ‘sortParams’, // because “sort” is a keyword too
pageParam: false, // we don’t use this in the controller, so don’t send it
reader: {
type: ‘json’,
rootProperty: ‘records’,
messageProperty: ‘errorMessage’
},
writer: {
type: ‘json’,
root: ‘records’,
writeAllFields: false, // otherwise empty fields will transmit
// as empty strings, instead of “null”/not present
allowSingle: false, // need to always be an array for code simplification
encode: false // docs say “set this to false when using DirectProxy”
}
}
},
});
All the magic is in the proxy and how it maps to the Apex controller. Proxies are an advanced concept, totally customizable and very powerful, but you should at least have a basic understanding of how they work under the hood. You’ll want to pay particular attention to how their properties map to the inner classes defined in the Apex controller.
Using the Web Inspector developer tool from Safari, you can trace the proxy request when the sync operation is executed. The sync event fires a load of the list component, which in turn fires the read proxy action to call the Query @RemoteAction method on the Apex controller. You can inspect below the JSON request payload sent to the Salesforce remoting service:
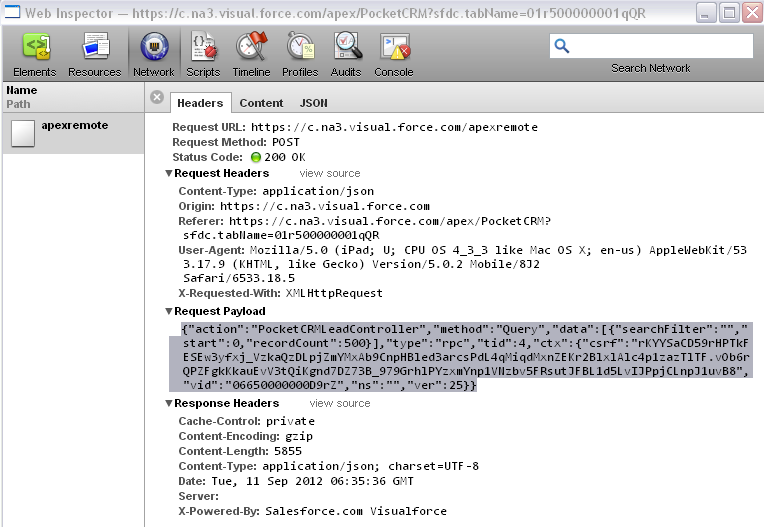
The action and method properties identify the controller class and the method, and the data packet will contain all key value pairs necessary to make a call; notice the start of 0 and the recordCount of 50 set by the pageSize property in the store. These are the parameters that must be included in the attribute structure of the QueryRequest inner class in your controller which is passed as an argument to the Query method.
limitParam: ‘recordCount’, // maps to QueryRequest.recordCount
…
}
(Apex)
public class QueryRequest {
…
Integer recordCount;
…
Above you can see the recordCount key mapped to the recordCount attribute on the Apex class. The start parameter, included automatically by the proxy, identifies the first record to fetch for a page of data. The recordCount parameter, a custom parameter name for the limitParam config, controls the fetched page size. (Our paging logic will be incomplete, and we’ll address it in a subsequent post.)
You can add your own custom parameters to include in the data packet by adding another proxy config item named extraParams, and setting one or more key value pairs to include in the passed data using the setExtraParams() proxy method. Remember that you will need to extend the attribute structure of the QueryRequest inner class to capture and marshall any extra params that you add.
The QueryResult structure is only used for the read operation when calling the Apex Query method. The other CRUD operations (create, update, and destroy) simply send a JSON ArrayList[] containing the records and fields to act on. Designed for maximum efficiency, the proxy passes only those fields actually entered for a new record, or updated in an edit process. For example, if only the LastName field is changed on an edit, only that field and the Id are passed for the record like this:
In the model we’ve replaced the FullName field with the Name field from the Salesforce Lead schema, which effectively provides the same data. We also removed the derived calculation for a blank Status field as it will always exist in Salesforce records. (It’s a required field.) Last we added a validation section to insure presence of the same three fields required in the Salesforce Lead UI. These validations work in concert with logic in the `onSaveLeadCommand()` function added to our Sencha controller.
console.log(“onSaveLeadCommand”);
…
//Check for validation errors.
var errors = currentLead.validate();
if (!errors.isValid()) {
var msg = ”;
errors.each(function(error) {
msg += error.getMessage() + ‘
‘;
});
console.log(‘Errors: ‘ + msg);
Ext.Msg.alert(‘Please correct errors!’, msg, Ext.emptyFn);
currentLead.reject();
return;
}
…
This validation feature used above checks for any errors on the records processed from the form and displays all error messages as defined in the Model for any missing values on the three required fields.
{ type: ‘presence’, field: ‘LastName’, message: ‘Enter a last name.’ },
…
We need to go back to our JavaScript controller and make a few more changes down near the bottom of the component. You can leave the original code alone for the launch section, it should remain like this:
launch: function () {
console.log(“launch”);
this.callParent(arguments);
//Load up the Store associated with the controller and its views.
console.log(“load Leads”);
var leadsStore = Ext.getStore(“Leads”);
leadsStore.load();
},
But we will need to add a listener in the init section to capture any Apex exceptions passed back to the proxy. This is an alternate way to add a listener, which in this case is actually configured on the Proxy but added here in the controller. We get a reference to the proxy from the store using its getProxy() method, and then call the proxy’s addListener() method.
Add the following code:
this.callParent(arguments);
console.log(“init”);
//Listen for exceptions observed by the proxy so we can report them and clean up.
Ext.getStore(‘Leads’).getProxy().addListener(‘exception’, function (proxy, response, operation, options) {
// only certain kinds of errors seem to have useful information returned from the server
if (response.data) {
if (response.data.errorMessage) {
Ext.Msg.alert(‘Error’, response.data.errorMessage);
} else {
Ext.Msg.alert(‘Error’, operation.action + ‘ failed: ‘ + response.data.message);
}
} else {
Ext.Msg.alert(‘Error’, operation.action + ‘ failed for an unknown reason’);
}
});
},
Refresh your Visualforce page and make sure it displays without error.
Step 9: Adjusting Our Proxy To Work With Visualforce Remoting
There’s just one more thing we must do before we’re finished. Visualforce remoting relies on server side JavaScript libraries running on the Salesforce.com server. At the time of this writing, there is a slight workaround needed for our Sencha direct server proxy to work with the Salesforce remoting feature. We’re going to add two additional JavaScript extensions at the bottom of the main JavaScript block. These are standalone JavaScript statements; don’t position them inside any particular Sencha component!
The first adds a method on our proxy’s Query call to provide a function that will provide args necessary for remoting:
PocketCRMLeadController.Query.directCfg.method.getArgs =
function (params, paramOrder, paramsAsHash) {
console.log(‘getArgs: ‘ + params.data);
return [params] }
The second adds an override to an existing Sencha Touch function to manage request callbacks in a slightly different manner for the Salesforce.com remoting service:
function(request, operation, callback, scope){
var me = this;
return function(data, event){
console.log(‘createRequestCallback: ‘ + operation);
me.processResponse(event.status, operation, request, data, callback, scope);
};
};
Now it’s time to save your code once again, hold your breath, and restart the app. Run your app through all the features and functions to be sure everything is working. If not, or if there are errors, debug using the Safari Error Console and Web Inspector. These tools are invaluable when debugging JavaScript applications and you need to master them if you’ll be doing any serious JavaScript related application development. Right now is a great time to start.
Summary
So let’s recap what we’ve accomplished:
- We added controls and event handling on our list view for the new, disclose, and sync user actions and view transitions.
- We added a new form view, again with all controls and and event handling for save, delete and back.
- We added references, event handling, and validation logic in the controller, and configured logic for view transitions.
- We rebuilt our Apex controller class with
@RemoteActionmethods and built a new data proxy into the Sencha model. We made sure to include inner classes to map to the proxy’s request and response data packets, and we reviewed a bit of how the proxy works under the covers. We also added a proxy listener in the controller to help handle any exceptions returned from Apex. - Finally, we added some bridge functions to allow our Sencha proxy to work properly with Visualforce JavaScript Remoting.
Closure
In coming iterations, we’ll explore search, paging, and other features of the framework. In the meantime, I’d like to give a shout out to Jorge Ramon (AKA: the MiamiCoder) for his great online tutorials that really helped me get a leg up on the Sencha Touch framework; I provided a link to his website in Part 1.
I have referenced much of the event handling and controller patterns from his tutorials, and I highly suggest you spend some time with them if you really want to learn more about Sencha Touch. His code will look quite familiar after working through this tutorial. Jorge has also recently published a new book on the Sencha Touch framework which is available online, and has additional tutorials and books on other frameworks as well which you can see at http://miamicoder.com
I’d also like to extend a big thank you to my associate Jeff Trull, who has worked extensively integrating Force.com with the Sencha ExtJS and Touch frameworks. He was my scout working through the integration of the server side direct data proxy with Visualforce JavaScript Remoting. You can follow his work and see some of his sample code at his Github project repostory here: https://github.com/jefftrull/ExtJSWidgetsOnForceDotCom.
Also, you’ll want to check out the latest version of the Sencha Architect 2.0 developer tools which allow you to build a Touch application in a drag and drop studio environment.
If you are planning to go to Salesforce’s Dreamforce, Ted Patrick from Sencha’s Developer Relations will be giving talks on building mobile apps with Sencha and Force.com tomorrow, September 18th. Find out more, here.
Did you find the content helpful?
 0
0

 0
0

Latest Content
Introducing Rapid Ext JS: The Ultimate Low-Code Editor for Ext JS Development
We’re excited to announce the official release of Rapid Ext JS 1.0, a revolutionary low-code…
August 21, 2024
Sencha Architect 4.3.6 Has Arrived!
The Sencha team is pleased to announce the availability of Sencha Architect version 4.3.6. Building…
August 20, 2024

Introducing ReExt: A Game-Changer for React Developers
Sencha, a leader in JavaScript developer tools for building cross-platform and enterprise web applications, is…
August 20, 2024


