

 Rapid Ext JS


Generating Stable Locators For Your Tests using Sencha Component Locator Extension For Google Chrome
December 13, 2019
179 Views
Sencha Test provides a set of powerful APIs, referred to as the Futures API, that allows you to reliably locate and interact with components inside of your Sencha web applications—specifically apps built with Ext JS, ExtReact, and ExtAngular.
These APIs provide a consistent and easy way to reference components, but you need to know how to generate locators that will then aid Sencha Test in finding a specific component through the use of the Futures API.
Ext JS Component Queries
Sencha Test supports the Ext JS Component Query syntax for locating components. This means you don’t have to rely on using unstable locators like DOM or XPath queries, which will likely change over time, or between each test run.
In the case of an Ext JS grid that’s configured with a title of “Users”, the following Ext JS Component Query can be used for referencing the component:
grid[title="Users"]
The Component Query above is a much better locator than using the auto-generated id of the underlying element in the DOM, e.g. gridpanel-1009, as this auto-generated id will change as soon as the ordering of rendered components differ.
Sencha Test Futures API
Once we have a locator, this can be combined with the Futures API in Sencha Test, allowing it to locate the component during a test run. In the case of the grid example above, this can be referenced by Sencha Test through the use of the ST.grid API:
ST.grid('grid[title="Users"]');
Just by executing this code in your test suite, Sencha Test will attempt to locate this component, verify its existence, and if it can’t be found within the default timeout period (5 seconds), it will automatically cause the containing test to fail.
There are APIs for the different types of components, such as ST.button for button components, and ST.textField for input fields, etc.
The Futures API provides chainable methods, so once we have a reference to a grid, we can drill down to locate a particular row and cell within the grid:
ST.grid('grid[title="Users"]')
.rowAt(2)
.cellAt(1);
In the example above, we attempt to locate the row at index position 2, and the cell at index position 1 within that row. If data in the grid is loaded from a remote source, that data could take a second or two before it shows up in the grid. Sencha Test allows for these delays by always waiting up to 5 seconds for the row to be available before causing a timeout.
Generating Locators
Sencha Test Studio includes an Inspect Tool for generating locators, however, this requires the launching of the app each time it’s used, navigating to the screen where the component exists, inspecting the component to generate a locator, then closing the browser and inserting the generated locator into the test suite.
Sencha Component Locator Extension for Google Chrome
One alternative to the Inspect Tool in Sencha Test Studio is to use the free Sencha Component Locator extension for Google Chrome. Installing this extension in Google Chrome will add a new Sencha Component Locator tab under the Elements tab within Chrome Developer Tools.
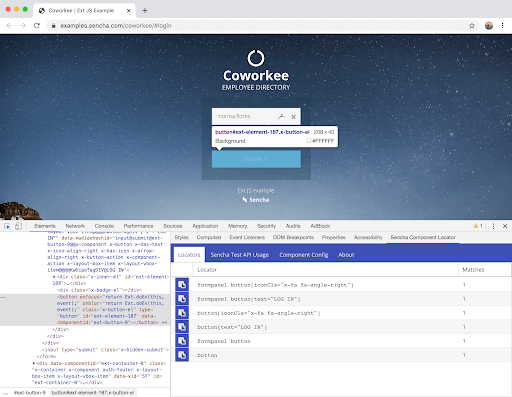
Once installed, you can inspect an Ext JS element on the page, and the Component Locator extension will attempt to find the associated component and provide a list of stable locators that can be used within your test suites in Sencha Test.
In the example above, I have inspected the Login button of the Coworkee app, built using Ext JS. The Component Locator extension has suggested 6 possible locators for this button, in order of specificity, along with the number of matches. You always want to pick a locator that matches one component or element, otherwise, the test will fail due to the locator matching multiple items.
The Component Locator extension has a ‘Copy’ button next to each locator, so you can easily copy and paste the locator into your test suite.
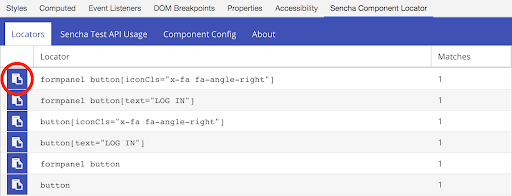
In the first locator shown in the screenshot above, the Component Locator extension has generated a locator that combines the button, its configured icon class, and parent form panel. This type of locator is very specific.
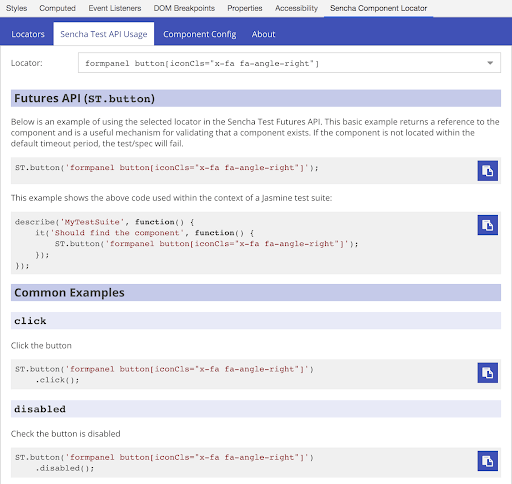
If you’re not so familiar with the Sencha Test Futures API, the second tab under the Sencha Component Locator provides some helpful pointers, and shows how the selected locator can be used inside a test suite in conjunction with the Futures API. Each of the code samples can be copied to your test suite by clicking the respective ‘Copy’ button.
If the component you are inspecting has no unique properties to distinguish it from other components of the same type, the Component Config tab lists other configs that you could combine together to make the locator more specific:
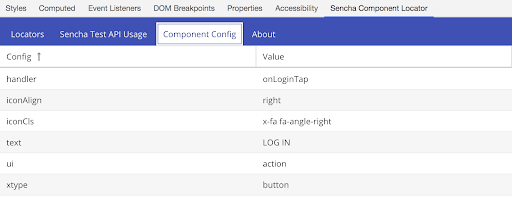
Multiple configs can be combined together in a locator as follows:
formpanel button[text="LOG IN"][ui="action"]
As this is a button, the ST.button API can be used:
ST.button('formpanel button[text="LOG IN"][ui="action"]');
Conclusion
The Sencha Component Locator extension for Google Chrome provides a straightforward mechanism to generate locators for your Sencha apps directly in the browser, and easily copy those locators to your test suites in Sencha Test.
Try out the extension and let us know your thoughts in the comments below! You can also add feedback on the extension page within the Chrome Web Store at the above link.
Did you find the content helpful?
 0
0

 0
0

Latest Content

Ext JS 7.8 Has Arrived!
The Sencha team is pleased to announce the latest Ext JS version 7.8 release. Following…
May 13, 2024

React Apps Development Using ReExt with Ext JS Components
The world is moving fast towards online businesses. Businesses are established online via social media,…
May 1, 2024

How to Write Unit Tests with Sencha Test
In modern software development, unit testing has become an essential practice to ensure the quality…
April 19, 2024


