


Building SAP mobile apps with Sencha Touch
April 3, 2013
134 Views
If you are working in a large corporate environment, chances are likely that your business data is in SAP systems. SAP is a leading enterprise software vendor. Traditionally SAP was a closed environment using proprietary UI solutions. More recently, however, SAP is opening its ecosystem by embracing open web standards and partnering with leading client framework vendors such as Sencha.
In this blog I will show how you can use Sencha Touch to create mobile apps that connect to SAP business data. Our integration will be based on SAP NetWeaver Gateway and Sencha’s SAP OData connector.
### OData
So what is OData? OData (Open Data Protocol) is a set of conventions for URLs and data formatting for REST APIs. OData is an open standard and backed by Microsoft, SAP, IBM and others. Check out the [OData site](http://www.odata.org/) and the [examples](http://www.odata.org/documentation/uri-conventions/) to get a quick impression of the capabilities and conventions of OData.
### SAP NetWeaver Gateway
[SAP NetWeaver Gateway](http://scn.sap.com/community/netweaver-gateway) is a SAP server add-on that allows mobile devices and other consumers to connect to SAP systems using OData-based REST services. The SAP Gateway front-ends various SAP systems like ERP, CRM, SRM and enables controlled read/write access to business data using HTTP and OData.
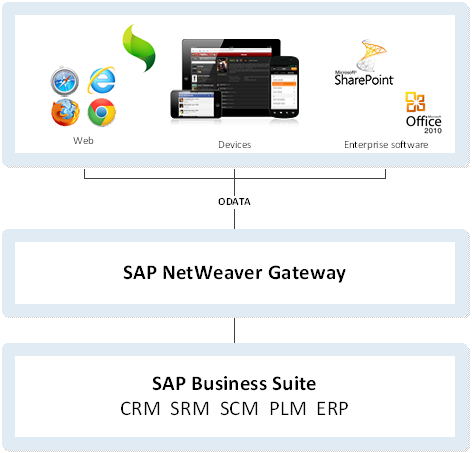
SAP graciously provides an [online demo system](http://scn.sap.com/docs/DOC-31221) where you can test-drive the SAP Gateway. Our mobile app is going to connect to this demo system,but you will need to go through the account registration process to get a demo account. Check out the getting started document. On [SCN](http://scn.sap.com/) (SAP Community Network) you will find more information on SAP NetWeaver Gateway and you will also find examples of other integration scenarios, e.g. using SUP (Sybase Unwired Platform, renamed to SAP Mobile Platform in version 2.2) in combination with Sencha Touch.
### Sencha SAP OData connector
Last year, Sencha and SAP [announced their partnership](http://www.sap.com/news-reader/index.epx?pressid=18622) in the mobile space. As a result, Sencha has delivered an SAP OData proxy which makes it easy for Sencha Touch developers to connect to SAP NetWeaver Gateway. Get the latest version of the Sencha SAP OData connector [here](https://market.sencha.com/extensions/sencha-touch-odata-connector-for-sap)! You will need the OData.js file for the sample app below.
### Let’s get coding
We’ll build a Sencha Touch app that fetches TravelAgency data from SAP NetWeaver Gateway and displays them in a grouped List. The easiest way to get started with Sencha Touch is to include the hosted library from
Create the following _app.html_ file that includes Sencha Touch JavaScript library and stylesheet:
Now, let’s define the Model for TravelAgency in _model/TravelAgency.js_, using the SAP OData proxy.
Ext.define(‘App.model.TravelAgency’, {
extend: ‘Ext.data.Model’,
requires: ‘Ext.data.proxy.OData’,
config: {
// define the fields. the default type is string
fields: [
{ name: “TravelAgencyID” },
{ name: “Name” },
{ name: “Street” },
{ name: “POBox” },
{ name: “PostalCode” },
{ name: “City” },
{ name: “Country” },
{ name: “Region” },
{ name: “TelephoneNumber” },
{ name: “URL” },
{ name: “LanguageCode” },
{ name: “LocalCurrencyCode” }
],
proxy: {
type: ‘odata’,
url: ‘https://sapes1.sapdevcenter.com/sap/opu/odata/IWBEP/RMTSAMPLEFLIGHT_2/TravelAgencyCollection’,
username: “
password: “
withCredentials: true
}
}
});
Using the Model, we can define a store for TravelAgencies in _store/TravelAgencies.js_:
Ext.define(‘App.store.TravelAgencies’, {
extend: ‘Ext.data.Store’,
requires: ‘App.model.TravelAgency’,
config: {
model: ‘App.model.TravelAgency’,
// automatically load the records when store is created
autoLoad: true,
// perform client-side sorting on field Name
sorters: ‘Name’,
// configure grouping
grouper: {
// group by the first letter of Name field
groupFn: function (record) {
return record.get(‘Name’)[0];
}
}
}
});
Please note that I included a grouper function. It returns the first letter of the Travel Agency’s name and is used to build a grouped list, which we will define next.
The TravelAgencyList view (in _view/TravelAgencyList.js_) lists the names of the agencies and groups them by first letter:
Ext.define(‘App.view.TravelAgencyList’, {
extend: ‘Ext.dataview.List’,
config: {
grouped: true,
itemTpl: ‘{Name}’
}
});
Finally, we use our building blocks to launch our application in _app.js_:
requires: [‘App.store.TravelAgencies’, ‘App.view.TravelAgencyList’],
launch: function () {
// create a store. It autoLoads the TravelAgencies collection from SAP Gateway
var store = Ext.create(‘App.store.TravelAgencies’);
// create a list view and bind it to the store
Ext.create(‘App.view.TravelAgencyList’, {
fullscreen: true,
store: store
});
}
});
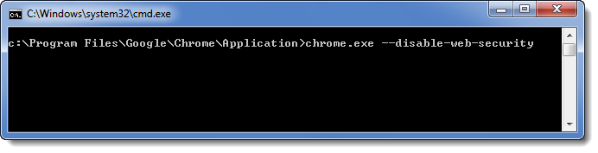
It’s time to fire up your Chrome browser with the “disable-web-security” command line. This will suppress the Same Origin Policy which normally doesn’t allow you to do XHR request across domains:
Now you can view app.html in Chrome, showing the TravelAgencies fetched from SAP Gateway:
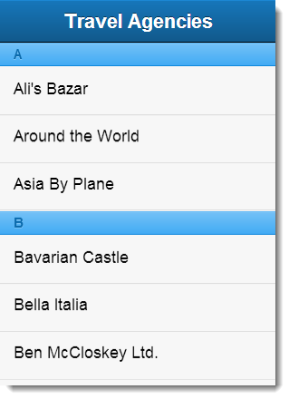
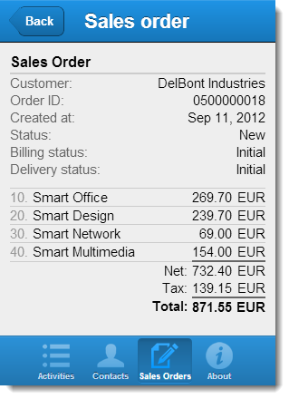
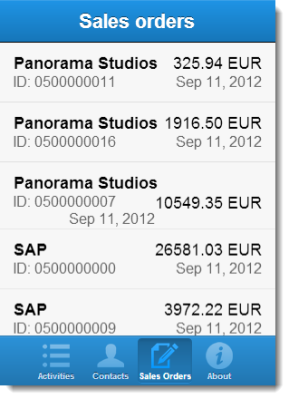
We have just built our first Sencha Touch app on top of SAP data! You can use the many UI components in Sencha Touch to create other views on your SAP data. Here are some examples:


### Create, update and delete
So far, we have used the [SAP OData connector](https://market.sencha.com/extensions/sencha-touch-odata-connector-for-sap) to fetch data from the SAP NetWeaver Gateway server. However, we can modify server data just as well! In the following example we will create, modify and delete a Booking for a Flight in the SAP NetWeaver Gateway Flight service.
We’ll first define a Booking model:
extend: ‘Ext.data.Model’,
config: {
fields: [{
name: ‘AirLineID’,
type: ‘string’
}, {
name: ‘FlightConnectionID’,
type: ‘string’
}, {
name: ‘FlightDate’,
type: ‘string’
}, {
name: ‘BookingID’,
type: ‘string’,
defaultValue: “”
}, {
name: ‘CustomerID’,
type: ‘string’
}, {
name: ‘TravelAgencyID’,
type: ‘string’
}, {
name: ‘PassengerName’,
type: ‘string’
}, {
name: ‘CustomerType’,
type: ‘string’
}, {
name: ‘Smoker’,
type: ‘boolean’
}, {
name: ‘LuggageWeight’,
type: ‘float’
}, {
name: ‘WeightUnit’,
type: ‘string’
}, {
name: ‘Invoice’,
type: ‘boolean’
}, {
name: ‘FlightClass’,
type: ‘string’
}, {
name: ‘PriceInForeignCurrency’,
type: ‘float’
}, {
name: ‘ForeignCurrencyCode’,
type: ‘string’
}, {
name: ‘PriceInLocalCurrency’,
type: ‘float’
}, {
name: ‘LocalCurrencyCode’,
type: ‘string’
}, {
name: ‘SalesOfficeID’,
type: ‘string’
}, {
name: ‘BookingDate’,
type: ‘string’
}, {
name: ‘TravelAgencyID’,
type: ‘string’
}, {
name: ‘Cancelled’,
type: ‘boolean’
}, {
name: ‘Reserved’,
type: ‘boolean’
}, {
name: ‘PassengerName’,
type: ‘string’
}, {
name: ‘Title’,
type: ‘string’
}, {
name: ‘PassengerDateOfBirth’,
type: ‘string’
}],
proxy: {
type: ‘odata’,
url: “https://sapes1.sapdevcenter.com/sap/opu/odata/IWBEP/RMTSAMPLEFLIGHT_2/BookingCollection”,
withCredentials: true,
username: ‘
password: ‘
}
}
});
Now let’s create a booking for a Flight. Please note that there are some required fields that we need to provide:
AirLineID: flight.get(‘AirLineID’),
FlightConnectionID: flight.get(‘FlightConnectionID’),
FlightDate: flight.get(‘FlightDate’),
CustomerID: ‘00004274’,
TravelAgencyID: ‘00000087’,
PassengerName: ‘Joe Picard’
});
booking.save(function (record, operation) {
if (operation.wasSuccessful()) {
console.log(‘Booking created. Id:’ + record.get(‘BookingID’));
} else {
console.log(‘Create booking failed’);
}
});
Once we have a Booking, we may update its properties:
booking.save(function (record) {
console.log(‘Booking updated’);
});
To delete the Booking, just use the `erase()` method on the model:
console.log(‘Booking cancelled’);
});
The exact semantics and allowed operations on the SAP data are determined by custom configuration and coding in SAP Netweaver Gateway. In the Flights service, the Booking record is not removed from the database. Instead, the Booking is marked as ‘Cancelled’.
It’s time to wrap up! In this post we have introduced the Sencha SAP OData connector and provided examples how a Sencha Touch app can interact with SAP data through SAP NetWeaver Gateway. I hope this helps you get started with building SAP mobile apps with Sencha Touch.
Thanks for reading!
**Resources**
– [SAP NetWeaver Gateway on SAP Community Network](http://scn.sap.com/community/netweaver-gateway)
– [Download Sencha SAP OData connector](https://market.sencha.com/extensions/sencha-touch-odata-connector-for-sap)
– [Get the sample code on GitHub](https://github.com/senchadevcenter/sap/tree/master/Samples)
Did you find the content helpful?
 0
0

 0
0

Latest Content

Ext JS 7.8 Has Arrived!
The Sencha team is pleased to announce the latest Ext JS version 7.8 release. Following…
May 13, 2024

React Apps Development Using ReExt with Ext JS Components
The world is moving fast towards online businesses. Businesses are established online via social media,…
May 1, 2024

How to Write Unit Tests with Sencha Test
In modern software development, unit testing has become an essential practice to ensure the quality…
April 19, 2024


