

 Rapid Ext JS


Creating an Online/Offline proxy in Sencha Touch
July 17, 2014
187 Views
Guest Blog Post
Introduction

A common requirement in Sencha Touch is that an application must continue working normally when a device loses its connection to the Internet. Sencha Cmd delivers some great tools that give us everything we need for the app to work offline, such as auto generated App Manifest files, but one of the biggest issues is how to handle your data. There are numerous ways to handle data, and one common technique is to switch proxies between a local storage proxy and an AJAX proxy.
In this post, Tom Cooksey of ProWeb Software will show you how you can achieve the same effect, but he’ll use a single proxy and make it completely transparent to the programmer using the store configured with it.
The Proxy
In this example, we’re going to extend the AJAX proxy; you could extend whichever proxy you like, but as AJAX is quite a common requirement, we’ll use that one. We only need to override two methods that deal with the data flowing into the proxy. We’re also going to create a few config items, which we’ll explain later. Here’s the bare bones class that we’re going to create without any of the logic in place yet:
* Offline Proxy
* @extend Ext.data.proxy.Ajax
*/
Ext.define('proxy.OfflineProxy', {
extend: 'Ext.data.proxy.Ajax',
alias: 'proxy.offline',
config: {
storageKey: null,
storageFacility: null,
online: true
},
originalCallback: null,
/**
* Override doRequest so that we can intercept the request and
* catch a failed request to fall back to offline
* @param operation
* @param callback
* @param scope
* @returns {*}
*/
doRequest: function(operation, callback, scope) {
},
/**
* Override processResponse so that if we are online we can store the response
* into the offline storage method provided and if a response fails,
* we can fall back.
* @param success
* @param operation
* @param request
* @param response
* @param callback
* @param scope
*/
processResponse: function(success, operation, request, response, callback, scope) {
}
});
doRequest() actually performs the request to the server. We override this method because we want to intercept whether the device is offline and/or has no access to the server and essentially fake the response back to the store.
processResponse() interprets the response from the server. The main reason we override this method is because, while we still want all of the original functionality, we want to store the data we get in a successful response to our storage facility. In the case of an unsuccessful request, we want to tell our proxy to do it again but with our faked response as described above.
Storage Facility
The proxy is going to use a storage facility being passed to it. This is simply a singleton class with two methods on it: getItem and setItem. You can use any storage facility and as long as you implement an API in it in the same way as we’re doing here, it will work:
* A class that gives access into WebSQL storage
*/
Ext.define('storage.WebSQL', {
singleton: true,
config:{
/**
* The database capacity in bytes (can't be changed after construction). 50MB by default.
*/
capacity:50 * 1024 * 1024
},
/**
* @private
* The websql database object.
*/
storage:null,
connected: false,
constructor: function (config) {
this.callParent(config);
this.storage = openDatabase('storage', '1.0', 'Offline resource storage', this.getCapacity());
this.storage.transaction(function (tx) {
tx.executeSql('CREATE TABLE IF NOT EXISTS items (key, value)');
}, function (error) {
console.error('WebSQL: Connection Error');
}, function () {
console.log('WebSQL: Connected');
});
},
/**
* Get an item from the store.
* @param key The key to get.
* @param callbacks object of success and failure callbacks
*/
getItem:function (key, callbacks) {
this.storage.transaction(function (tx) {
tx.executeSql('SELECT * FROM items WHERE key = ?', [key], function (tx, results) {
var len = results.rows.length;
if (len > 0) {
callbacks.success(results.rows.item(0).value)
} else {
callbacks.failure(); // no result
}
});
}, function (error) {
console.log('WebSQL: Error in getItem');
callbacks.failure(error);
});
},
/**
* Set an item in the store.
* @param key The key to set.
* @param value The string to store.
* @param callbacks object of success and failure callbacks
*/
setItem:function (key, value, callbacks) {
this.storage.transaction(function (tx) {
//remove old version first
tx.executeSql('DELETE FROM items WHERE key = ?', [key]);
tx.executeSql('INSERT INTO items (key, value) VALUES (?, ?)', [key, value]);
}, function (error) {
console.log('WebSQL: Error in setItem:' + error.message);
callbacks.failure(error.message);
}, function () {
callbacks.success(); // no value.
});
}
});
Nothing too remarkable here, but you should note that the setItem and getItem methods allow success and failure callbacks to be supplied. Also, in the constructor, we set up the SQL database; in a more straightforward case like local storage, this step wouldn’t be necessary.
Digging a bit deeper into how this works, let’s look at setItem:
this.storage.transaction(function (tx) {
//remove old version first
tx.executeSql('DELETE FROM items WHERE key = ?', [key]);
tx.executeSql('INSERT INTO items (key, value) VALUES (?, ?)', [key, value]);
}, function (error) {
console.log('WebSQL: Error in setItem:' + error.message);
callbacks.failure(error.message);
}, function () {
callbacks.success(); // no value.
});
}
});
Here we are taking the key we want to set (the storage key comes from the proxy), the new value (in this case a serialized JSON object) and an object containing callbacks as parameters. We remove any old references for this key and then insert our new value.
These lines:
tx.executeSql('INSERT INTO items (key, value) VALUES (?, ?)', [key, value]);
are the equivalent of this code, using local storage:
localstorage.setItem(key, value);
If we have success in this transaction, we call the success callback passed in, otherwise we call the error callback.
getItem works very similarly:
this.storage.transaction(function (tx) {
tx.executeSql('SELECT * FROM items WHERE key = ?', [key], function (tx, results) {
var len = results.rows.length;
if (len > 0) {
callbacks.success(results.rows.item(0).value)
} else {
callbacks.failure(); // no result
}
});
}, function (error) {
console.log('WebSQL: Error in getItem');
callbacks.failure(error);
});
}
This time we only have two parameters, key and callbacks. The key is used to retrieve the item in question and then we call the success callback with that value if we can find it. Otherwise, we call the error callback.
The Final Proxy
Now that we have our storage facility, we can complete our proxy. The proxy will make use of our storage facility and will be passed in when the proxy is configured.
var that = this,
passCallback,
request,
fakedResponse = {};
this.originalCallback = callback;
function failedRequest() {
fakedResponse.status = 500;
fakedResponse.responseText = 'Error';
fakedResponse.statusText = 'ERROR';
that.processResponse(false, operation, request, fakedResponse, passCallback, scope);
}
if(this.getOnline()) {
console.log('PROXY: Loading from online resource');
return this.callParent(arguments);
}else{
console.log('PROXY: Loading from offline resource');
request = this.buildRequest(operation);
passCallback = this.createRequestCallback(request, operation, callback, scope);
if(this.getStorageKey() && this.getStorageFacility()) {
this.getStorageFacility().getItem(this.getStorageKey(), {
success: function(dataString) {
fakedResponse.status = 200;
fakedResponse.responseText = dataString;
fakedResponse.statusText = 'OK';
that.processResponse(true, operation, request, fakedResponse, passCallback, scope);
},
failure: failedRequest
});
}else{
console.error('No storage key or facility for proxy');
setTimeout(function() {
failedRequest();
}, 1);
}
}
},
The first method we’re going to override is doRequest(). In the original AJAX class, this method is used to perform the actual request to the server, and in the case where the device is online, we will simply call into the parent method using callParent(); If, however, the device is offline then we will essentially fake the response by getting the data from our offline storage facility and calling processResponse(). We have to fake this response because processResponse() will interrogate what’s passed to it to make sure it’s a valid response. We fake it by setting the correct http status code (200), setting the responseText to the data we withdrew from our storage facility and set a statusText of “OK”. This object now looks to the processResponse method like a completely normal request response. This kind of abstraction is something the Sencha framework is very good at and makes for nicely decoupled code.
var that = this;
if(success) {
console.log('PROXY: Request succeeded');
this.callParent(arguments);
if(this.getOnline()) {
if(this.getStorageKey() && this.getStorageFacility()) {
this.getStorageFacility().setItem(this.getStorageKey(), response.responseText, {
success: function() {
console.log('PROXY: Data stored to offline storage: ' + that.getStorageKey());
},
failure: function(error) {
console.log('PROXY: Error in storing data: ' + that.getStorageKey());
}
});
}else{
console.error('PROXY: No storage key or facility for proxy');
}
}
}else{
if(this.getOnline()) {
//If the request failed and we were online, we need to try and fall back to offline
console.log('PROXY: Request failed, will try to fallback to offline');
this.setOnline(false);
this.doRequest(operation, this.originalCallback, scope);
}else{
this.callParent(arguments);
}
}
}
The second method we override is processResponse(). We, again, in normal circumstances callParent() when there is a successful request to the server, but additionally we will save the data from the request into the offline storage facility.
There are a few stages in this process. Firstly, if the request success flag is true (i.e. we just got a valid response from the server), we make a check to the config item “online” that is set on the proxy. This is a value that can be passed into the proxy on initialize. Alternatively, the proxy will default to this being true until such time as a request fails, and it will then assume the device is offline. If the flag is set to true and we have our storage facility passed in, then we will store the data we just received into it. We do this every time a successful request is made, so that if the device goes offline it always has the latest data that it had access to at the time.
If the request failed, we set the online flag to false and we re-run the doRequest method which, now that the online flag set to false, will go and fetch the data from our storage facility.
Bringing It all Together
All of these elements get pulled together when we configure the proxy on our store:
type : 'offline',
url : '/test-api/test-resource.json',
storageKey : 'buttons',
storageFacility : storage.WebSQL,
reader : {
type : 'json',
rootProperty : 'data'
}
}
As you can see, we set the type to “offline” as our proxy’s alias is set to proxy.offline. The storageKey is the key in the offline data storage you want to store the data for the request against. In this case, the store is called “buttons”, so we gave the storage key the same name. The storage facility is the class we created above and everything else is what you’d expect in a standard proxy configuration.
The Result
We’ve developed a demo Sencha Touch app for you to see all of this code in action. In addition, here are some screenshots to demonstrate. This demo app has a toolbar, and its content is driven by a JSON file on the server.
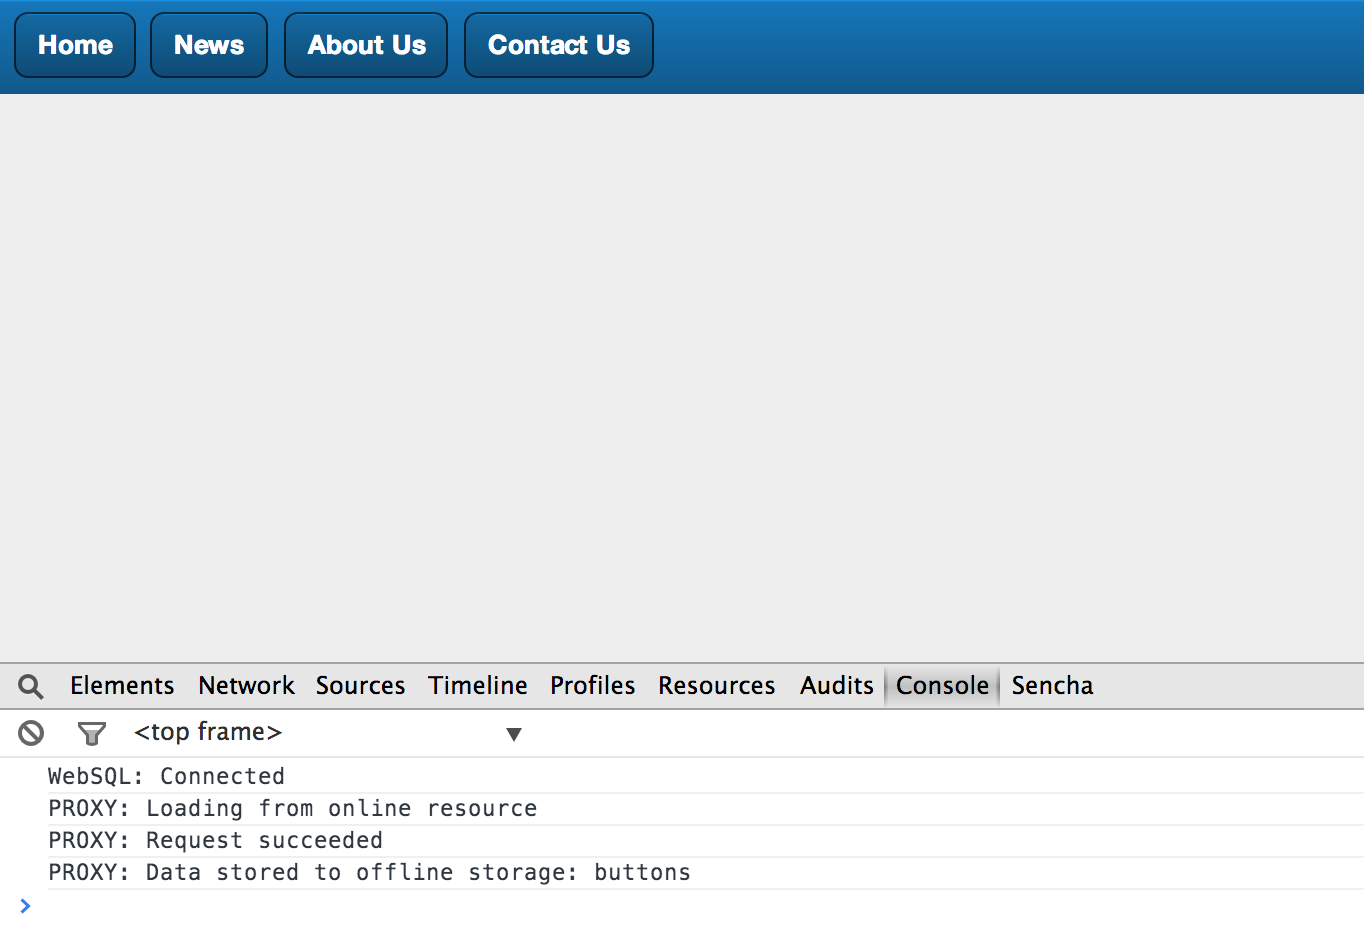
In the first image, you can see that the buttons have been generated, and in the console, you can observe that the data has been stored to the offline storage.
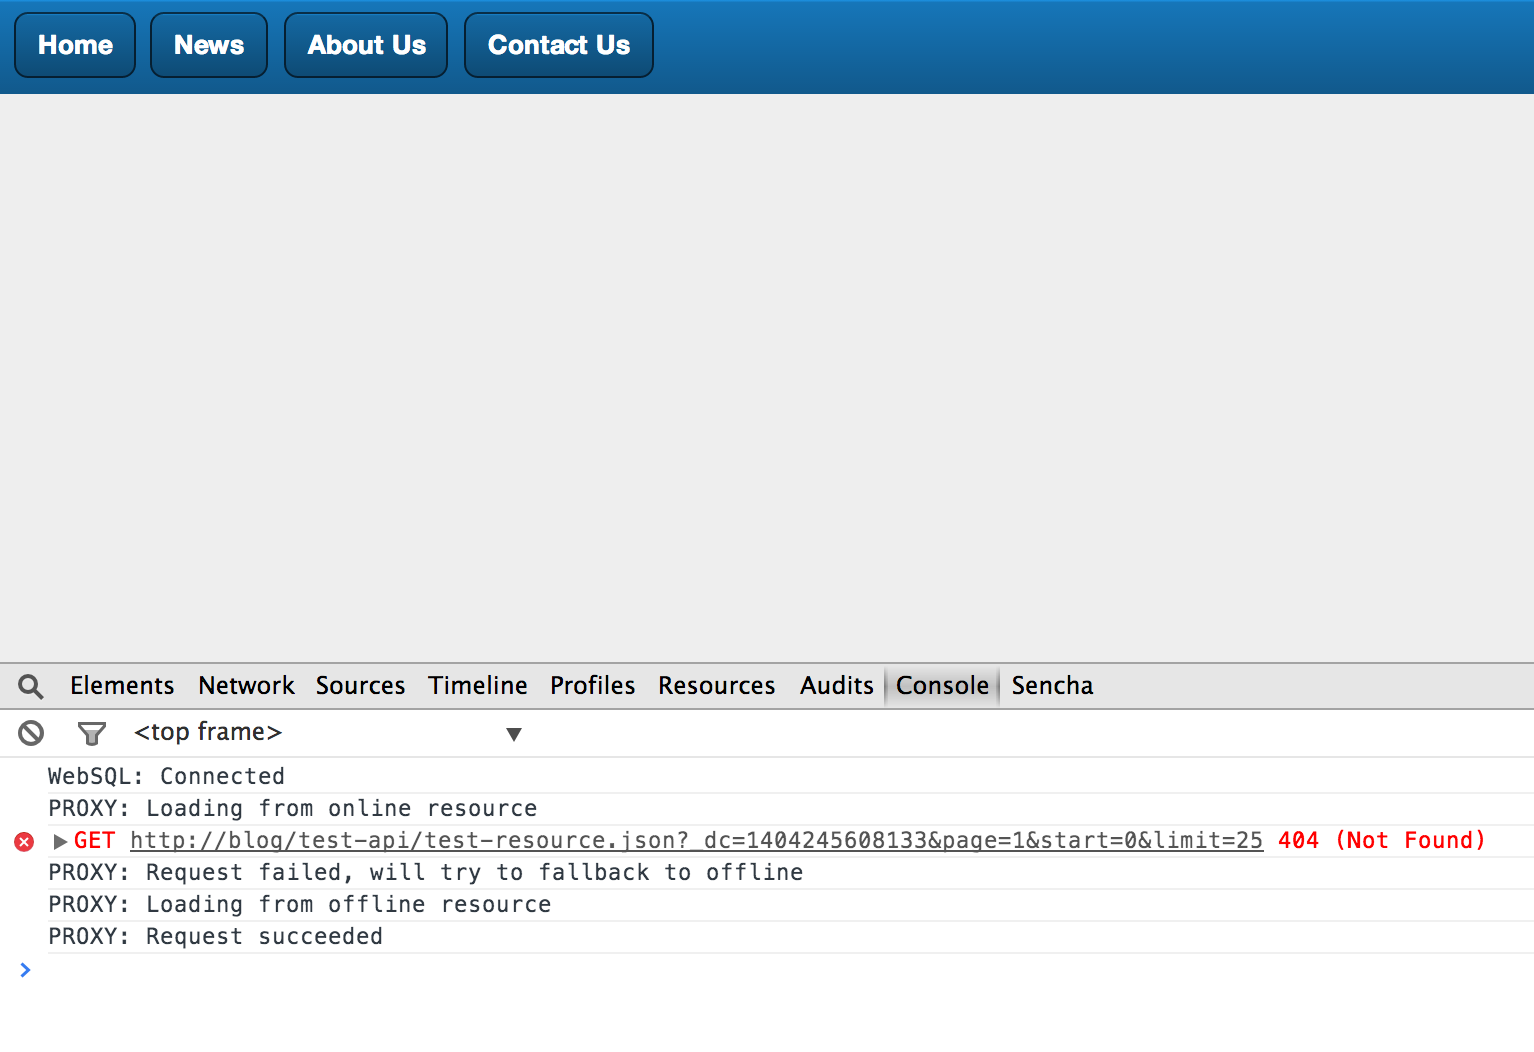
In the second image, the test-resource.json file is no longer available. In this case, I simply renamed it so we got a 404 response (though this could have been because the device could no longer access the internet or the server was down etc). You can see from the console logs that instead we simply load from the offline version, and the buttons are successfully loaded.
Conclusion
The flexibility of the Sencha class system means it’s easy to extend and repurpose built-in components and utilities. As we have demonstrated, a potentially difficult problem is easily solved by hooking into an already well-defined workflow and simply adding the additional functionality we need. The result is that we have retained the power of the original proxy while making the chore of managing offline data completely transparently to the developer using it.
Did you find the content helpful?
 0
0

 0
0

Latest Content

Ext JS 7.8 Has Arrived!
The Sencha team is pleased to announce the latest Ext JS version 7.8 release. Following…
May 13, 2024

React Apps Development Using ReExt with Ext JS Components
The world is moving fast towards online businesses. Businesses are established online via social media,…
May 1, 2024

How to Write Unit Tests with Sencha Test
In modern software development, unit testing has become an essential practice to ensure the quality…
April 19, 2024


