


Ext JS from Scratch – Part 1
November 17, 2017
219 Views
Welcome to part 1 of a new blog series, “Ext JS From Scratch”. Why start this series? Well, we have received a lot of feedback from customers regarding the learning curve time for Ext JS. One of the challenges I believe people face in learning Ext JS is that they’ve never learned the fundamentals, or they have not learned how Ext JS really works – they just learn a pattern and off they go.
In this series I will explain how and why Ext JS works the way it does. I will do this by providing simple examples and, over the course of this series, I will build up to a fully featured Ext JS application; essentially I will be ‘starting from scratch’.
For reference, the source code for this series will be available at:
https://github.com/mgusmano/ExtJSFromScratch
So, let’s get started!
The best place to start is with the simplest of HTML5 web applications. An HTML5 web application is data-oriented and is typically discussed in 3 parts:
- HTML – the ‘tags’ that are used to tell the web browser what to draw.
- CSS – Cascading Style Sheets; instructions to tell the browser how to style the HTML tags (fonts, colors, etc).
- JavaScript – the programming language used to manipulate the HTML when it is actually in the browser (typically called the DOM, or Document object Model).
Here is the simplest of HTML5 applications in 1 file, named ‘index.html’. Note that the indenting and spacing are optional, but good use of each makes things a lot more readable.
Basic Web Page:
Let’s dissect this file – it is broken into a set of starting and ending HTML “tags”:
- Line 1 indicates that this file is an HTML5 file
- Lines 2 and 35 are the beginning and ending HTML tags – inside the HTML tags are the head and body tags
- Lines 3 and 8 are the head tags – it contains references to 3 files (which are currently empty) that will hold CSS and JavaScript we will soon write
- Lines 9 and 34 is the set of body tags – the contents of the body tags can have other tags to tell the browser what to display, or JavaScript code can ‘inject’ more tags programmatically (we will see that soon)
Opening this file in a browser produces the following page:
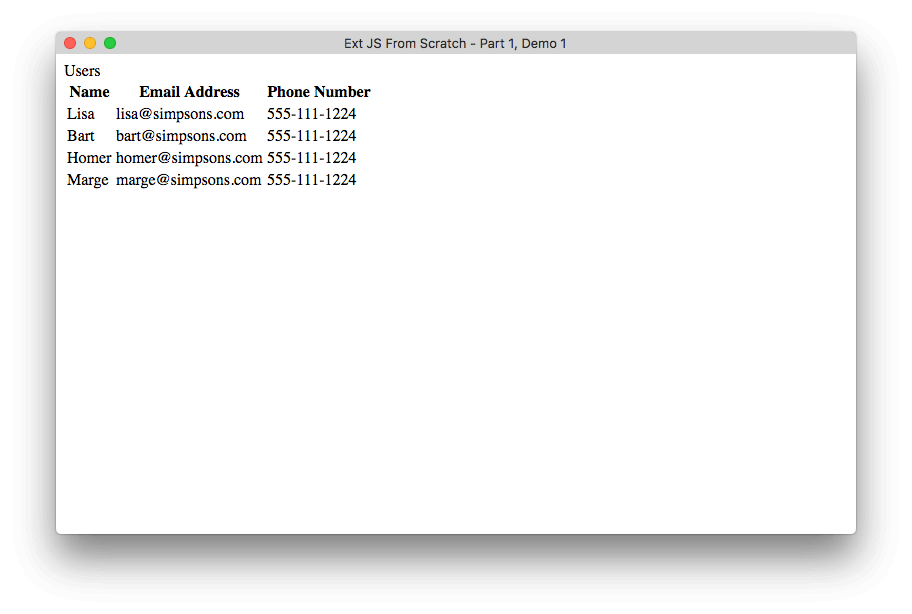
Static web page
This page represents a grid, with the top line being the title of the grid, the second line is column headers and the remaining lines are the data for the grid. There are several things to notice about this display. First, there is no ‘theme’ to this page, it is just black text on a white background. Secondly, the page is static – the data is hard-coded on the page. In the web applications we build, data is typically dynamic and based on data calls to a server. Let’s address both of these issues.
Using CSS to create our theme
CSS is used to add the ‘style’ or ‘theme’ to our application. I have added the following CSS to the theme.css file that is referenced by our HTML file and refreshed the browser.
margin: 0; border: 5px solid green;
width: 100%; height: 100%; right: 0; top: 0;
overflow: hidden;
position: absolute; box-sizing: border-box;
}
.x-grid {
font-family: Roboto, sans-serif;
font-weight: 400;font-size: 18px; width: 100%;
}
.gridTitle {
position: absolute;
top: 0;right: 0;bottom: 0;left: 0;
display: flex;
align-items: center;
justify-content: center;
background: #2196f3; color: #FFFFFF;
height: 48px;
}
.blueTable {
margin-top: 48px;
border-collapse: collapse;
font-weight: 100;font-size: 14px; width: 100%;
}
.blueTable td, .blueTable th {
border: 1px solid #E6E6E6; padding: 10px;
}
.blueTable th {
font-weight: 600;text-align: left;
}
The result is seen here:
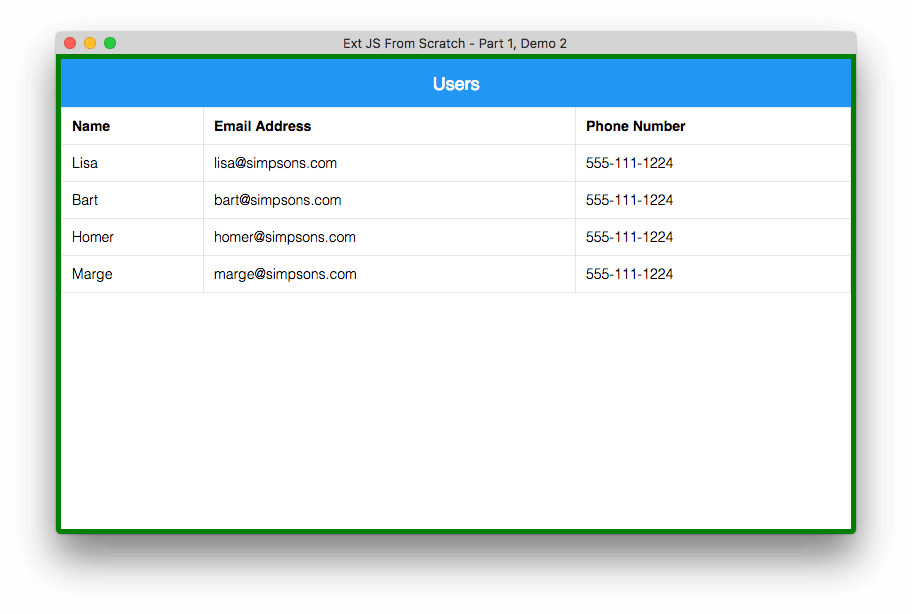
Static web page with CSS applied
Creating CSS that works well and works across browsers is not easy. We will see later that Ext JS comes with a complete set of ‘themes’ – and those themes can also be easily modified.
Bringing the page to life with JavaScript
Now let’s tackle the issues of providing for interaction on a page, things like ‘events’ (like a click on a row), and the use of static data tags in the grid. In fact, any HTML tags in the body of the page are static tags. Fortunately, with JavaScript, any part of the page can be manipulated and a dynamically drawn page can be created. This is something that we want a framework to do. So, let’s take a look at this in 2 steps.
Step 1: In ‘Ext-lite.js’ I have included some ‘framework’ code – defining this as ‘framework’ code means that this code will be the same for each application, containing helper functions, and anything else not specific to my application.
For this first iteration, I have included code that will add click event handlers to each row of a table (addRowHandlers). I have also added code that will wait for the DOM content to be loaded (meaning the page is ready for my code) and will call a ‘launch’ function – it is in this ‘launch’ function that I can write my application code.
launch();
});
function addRowHandlers(table, fn) {
var table = document.getElementById(table);
var rows = table.getElementsByTagName(“tr”);
for (var i = 1; i < rows.length; i++) {
var row = table.rows;
var cols = row.getElementsByTagName("td");
var o = {};
for (var j=0;j
Step 2: In the ‘launch’ function of the ‘app.js’ file, I have included code that is needed to call the addRowHandlers function. The key thing to understand here is that I only write the code in ‘app.js’. All of the ‘framework’ code in ‘Ext-lite.js’ is provided to me and allows me to focus on my application, not the inner workings of the framework.
console.log(‘page is loaded’);
addRowHandlers(“ext-table1”, onSelect);
};
function onSelect(sender, record) {
var r = record[0].data;
var text = r.c0+’ – ‘+r.c1+’ – ‘+r.c2;
alert(text);
};
Refreshing the page and clicking on the row for Marge produces the following output:
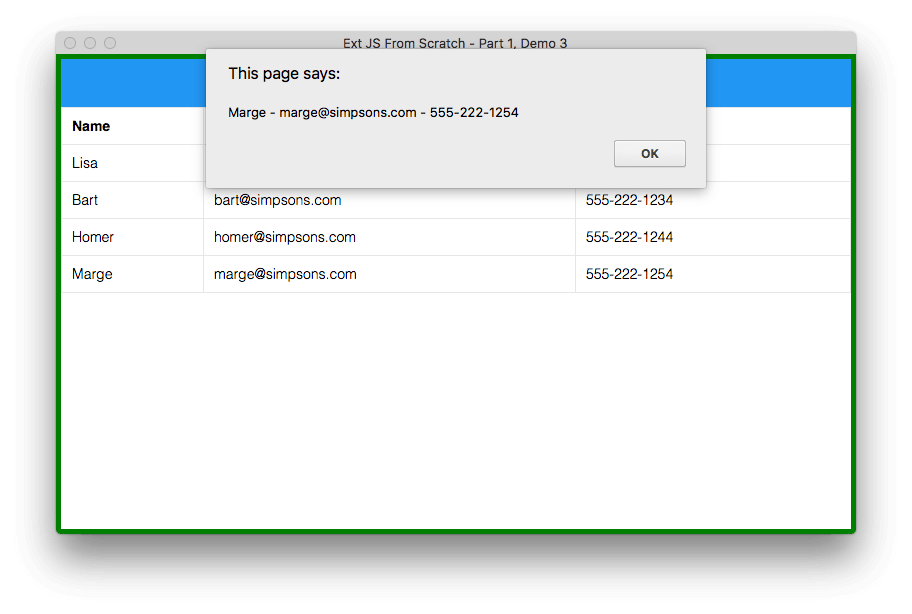
addRowHandlers function – results
Finally, let’s tackle the issue of the static tags in the body. As I mentioned, with JavaScript you can completely construct the HTML on the page dynamically.
If you take a look at the structure of the static HTML, you essentially see a logical structure similar to this:
the viewport is common to each application, and the grid itself has just a few dynamic items:
- xtype (the type of an object, referred to as xtype in Ext JS)
- title (what goes in the header panel
- columns (description of all columns in the grid
- data (the data to populate the grid)
- listeners (the set of events the object is listening to)
What if we could remove all of the static HTML in the page (allowing the framework to create it dynamically with JavaScript) and just create a logical ‘grid’ in the launch function as a child of the viewport, with a definition of xtype, title, columns, data and events? Say something like this:
xtype: ‘grid’,
title: ‘Users’,
columns: [
{ name: ‘Name’ },
{ name: ‘Email’ },
{ name: ‘Phone number’ }
],
data: data,
listeners: {
select: onSelect
}
}
First, we add a few functions to ‘Ext-lite.js’ to handle the dynamic creation of the HTML – to see the code that was added, go to:
https://github.com/mgusmano/ExtJSFromScratch/blob/master/Part01/03/Ext-lite.js
You will notice that there is quite a bit of code in this file – this code represents the type of code that is in the Ext JS framework, and will be code that you will NOT have to write – the framework does all of this for you! We only have to write code in the ‘launch’ function of ‘app.js’ – you will see that below.
The ‘index.html’ file now looks like this (notice that now there are NO tags in the body):
Then, in ‘app.js’, we modify the ‘launch’ function so that it looks like this:
Viewport.add({
xtype: ‘grid’,
title: ‘Users’,
columns: [
{text: ‘Name’, width: 100, dataIndex: ‘name’},
{text: ‘Email Address’, flex: 1, dataIndex: ’email’},
{text: ‘Phone Number’, width: 200, dataIndex: ‘phone’}
],
data: data,
listeners: {
select: onSelect
}
});
}
function onSelect(sender, record) {
var r = record[0].data;
var text = r.name+’ – ‘+r.email+’ – ‘+r.phone;
alert(text);
};
var data = [
{ name: ‘Lisa’, email: ‘lisa@simpsons.com’, phone: ‘555-111-1224’ },
{ name: ‘Bart’, email: ‘bart@simpsons.com’, phone: ‘555-222-1234’ },
{ name: ‘Homer’, email: ‘homer@simpsons.com’, phone: ‘555-222-1244’ },
{ name: ‘Marge’, email: ‘marge@simpsons.com’, phone: ‘555-222-1254’ }
]
So now I have a way to define WHAT I want the user interface to look like and should do, not having to worry about HOW the specific HTML is constructed. I would say that makes creating a web application a lot simpler – and that’s exactly what Ext JS is!
Using the Ext JS Framework to create our application
So now (finally!) let’s use the Ext JS Theme and Framework libraries instead of our own libraries – to see the final files, take a look here: https://github.com/mgusmano/ExtJSFromScratch/tree/master/Part01/05
For this example, I have a copy of the Ext JS 6.5.2 framework in a folder called ‘ext-6.5.2’ – to try this, you can use your licensed version of Ext JS or get a trial of the framework at: https://staging.sencha.com/products/extjs/evaluate
First, lets look at the ‘index.html’ file. Line 5 is a link to one of the Ext JS themes, the ‘Material Theme’ (modeled after the Google Material specification). Line 6 is a link to the Ext JS ‘modern’ toolkit (this example refers to the entire framework – in future blog posts (as part of this series) we will look at better ways to include the Ext JS framework in your application). The resulting ‘index.html’ page now looks like this:
The only change in the ‘app.js’ file is that we wrap the launch function in an object parameter to an Ext.application instance (we will explain the reason for that in a future blog).
launch: function () {
Ext.Viewport.add({
xtype: ‘grid’,
title: ‘Users’,
columns: [
{text: ‘Name’, width: 100, dataIndex: ‘name’},
{text: ‘Email Address’, flex: 1, dataIndex: ’email’},
{text: ‘Phone Number’, width: 200, dataIndex: ‘phone’}
],
data: data,
listeners: {
select: onSelect
}
});
}
});
function onSelect(sender, record) {
var r = record[0].data;
var text = r.name+’ – ‘+r.email+’ – ‘+r.phone;
alert(text);
};
var data = [
{ name: ‘Lisa’, email: ‘lisa@simpsons.com’, phone: ‘555-111-1224’ },
{ name: ‘Bart’, email: ‘bart@simpsons.com’, phone: ‘555-222-1234’ },
{ name: ‘Homer’, email: ‘homer@simpsons.com’, phone: ‘555-222-1244’ },
{ name: ‘Marge’, email: ‘marge@simpsons.com’, phone: ‘555-222-1254’ }
]
and the app now looks like this:
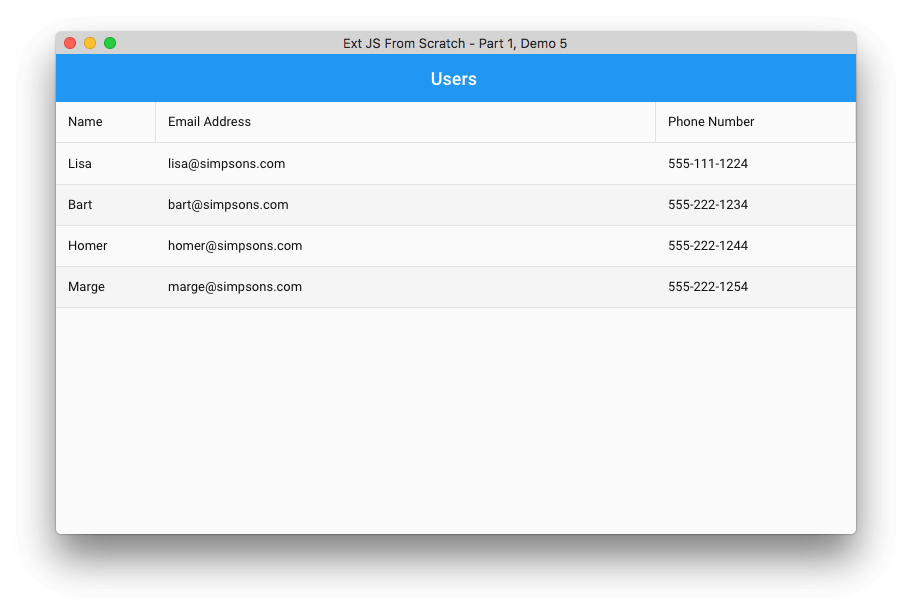
Our first Ext JS application
That’s it – you now have an actual Ext JS application! And it is much more functional than the one we were creating from scratch. The Ext JS Grid has things like sorting, big data handling, column hiding, and much more! If you are curious about all that the Ext JS Grid can do, check out our Kitchen Sink Example at: http://examples.sencha.com/extjs/6.5.1/examples/kitchensink/?modern#grids
All you need to do is modify what is in the ‘launch’ function – the Ext JS framework does the rest.
I assume you’ll want to write a much more complex application that what we wrote here. We’ll have plenty more to cover in the series, but we’ve made a lot of progress so far. Stay tuned for Part 2 of the “Ext JS from Scratch” series, coming soon!
Did you find the content helpful?
 0
0

 0
0

Latest Content

Introducing Rapid Ext JS: The Ultimate Low-Code Editor for Ext JS Development
We’re excited to announce the official release of Rapid Ext JS 1.0, a revolutionary low-code…
August 21, 2024

Sencha Architect 4.3.6 Has Arrived!
The Sencha team is pleased to announce the availability of Sencha Architect version 4.3.6. Building…
August 20, 2024

Introducing ReExt: A Game-Changer for React Developers
Sencha, a leader in JavaScript developer tools for building cross-platform and enterprise web applications, is…
August 20, 2024


