


Productive Enterprise Web Development with Ext JS and Clear Data Builder
April 22, 2013
122 Views
Guest Blog Post
It’s not likely that you’ll start developing an enterprise HTML5 application without using one of the JavaScript frameworks. One of the most feature complete frameworks is Sencha Ext JS. Farata Systems has developed an open source software tool called Clear Toolkit for Ext JS. Clear Toolkit includes an Eclipse plugin called Clear Data Builder. This is a productivity tool — a code generator — that can create a CRUD application for you in no time. This application has an HTML/JavaScript/Ext JS client and Java-based server. In this article, you will learn how to jumpstart development of enterprise web applications.
Part One: Ext JS MVC Application Scaffolding
In Part One, I’ll cover the following topics:
- What is Clear Toolkit for Ext JS
- How to create an Ext JS MVC application for a Java-based project
- How to deploy and run your first Ext JS + Java application on Apache Tomcat server
Clear Toolkit for Ext JS contains the following parts:
- Clear Data Builder (CDB) — Eclipse plugin that supports code generation of Ext JS MVC artifacts based on Java code. CDB comes with wizards to start a new project with plain Java or with popular frameworks like Hibernate, Spring, MyBatis.
- Clear JS — a set of JavaScript components that extend Ext JS standard components. For example, Clear JS contains
- Clear Runtime — Java components that implement the server side of ChangeObject, DirectOptions, etc.
ChangeObject — a universal way to trace the state changes between old and new versions of the same item in a store.
CDB helps you to be more productive which means you write less code and produce results faster. You’ll see how CDB helps you to integrate the client side with the back-end using RPC style and how to implement data pagination for your application.
CDB distribution is available as a plugin for Eclipse IDE. You can download CDB here. The current version is 4.1.4. You can install this plugin via the Install New Software menu in the Eclipse IDE. Figure 1 shows how you can validate the plugin installation. If you see “Clear Data Builder for Ext JS feature” in the list of Installed Software in your Eclipse IDE, you’re good to go.
Important: You must have “Eclipse for Java EE Developers” installed, which includes the plugins for automation of the Web applications.
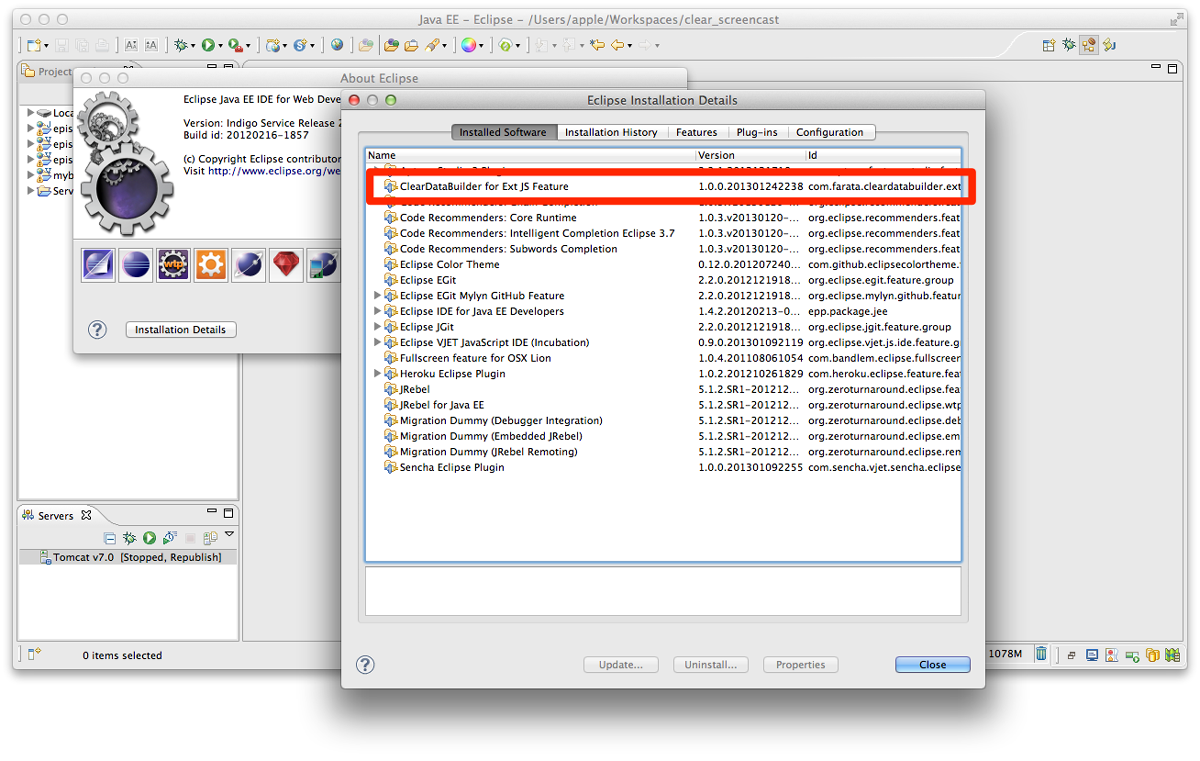
Figure 1. Verifying CDB Installation
Clear Data Builder comes with a set of prepared examples that demonstrate the integration with popular Java frameworks — MyBatis, Hibernate, and Spring. Also, a plain Java project example that doesn’t use any of the frameworks is available. Let’s start with the creation of a new project by selecting the menu File → New → Other → Clear, and then press Next.
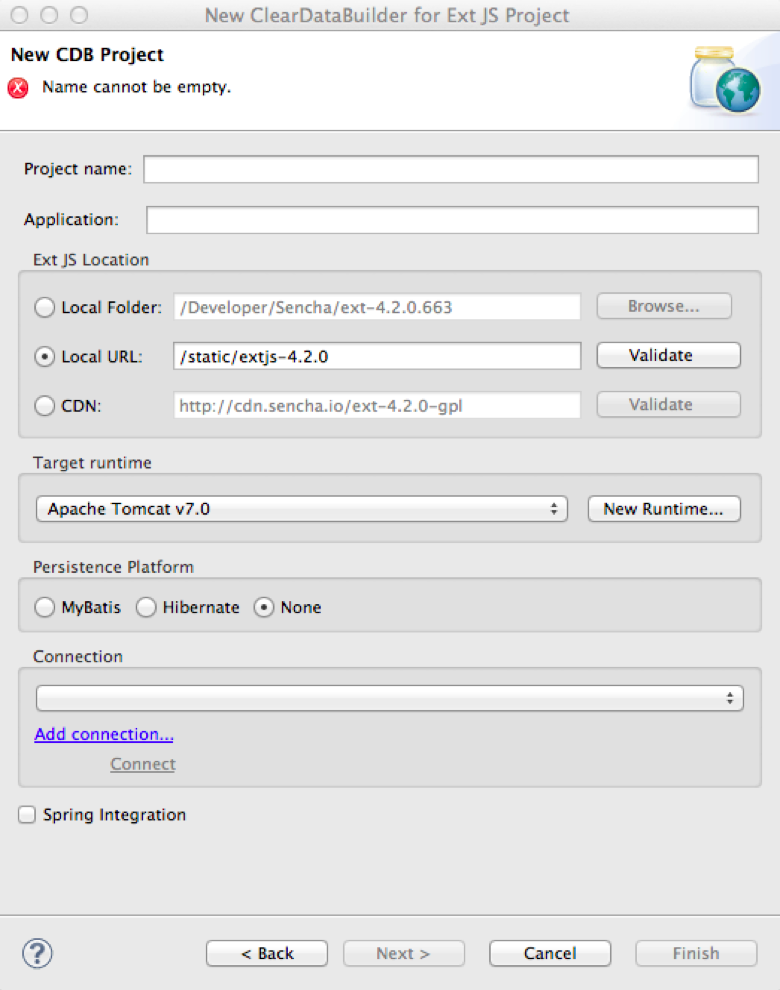
Figure 2. New CDB Project Wizard
First, let’s call the new project episode_1_intro. CDB supports different ways of linking the Ext JS framework to the application. In my case, I have already installed Ext JS libraries under my Web server (Apache Tomcat). I’m going to use this local Ext JS URL, but you can just specify any folder on your machine, and CDB will copy the Ext JS file inside your project. Lastly, you can use Ext JS from the Sencha CDN, if you don’t want to store these libraries inside your project. Besides, using a common CDN will allow the Web browser to reuse the cached version of Ext JS.
For this project, we are not going to use any server side platform (like MyBatis or Hibernate). Just click the Finish button. First, CDB will print some initial messages on the Eclipse console. When CDB runs for the first time, it initializes a directory structure in the WebContent folder. Inside the WebContent directory, CDB creates a directory structure, which is recommended by Sencha for MVC applications. Also, you’ll get the HTML wrapper — index.html — for this application, which contains the link to the entry point of our application.
CDB generates an empty project with one sample controller and one view — Viewport.js. To run this application, you need to add the newly generated Dynamic Web Project to Tomcat and start the server (right-click on the Tomcat in the Servers view of Eclipse).
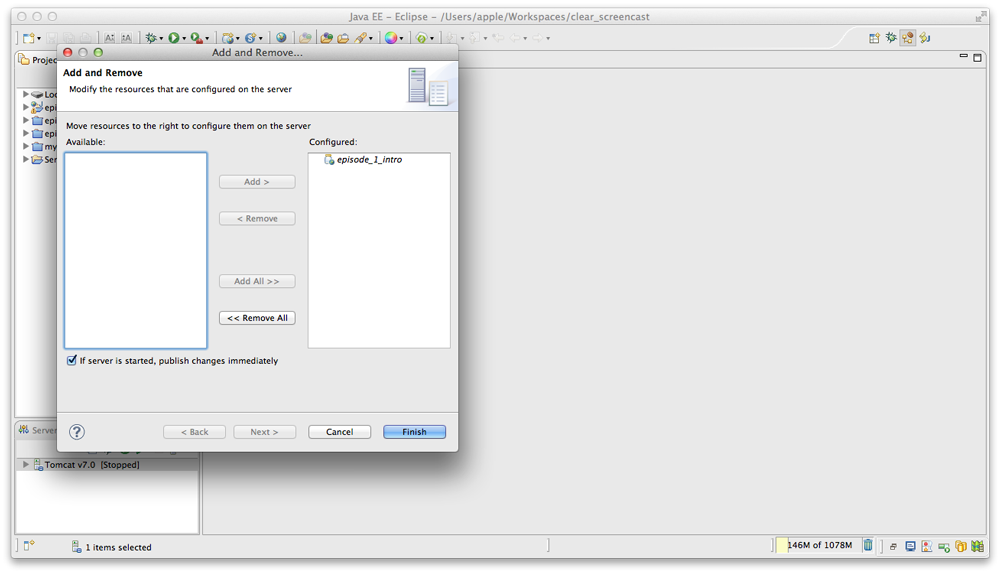
Figure 3. Adding a Web Project to Tomcat
Let’s switch to the web browser to open this application on http://localhost:8080/episode_1_intro . Voila! In just a couple of minutes, we’ve set up a new Dynamic Web Project with the Ext JS framework support and one fancy button on the UI.
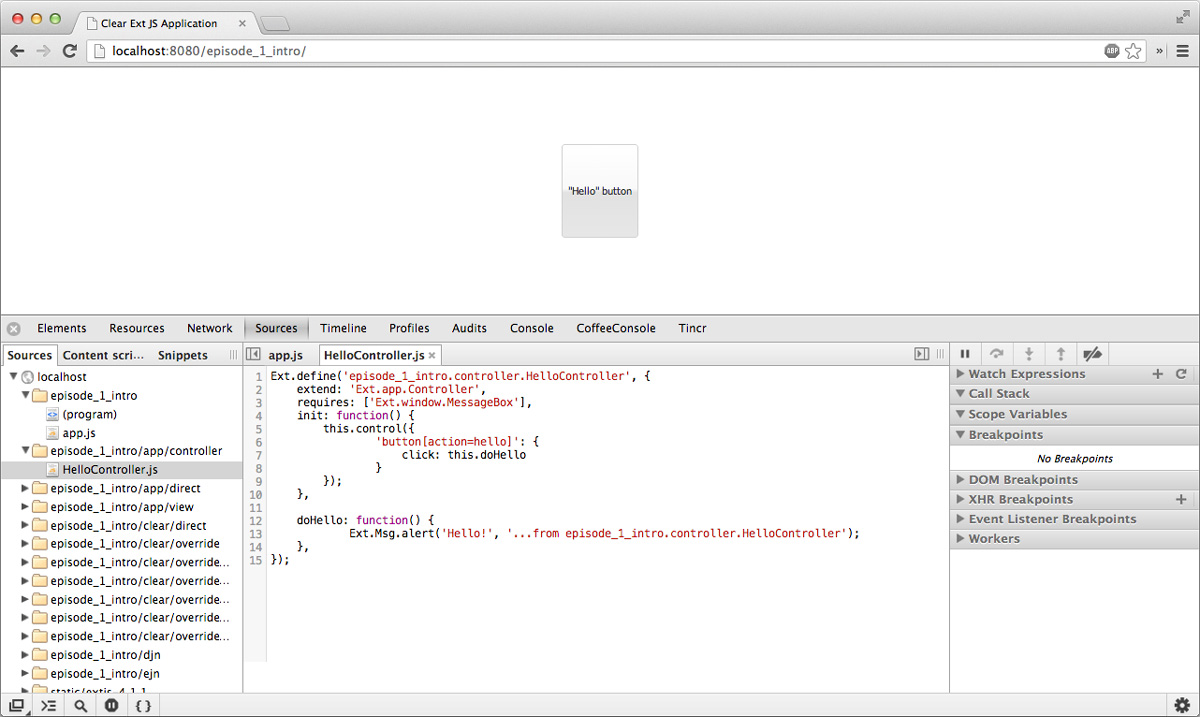
Figure 4. Running a Scaffolded Application
The next step is to make something useful out of this basic application.
Part Two: Generating a CRUD Application
CRUD stands for Create-Retrieve-Update-Delete. It’s a well-known term for describing the applications that support data manipulation. The apps can retrieve data from some data source and update the data too.
In Part Two, I’ll cover the following topics:
- Create a simple CRUD Ext JS + Java application
- Create a POJO and the corresponding Ext.data.Model
- Create a Java service and populate Ext.data.Store with data from the service
- Use the auto-generated Ext JS application
- Extend the auto-generated CRUD methods
- Use ChangeObject
Now, I would like to show you how to use CDB to create a CRUD application. I’ll show you how you can turn your Java POJO class into the Ext JS model. I’ll explain the following:
- How you can populate the Ext JS store from a remote service
- How you can use automatically generated UI for that application
- How you can extend it
- How to use the ChangeObject class
I will extend the application from Part 1. For my CRUD application, I need a Java POJO. First, I’ve created the class Person.java in the package dto. Then I’ve added the fieldsfirstName, lastName, address, ssn and phone and id. Also, I need getters and setters for these fields. It’s good to have a constructor that uses these fields, and a DTO class should have a toString() method.
Now, I need the same corresponding Ext JS model for my Person. I just annotate this class with the CDB annotation called @JSClass to ask CDB to generate the Ext JS model.
Person Data Transfer Object
import com.farata.dto2extjs.annotations.JSClass;
import com.farata.dto2extjs.annotations.JSGeneratedId;
@JSClass
public class Person {
@JSGeneratedId
private Integer id;
private String firstName;
private String lastName;
private String phone;
private String ssn;
public Person(Integer id, String firstName, String lastName, String phone,
String ssn) {
super();
this.id = id;
this.firstName = firstName;
this.lastName = lastName;
this.phone = phone;
this.ssn = ssn;
}
// Getters and Setter are omitted
}
Next, I need to annotate the id field with the CDB annotation @JSGeneratedId. With this annotation, I’ll instruct CDB to treat this field as an auto-generated id. Let’s examine the directory of the Ext JS MVC application and take a look inside the model folder. Inside the model folder (the JavaScript section), we have the folder dto which corresponds to the Java dto package where the class PersonModel.java resides.
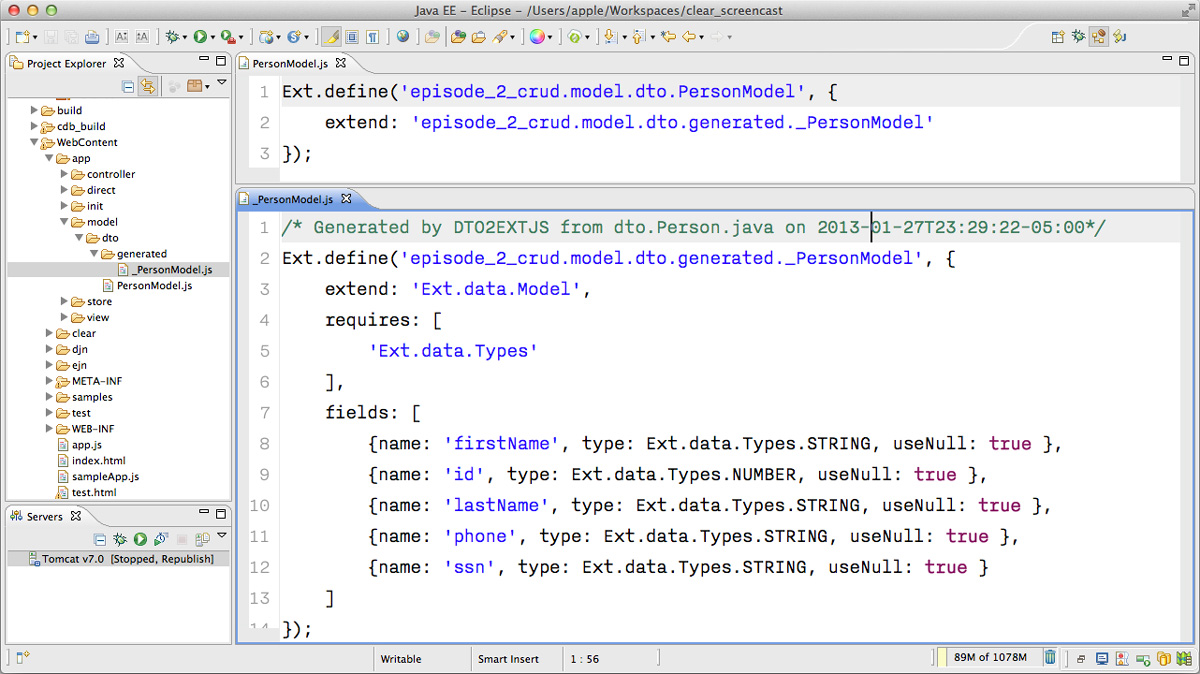
Figure 5. Generated from Java Class Ext JS Model
As you can see Clear Data Builder generated two files as recommended by the Generation Gap pattern, which recommends keeping the generated and handwritten code separate by putting them in different classes, linked by inheritance. Let’s open the Person model. In our case, the PersonModel.js is extended from the generated_PersonModel.js. In case we need to customize this class, we’ll do it inside thePersonModel.js, but this underscore-prefixed file will be regenerated each and every time when we change something in our model. CDB follows this pattern for all generated artifacts — Java services, Ext JS models and stores. This model contains all the fields from our Person DTO.
Now, we need to create a Java service to populate the Ext JS store with the data. Let’s create an interface PersonService in the package service. This service will return the list of persons. This interface contains one method -List<Person> getPersons().
I need to ask CDB to expose this service as a remote object, which is done by the annotation @JSService. Another annotation @JSGenetareStore will instruct CDB to generate the store. In this case, CDB will create the destination-aware store. This means that the store will know from what remote service to populate its content. All configurations of the store’s proxies will be handled by the code generator. With @JSFillMethodannotation, we will identify our main read method (remember the “R” from CRUD).
Also, it would be nice to have some sort of UI to test the service — the annotation @JSGenerateSample will help here. CDB will examine the interface PersonService, and based on these annotations will generate all Ext JS MVC artifacts (models, views, controller) with the sample application.
PersonService Interface Annotated with CDB Annotations
public interface PersonService {
@JSGenerateStore
@JSFillMethod
@JSGenerateSample
List
}
When the code generation is complete, you’ll get the implementation for the service — PersonServiceImpl. The store folder inside the application folder (WebContentapp) has the store, which is bound to the PersonModel. And my person model was generated previously. In this case, Clear Data Builder generated the store that binds to the remote service.
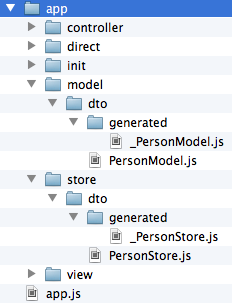
Figure 6. Structure of Store and Model Folders
All of this intermediate translation from the JavaScript to Java and from Java to JavaScript is done by DirectJNgine, which is a server side implementation of the Ext Direct protocol.
There is one more thing you don’t want to miss — Clear Data Builder generated a UI for us! Check out the samples directory shown in Figure 7.
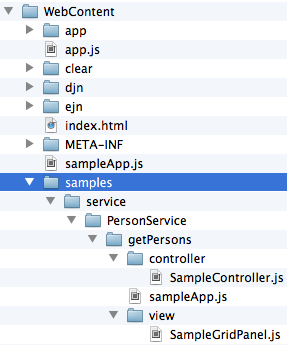
Figure 7. Folder with Generated Samples
You can see the SampleController and SampleGridPanel inside the samples folder. CDB also generates the JavaScript application entry point — sampleApp.js. To test this application, just copy the file SampleController.js into the controller folder, SampleGridPanel.js into the view folder, and the sample application in the root of ourWebContent folder. You need to change the application entry point with sampleApp in index.html.
This is how the generated UI of the sample application looks:
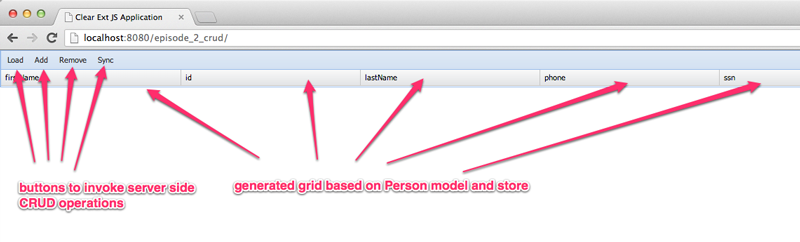
Figure 8. Scaffolded CRUD Application Template
Let’s return to the server side code. For services, CDB also follows the Generation Gap Pattern, and it generated stubs for the service methods. Override these methods when you’re ready to implement the CRUD functionality.
Implementation of PersonService Interface
import java.util.ArrayList;
import java.util.List;
import clear.data.ChangeObject;
import dto.Person;
import service.generated.*;
public class PersonServiceImpl extends _PersonServiceImpl { // 1
@Override
public List
List
Integer id= 0;
result.add(new Person(++id, “Joe”, “Doe”, “555-55-55”, “1111-11-1111”));
result.add(new Person(++id, “Joe”, “Doe”, “555-55-55”, “1111-11-1111”));
result.add(new Person(++id, “Joe”, “Doe”, “555-55-55”, “1111-11-1111”));
result.add(new Person(++id, “Joe”, “Doe”, “555-55-55”, “1111-11-1111”));
return result; // 3
}
@Override
public void getPersons_doCreate(ChangeObject changeObject) { // 4
Person dto = (Person) deserializeObject(
(Map
Person.class);
System.out.println(dto.toString());
}
@Override
public void getPersons_doUpdate(ChangeObject changeObject) { // 5
// TODO Auto-generated method stub
super.getPersons_doUpdate(changeObject);
}
@Override
public void getPersons_doDelete(ChangeObject changeObject) { // 6
// TODO Auto-generated method stub
super.getPersons_doDelete(changeObject);
}
}
- We need to extend the generated class and provide the actual implementation.
- getPerson is our retrieve method (the R in CRUD).
- For this sample application, we can use java.util.ArrayList class as the in-memory server side storage of the Person objects. In real world applications, you’d use a database or other persistent storage.
- fillmethod+doCreate() is our create method (the C in CRUD).
- fillmethod+doUpdate is our update method (the U in CRUD).
- fillmethod+doDelete is our delete method (the D in CRUD).
Click on the Load menu, and you’ll get 4 persons from our server.
To demonstrate the rest of the CRUD methods, we’ll ask the user to insert one new row, modify three existing ones and remove two rows using the generated Web client. The Clear.data.DirectStore object will automatically create a collection of six ChangeObject’s — one to represent a new row, three to represent the modified ones and two for the removed rows.
When the user clicks on the Sync menu, the changes will be sent to the corresponding do… remote method. When you sync(), a standard Ext.data.DirectStoreExtJS is POST-ing new, modified and deleted items to the server. When the request is complete, the server’s reply data is applied to the store, expecting that some items can be modified by the server. In the case of Clear.data.DirectStore, instead of passing around items, we pass the delta, wrapped in the ChangeObject.
Each instance of the ChangeObject contains the following:
- newVersion — it’s an instance of the newly inserted or modified item. On the Java side, it’s available via getNewVersion().
- prevVersion — it’s an instance of the deleted old version of the modified item. On the Java side, it’s available via getPrevVersion().
- array of changepropertyNames — this ChangeObject represents an update operation.
The rest of ChangeObject details are described in the Clear Data Builder wiki on Github (see the Useful Links section below).
The corresponding Java implementation of ChangeObject is available on the server side, and Clear Toolkit passes ChangeObject instances to the appropriate do* method of the service class. Take a look at the getPersons_doCreate() method from the code sample above. When the server needs to read the data that arrived from the client, your Java class has to invoke the method changeObject.getNewVersion(). This method will return the JSON object that you need to deserialize into the object Person. This is done in the code sample above and looks like this:
(Map
When the new version of the Person object is extracted from the ChangeObject, you can do whatever has to be done to persist it in the appropriate storage. In our example, we just print the new person information on the server side Java console. This is why we said earlier, that it may be a good idea to provide a pretty printing feature on the class Person by overriding method toString(). Similarly, when you need to do a delete, the changeObject.getPrevVersion() would give you a person to be deleted.
Part Three: Data Pagination
The pagination feature is needed in almost every enterprise web application. Often, you don’t want to bring all the data to the client at once — a page by page feed is a lot more responsive. The user can navigate back and forth between the pages using pagination UI components. To do that, we need to split our data on the server side into chunks, so we can display it when the specific page is required.
In Part Three, I’ll cover Implementing Pagination including:
- Add the data pagination to our sample CRUD Ext JS + Java application:
- Add the Ext.toolbar.Paging component
- Bind both grid and pagingtoolbar to the same store
- Use DirectOptions class to read the pagination parameters
We are going to extend our CRUD application by adding the paging toolbar component bound to the same store as the grid. The class DirectOptions will handle pagination parameters on the server side.
In Parts 1 and 2, you learned how to generate the UI from the Java back-end service and how to generate the Ext JS store and Ext JS model. In this part, you’ll learn how to add the pagination functionality to your CRUD application by asking the server to send only portions of the data. We’ll need to refactor the service code from the previous example to generate a little bit more data than the five records.
Refactored implementation of PersonService Interface
@Override
public List
List
for (int i=0; i<1000; i++){ result.add(new Person(i, "Joe", "Doe", "555-55-55", "1111-11-1111")); } return result; } }
The Google Chrome Console shows that PersonStore was populated with one thousand records. Let’s add the pagination component using the Ext toolbarpagingcomponent, and let’s add it to the file sampleApp.js above.
Sample Application Entry
disableCaching : false,
enabled : true,
paths : {
episode_3_pagination : ‘app’,
Clear : ‘clear’
}
});
Ext.syncRequire(‘episode_3_pagination.init.InitDirect’);
// Define GridPanel
var myStore = Ext.create(‘episode_3_pagination.store.dto.PersonStore’,{}); // 1
Ext.define(‘episode_3_pagination.view.SampleGridPanel’, {
extend : ‘Ext.grid.Panel’,
store : myStore,
alias : ‘widget.samplegridpanel’,
autoscroll : true,
plugins : [{
ptype : ‘cellediting’
}],
dockedItems: [
{
xtype: ‘pagingtoolbar’, // 2
displayInfo: true,
dock: ‘top’,
store: myStore // 3
}
],
columns : [
{header : ‘firstName’, dataIndex : ‘firstName’, editor : {xtype : ‘textfield’}, flex : 1 },
{header : ‘id’, dataIndex : ‘id’, flex : 1 },
{header : ‘lastName’, dataIndex : ‘lastName’, editor : {xtype : ‘textfield’}, flex : 1 },
{header : ‘phone’, dataIndex : ‘phone’, editor : {xtype : ‘textfield’}, flex : 1 },
{header : ‘ssn’, dataIndex : ‘ssn’, editor : {xtype : ‘textfield’}, flex : 1 }],
tbar : [
{text : ‘Load’, action : ‘load’},
{text : ‘Add’, action : ‘add’},
{text : ‘Remove’, action : ‘remove’},
{text : ‘Sync’, action : ‘sync’}
]
});
// Launch the application
Ext.application({
name : ‘episode_3_pagination’,
requires : [‘Clear.override.ExtJSOverrider’],
controllers : [‘SampleController’],
launch : function() {
Ext.create(‘Ext.container.Viewport’, {
items : [{
xtype : ‘samplegridpanel’
}]
});
}
});
- Let’s manually instantiate this store — create a separate variable myStore for this store with an empty config object.
- Add the xtype pagingtoolbar to this component docked items property — I’d like to display the information and dock this element at the top.
- Now, the paging toolbar is also connected to same store.
Next, we need to fix the automatically generated controller to control loading of data on the click of the Load button.
Controller for Sample Application
extend: ‘Ext.app.Controller’,
stores: [‘episode_3_pagination.store.dto.PersonStore’],
refs: [{ // 1
ref: ‘ThePanel’,
selector: ‘samplegridpanel’
}],
init: function() {
this.control({
‘samplegridpanel button[action=load]’: {
click: this.onLoad
}
});
},
onLoad: function() {
// returns instance of PersonStore
var store = this.getThePanel().getStore(); // 2
store.load();
}
});
- We can bind the store instance to our grid panel. In the controller’s refs property, I’m referencing our simplegrid panel with ThePanel alias.
- In this case, I don’t need to explicitly retrieve the store instance by name. Instead, we can use getters getPanel() and getStore() automatically generated by the Ext JS framework.
When the user clicks the button next or previous, the method loadPage of the underlying store is called. Let’s examine the directprovider URL — server side router of remoting calls — and see what the direct request looks like. Open Google Chrome Developer Tools from the menu, View → Developer, refresh the Web page and go to the Network tab. You’ll see that each time the user clicks on the next or previous buttons on the pagination toolbar, the component sends directOptions as a part of the request.
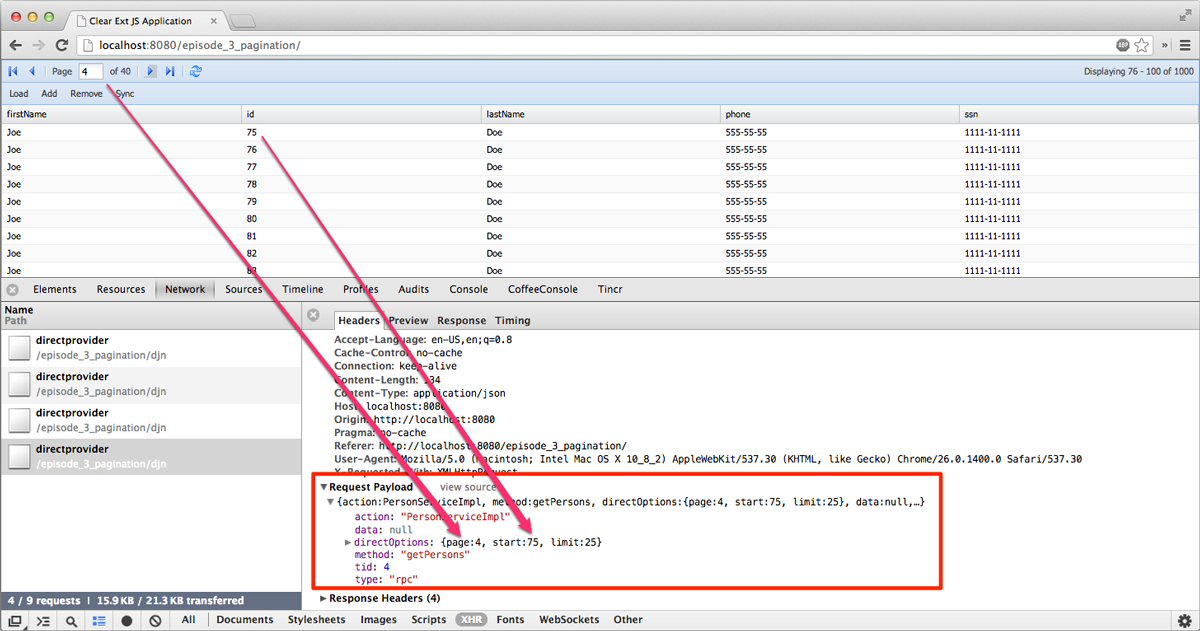
Figure 9. Request Payload Details
The default Ext Direct request doesn’t carry any information about page size. Clear JS, the client side extension of the Ext JS framework, adds some extra functionality to the Ext.data.DirectStore component to pass the page start and limit values to the server side. At this point, the directOptions request property shown in Figure 9 can be extracted on the server side to get the information about the page’s boundaries. Let’s return to the code of PersonServiceImpl and add some extra code there. Right now, the pagination doesn’t work. The server sends the entire thousand records, because the server is not aware that the data has to be paginated. We’ll fix it in the code below.
Implementation of PersonService with Pagination
import java.util.ArrayList;
import java.util.List;
import clear.djn.DirectOptions; // 1
import dto.Person;
import service.generated.*;
public class PersonServiceImpl extends _PersonServiceImpl {
@Override
public List
List
for (int i=0; i<1000; i++){
result.add(new Person(i, "Joe", "Doe", "555-55-55", "1111-11-1111"));
}
// 2
int start = ((Double)DirectOptions.getOption("start")).intValue();
int limit = ((Double)DirectOptions.getOption("limit")).intValue();
limit = Math.min(start+limit, result.size() ); // 3
DirectOptions.setOption("total", result.size()); // 4
result = result.subList(start, limit); // 5
return result;
}
}
- On the server side, there is a special object called DirectOptions, which comes with Clear Toolkit.
- We’re interested in start and in limit options (see Figure 9).
- Calculate the actual limit. Assign the size of the data collection to the limitvariable if it’s less than the page size (start+limit).
- Notify the component about the total number of elements on the server side by using DirectOptions.setOption() method with total option.
- Before returning the result, create a subset, an actual page of data. In this case, we need to use the method java.util.List.sublist(), which produces the view of the portion of this list between indexes specified by the start and the limitparameters.
If you’d like to repeat all of the above steps on your own, watch the screencasts where I perform all the actions described in this article.
The source code is hosted on SourceForge as part of the Clear Toolkit Project under the MIT license.
Conclusion
The development of an enterprise web application involves many steps that need to be done by the developer. But with the right set of tools, the repetitive steps can be automated. Remember the DRY principle — don’t repeat yourself. Try to do more with less effort.
Additional Useful Links
- Clear Toolkit on Github
- Clear Data Builder Eclipse update site
- Ext JS MVC Application Architecture
- Ext.data.Model
- Ext.data.Store
- Ext JS Grid Panel
- Ext.toolbar.Paging
- Ext Direct
- DirectJNgine: Direct for Java
- Change Object: Synchronization Keystone
- Data Pagination in Clear Toolkit
- Farata YouTube channel
Did you find the content helpful?
 0
0

 0
0

Latest Content

Introducing Rapid Ext JS: The Ultimate Low-Code Editor for Ext JS Development
We’re excited to announce the official release of Rapid Ext JS 1.0, a revolutionary low-code…
August 21, 2024
Sencha Architect 4.3.6 Has Arrived!
The Sencha team is pleased to announce the availability of Sencha Architect version 4.3.6. Building…
August 20, 2024

Introducing ReExt: A Game-Changer for React Developers
Sencha, a leader in JavaScript developer tools for building cross-platform and enterprise web applications, is…
August 20, 2024


