Sencha Test Tip of the Week Summary for April 2017
Last quarter, we launched our Sencha Test Tip of the Week emails. Our Tip of the Week provides you with a variety of best practices and tips and tricks, so you can get up to speed quickly on using Sencha Test. Our topics for April included:
- Refactor Tests Using Page Objects Pattern
- Test a ComboBox Using the Sencha Test API
- Test a CheckBox Using the Sencha Test API
- How to Test an Ext JS Package
If you’re interested in reading the tips, sign up to receive the emails or check back here the first week of each month where we’ll be posting a monthly roundup.
Tip of the Week #1: Refactor Tests Using Page Objects Pattern
Setting Up Your Test Environment
This blog post explains how to set up the environment and get the first test, if you have not done it already.
Now that you’ve gotten your test environment set up and have the first test running properly, you’re ready to refactor the test code using Page Objects Design Pattern.
Refactoring a Test Using Page Objects Pattern and Sencha Test API
Go to the sample application that I’m using for this demo. In this test, I’ll show you how to refactor tests written using Sencha Test APIs by leveraging Page Objects Pattern for the test case below:
- Navigate to the “Email” page from the “Dashboard”.
- Click on the “Compose” button.
- Type a value in the “Subject Field”.
- Check if the “Discard” button is enabled.
- Click on the “Discard” button.
Test Code
Go to this GitHub repo to get the test code, and follow these steps to add the new test as a separate Jasmine Suite in the existing workspace.
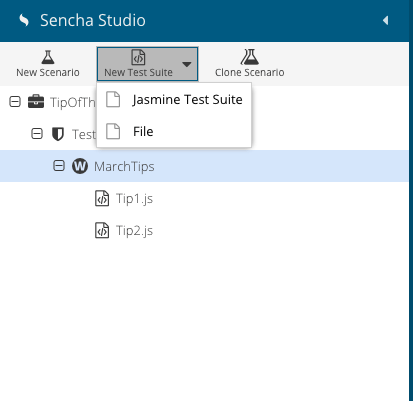
- Using Sencha Studio, add a new Jasmine Test Suite within the March Tips scenario.
- Name the Suite Tip2.js.
- Copy and paste the code into the editor from the GitHub file that you just downloaded.
Now that the test code has been added to the workspace, it’s time to execute the test created as part of Tip2.
In the Test Runner, select the Chrome browser and select just one test, Tip2.
Use this test code against the sample application provided for Ext JS 6.2, and try out the APIs with your tests.
Tip of the Week #2: Test a ComboBox Using the Sencha Test API
Go to the sample in the kitchen sink that I’m using for this demo. In this test, I’ll show you how to test a ComboBox:
- Launch the kitchen sink page that has the ComboBox.
- Select a value from the ComboBox.
- Check if the value is displayed in the “Selected State” field.
APIs Used
ST.comboBox, ST.field
Test Code
Go to this GitHub repo to get the test code, and follow these steps to add the new test as a separate Scenario and a Jasmine Suite in the existing workspace:
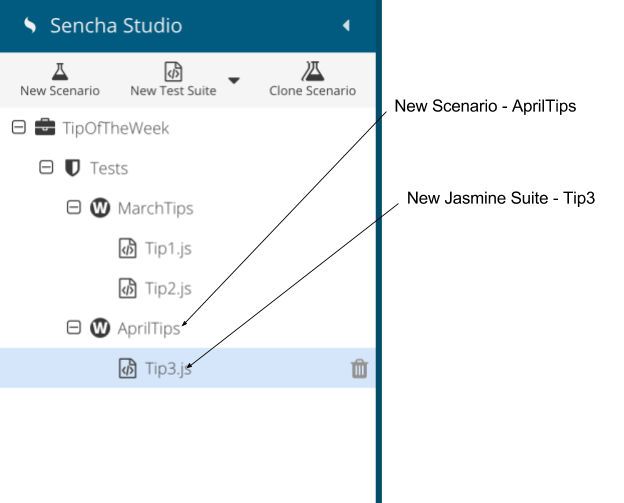
- Using Sencha Studio, create a new test scenario.
- In the advanced section, provide a name for the scenario.
- Input the URL of the ComboBox sample from kitchen sink.
- Add a new Jasmine Test Suite within the new scenario.
- Name the Suite Tip3.js.
- Copy and paste the code into the editor from the GitHub file that you just downloaded.
Now that the test code has been added to the workspace, it’s time to execute the test created as part of tip3.
In the Test Runner, click on the scenario name AprilTips, select the Chrome browser and select the test, Tip3.
Use this test code against the kitchen sink sample provided for Ext JS 6.2, and try out the APIs with your tests.
Tip of the Week #3: Test a CheckBox Using the Sencha Test API
Go to the sample in kitchen sink that I’m using for this demo. In this test, I’ll show you how to test a CheckBox:
- Launch the kitchen sink page that has the CheckBox.
- Check a few fields and uncheck a few others.
- Use the built-in method in the Sencha Test API to validate the correct behavior.
APIs Used
ST.checkBox, ST.navigate
Test Code
Go to this GitHub repo to get the test code, and follow these steps to add the new test as a separate scenario and add a Jasmine Suite in the existing workspace:
- Using Sencha Studio, add a new Jasmine suite under an existing scenario.
In this case, I have added it under the April Tips scenario that we created in the previous tip. - Don’t worry about adding the URL for this example. We will handle it using the API ST.navigate within the test code.
- Name the Suite Tip4.js.
- Copy and paste the code into the editor from the GitHub file that you just downloaded.
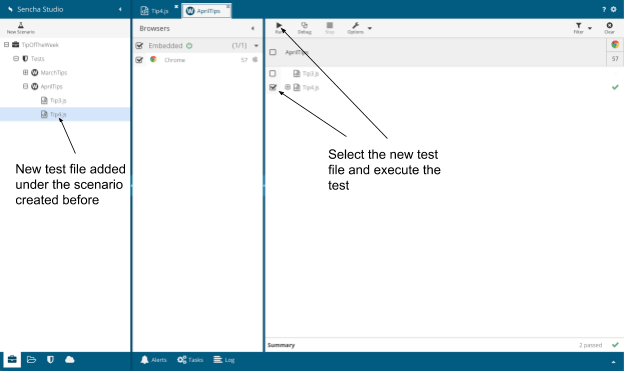
Now that the test code has been added to the workspace, it’s time to execute the test created as part of Tip4.
In the Test Runner, click on the scenario named AprilTips, select the Chrome browser, and select the test, Tip4.
Use this test code against the kitchen sink sample provided for Ext JS 6.2, and try out the APIs with your tests.
Tip of the Week #4: How to Test an Ext JS Package
Requirements for this Demo Test:
- Make sure you have the latest version of the Ext JS framework, so the code will work well.
- Make sure you have Sencha Cmd 6.2 installed and added to your path.
Test an Ext JS Package
Packages simply hold code or themes that are available for multiple applications in the workspace. These packages never need to be distributed (beyond source control) to provide value to your development. You can test packages that hold code for custom components, themes, or anything in the form of an Ext JS class.
In Sencha Test, the Ext class can be instantiated in isolation and tested without having to launch the entire application.
Get the source and test code from the GitHub repo that I’m using for this demo. In this test, I’ll show you how to test a package without launching the entire application:
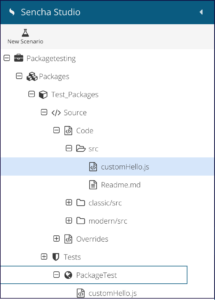
- Launch Sencha Studio and click Open Project; navigate to the directory where the package code was downloaded from GitHub.
- The Sample Package should now be available in Sencha Studio.
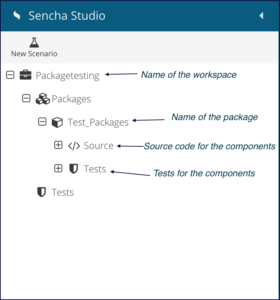
- The workspace will have the packages node under which the multiple packages can be generated. In this case, we just have the one package “Test_Packages”.
- The source code and tests for the package, “Test_Packages”, reside at the same level.
- You’ll find “customHello.js” inside the src directory. This contains the code for the Ext class.
- Run a development build using Sencha Cmd.
- Once the build is complete, click on the Tests folder under the same node.
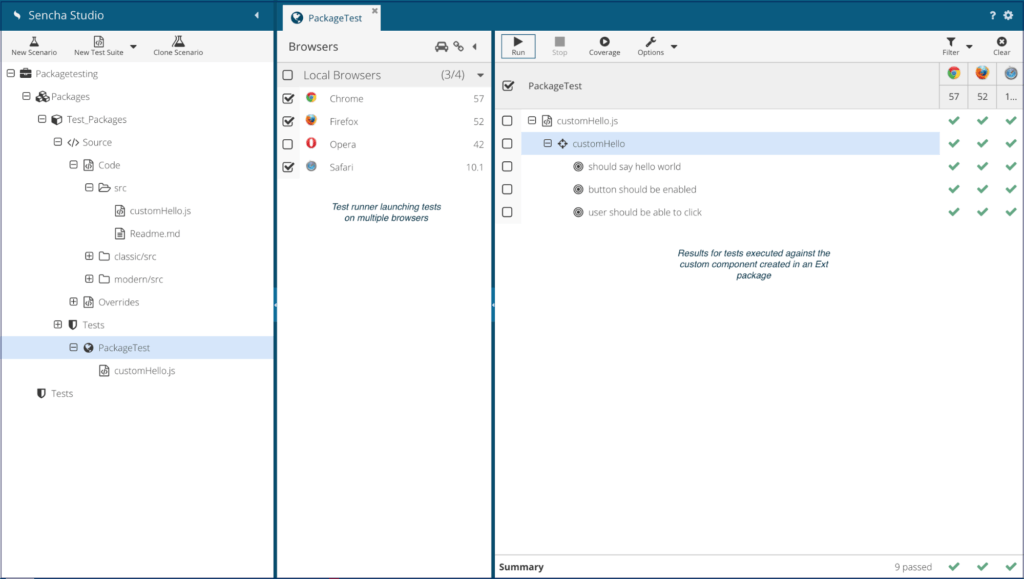
- You’ll find a scenario “PackageTest” and a new Jasmine suite with a file name “customHello.js”.
APIs Used
ST.component, ST.button
Test Code
In the Test Runner, click on the scenario named PackageTest, select multiple browsers, and click on Run.
That’s it. You now have the results from testing an Ext JS Package.
If you’re using packages to share code among Ext JS applications, testing them in isolation can save a lot of time. Tests run a lot faster, and most of the bugs can be detected and fixed much earlier in the cycle.
Share Your Feedback
Get more information about other Sencha Test APIs. Share your feedback and questions in the Sencha Test forum.
Get More Tips
Want to receive the Sencha Test Tip of the Week emails? Sign up now.
Happy Testing!

We’re excited to announce the official release of Rapid Ext JS 1.0, a revolutionary low-code…

The Sencha team is pleased to announce the availability of Sencha Architect version 4.3.6. Building…

Sencha, a leader in JavaScript developer tools for building cross-platform and enterprise web applications, is…


