

 Rapid Ext JS


Sencha Test Tip of the Week Summary for May 2017
June 6, 2017
184 Views

Our Sencha Test Tip of the Week emails provide you with a variety of best practices and tips and tricks, so you can get up to speed quickly on using Sencha Test. Our topics for May included:
- How to Execute Tests on Multiple Browsers Simultaneously Using Selenium Grid
- How to Execute Tests on Multiple Browsers Simultaneously Using a Browser Farm
- How to Execute Tests Using Headless Chrome with Sencha Test
If you’re interested in getting the tips, sign up to receive the emails. Or, you can check back here the first week of each month, where we’ll post a monthly roundup.
Tip of the Week #1: How to Execute Tests on Multiple Browsers Simultaneously Using Selenium Grid
There are four ways to run tests on multiple browsers. You can choose from:
- Sencha Studio Test Runner on local browsers
- Sencha Studio Test Runner on an embedded browser/Selenium configuration
- Selenium Grid infrastructure
- Browser Farm such as Sauce Labs or BrowserStack
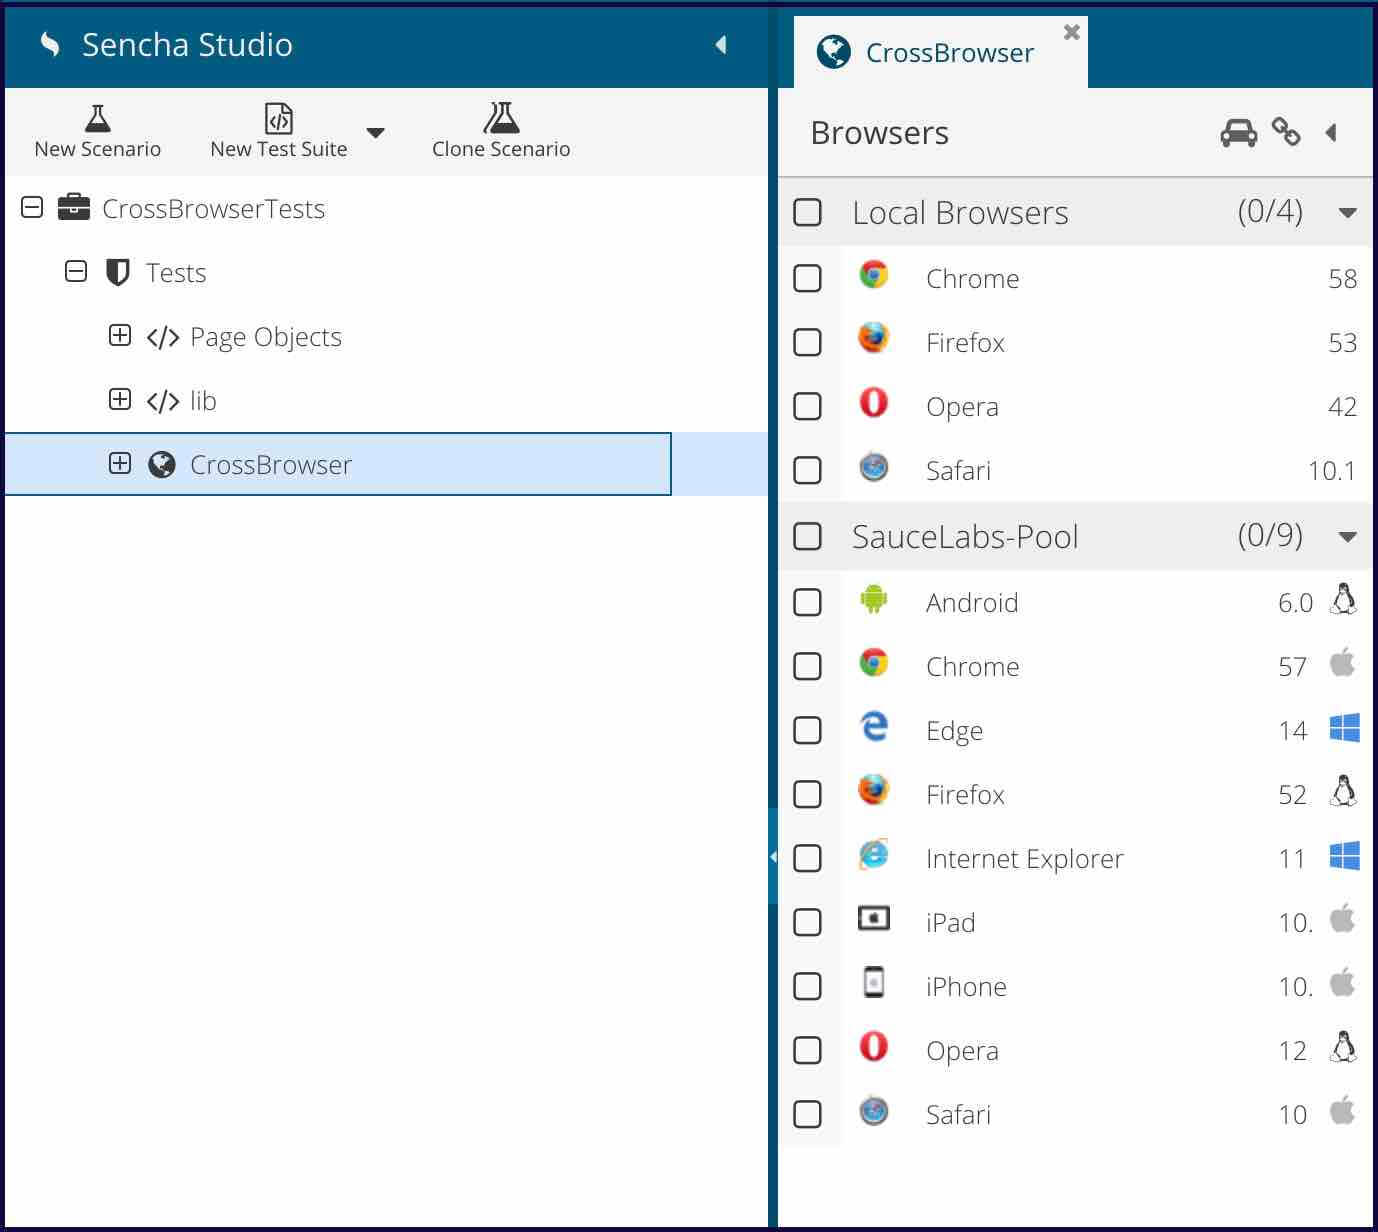
Cross Browser Test Execution – In-Browser Scenario
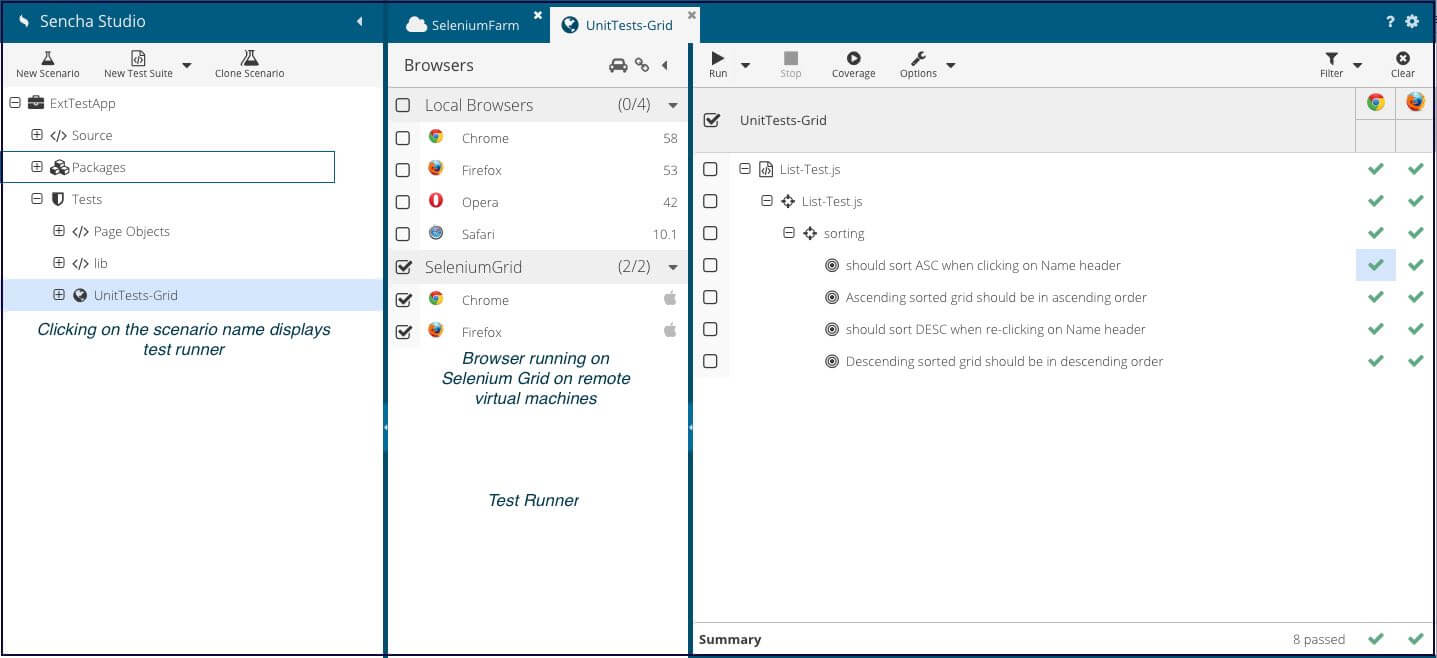
Sencha Studio’s Test Runner is a very powerful component. If you’re testing a single page application, you can simply create an in-browser scenario, and the Test Runner will automatically scan and make all major local browsers available for test execution.

Now, simply select the browser you want or select-all and execute tests. This is the easiest way to execute tests on multiple browsers simultaneously.
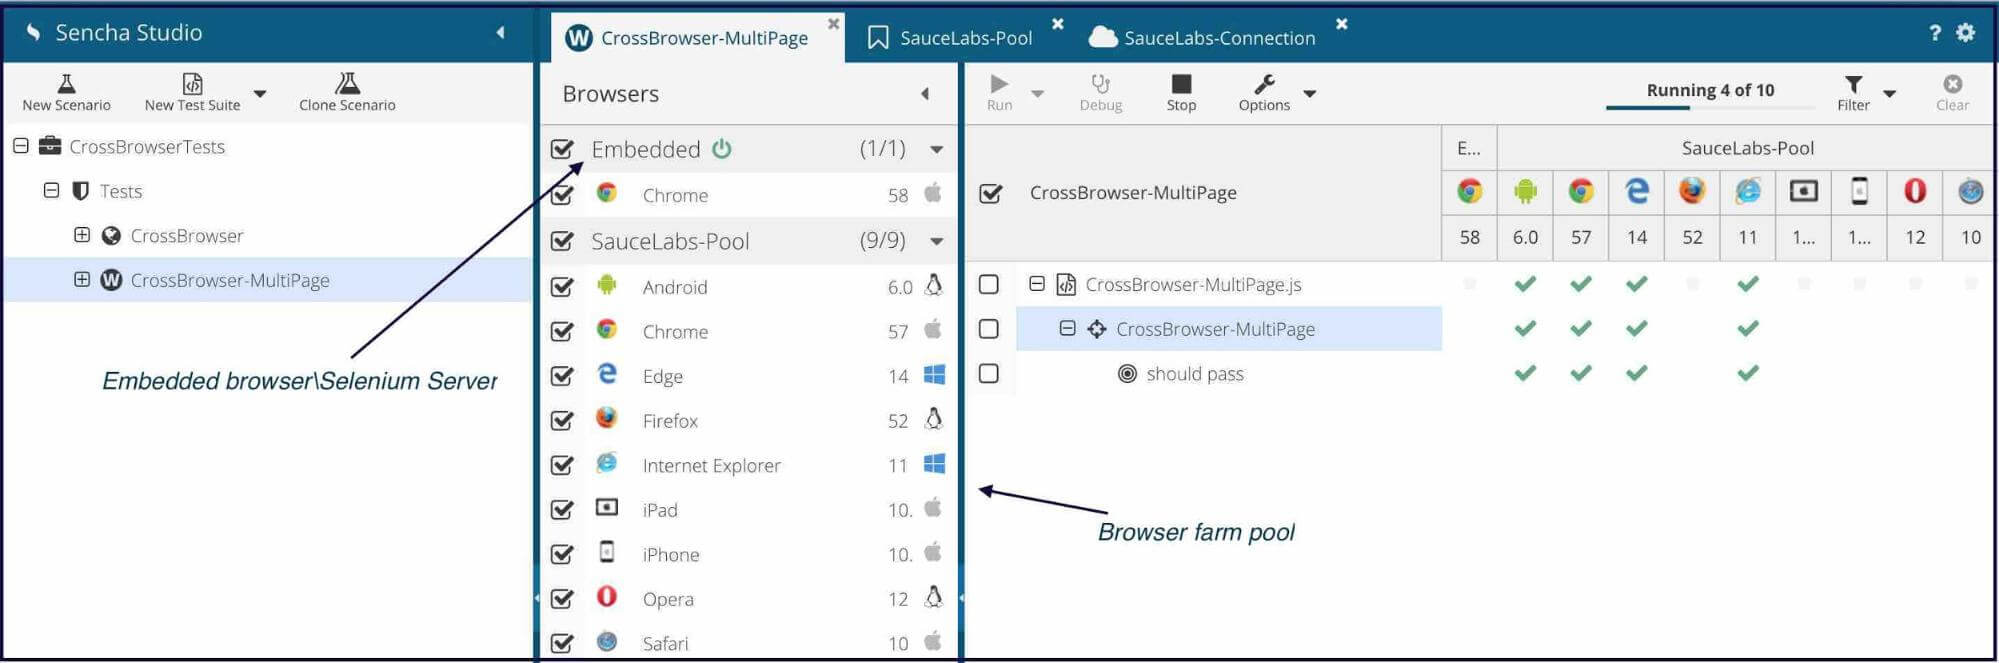
Cross-Browser Test Execution – WebDriver Scenario
If you’re testing a multi-page application, the in-browser scenario is not the best solution. Instead, start by creating a WebDriver scenario in Sencha Studio. If you’re running in developer mode, the option to choose a WebDriver scenario will be under the “Scenario Settings > Advanced” section. If you’re running in test automation engineer mode, “WebDriver” is the only available scenario.
The Test Runner has an embedded browser (Chrome) and an embedded Selenium server within Sencha Studio. This allows you to execute and debug tests before running them on multiple browsers. In order to run tests on multiple browsers simultaneously, you need a Selenium Grid or a connection to a browser farm. Sencha Test has been configured to work out-of-the-box with Selenium Grid and browser farms. Sencha Studio provides an easy way to enter the required credentials to access the grid or farm and start using it very quickly. We’ll look at how to execute tests on Selenium Grid.
Download Selenium Servers and Browser Drivers
Download the Selenium servers and browser drivers needed for test execution from the SeleniumHQ website. There are clear instructions on how to set up the jar files and browser drivers.
In order to set up a grid infrastructure, multiple virtual machines (VMs) are required. Designate one VM as the hub and the other VMs as the nodes. We recommend you run one browser per machine. For some tests, browsers need focus, and running multiple browsers on one machine can create false failures. Also, complex tests can make machines slower as browsers compete for machine resources.
How to Start the Selenium Grid
- The grid has to be started by designating one VM as a hub using the following command:
java -jar selenium-server-standalone-3.4.0.jar -role hub - Once the hub has been started, launch a VM, start the node, and register it with the hub:
java -jar selenium-server-standalone-3.4.0.jar -role node -hub http://<ip of the hub>:4444/grid/register - Now, the hub and all the nodes are set up and running. On the machine that is designated as the hub, navigate to http://localhost:4444/wd/hub/ and create a session by selecting the browsers that are installed as part of the grid. If you’re successful, the Selenium infrastructure and browser drivers are now set up properly.
Connecting the Selenium Grid with Sencha Test
- In Sencha Studio, navigate to the “Browsers” tab.
- Click on the “Add” button and select “Generic Farm”.
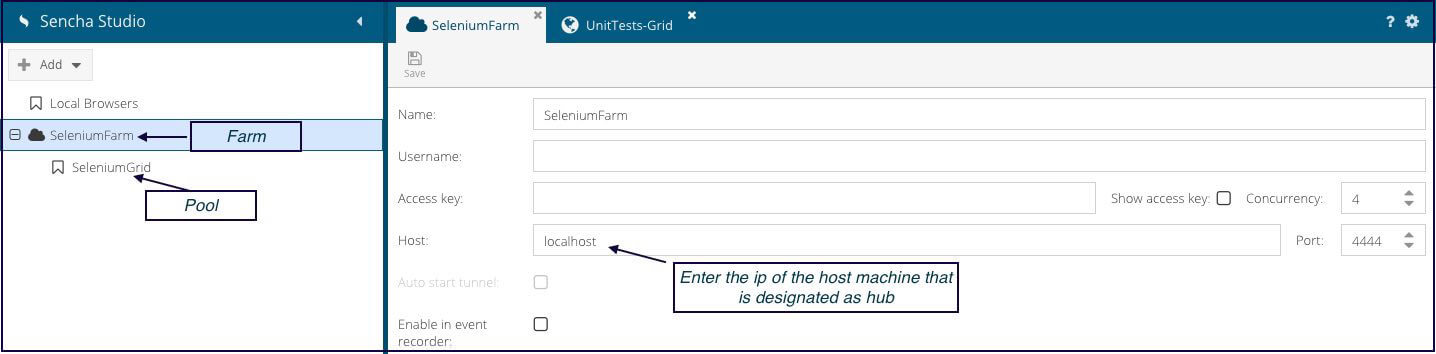
- Provide a name for the browser farm. In this case, we’re calling it “SeleniumFarm”.
- A success message will be displayed.
- Once the farm is created, click on it and a screen with user credential information will be displayed.
- Enter the hostname (IP of the machine designated as the hub) and the port (4444 – default for Selenium).
- Select the total number of VMs to be spun up for test execution.

Creating the Pool
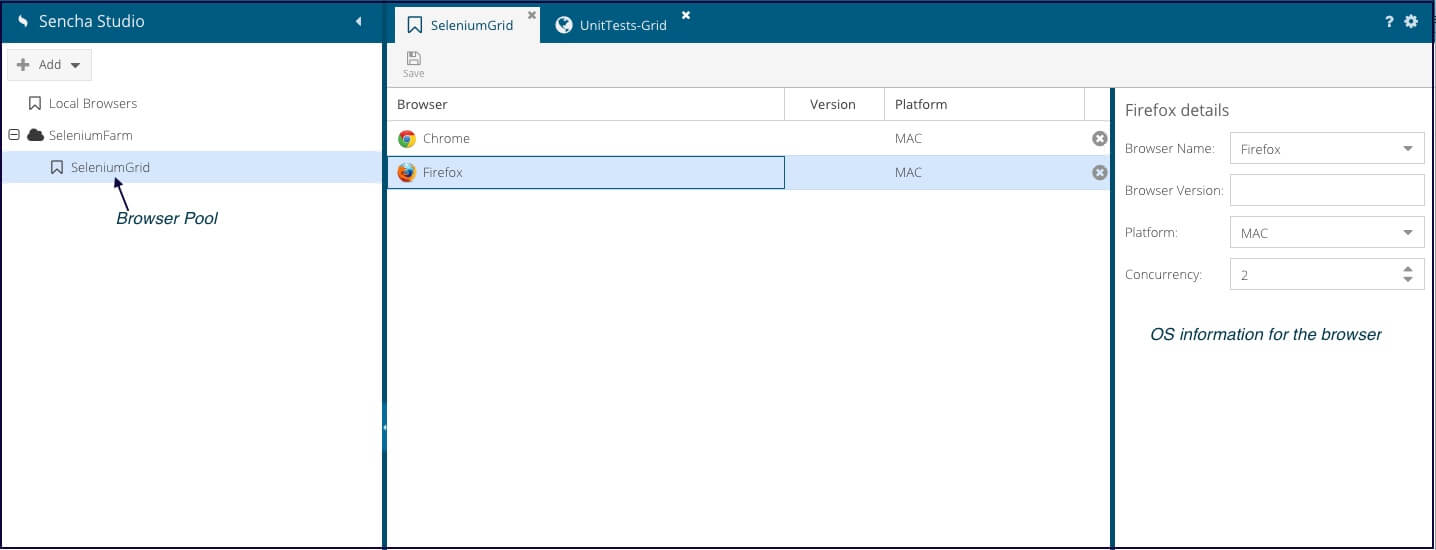
Now that the farm is created, we need to select the browsers that we want to test against and create a pool. The pool name (SeleniumGrid) will be used for running tests from Sencha Studio Test Runner as well as Sencha Test Command Line Interface (CLI).
- Create a pool and make sure that it’s stored within the workspace.
- Once the pool is added successfully, add browsers to the pool.
- Provide some basic information about browsers that you’re selecting, e.g. browser version, operating system, etc.
- Click Save.
- Add all the required browsers and save the config.
Note
When browsers are being added to the pool, make sure that the correct OS is selected from the dropdown. This way the hub gets the correct config details for the browser/OS combination.
Cross-browser test automation is very important, especially for consumer-facing applications. Sencha Test allows you to run the same test across multiple browsers without having to explicitly code browser-specific instructions.
Tip of the Week #2: How to Execute Tests on Multiple Browsers Simultaneously Using a Browser Farm
Sencha Test has been configured to work out-of-the-box with Selenium Grid and Browser Farms. Sencha Studio provides an easy way to enter the required credentials to access the grid or farm and start using it very quickly. We’ll look at how to execute tests on browser farms.
Creating the Browser Farm
- In Sencha Studio, navigate to the “Browsers” tab
- Click on the “Add” button and select Sauce Labs
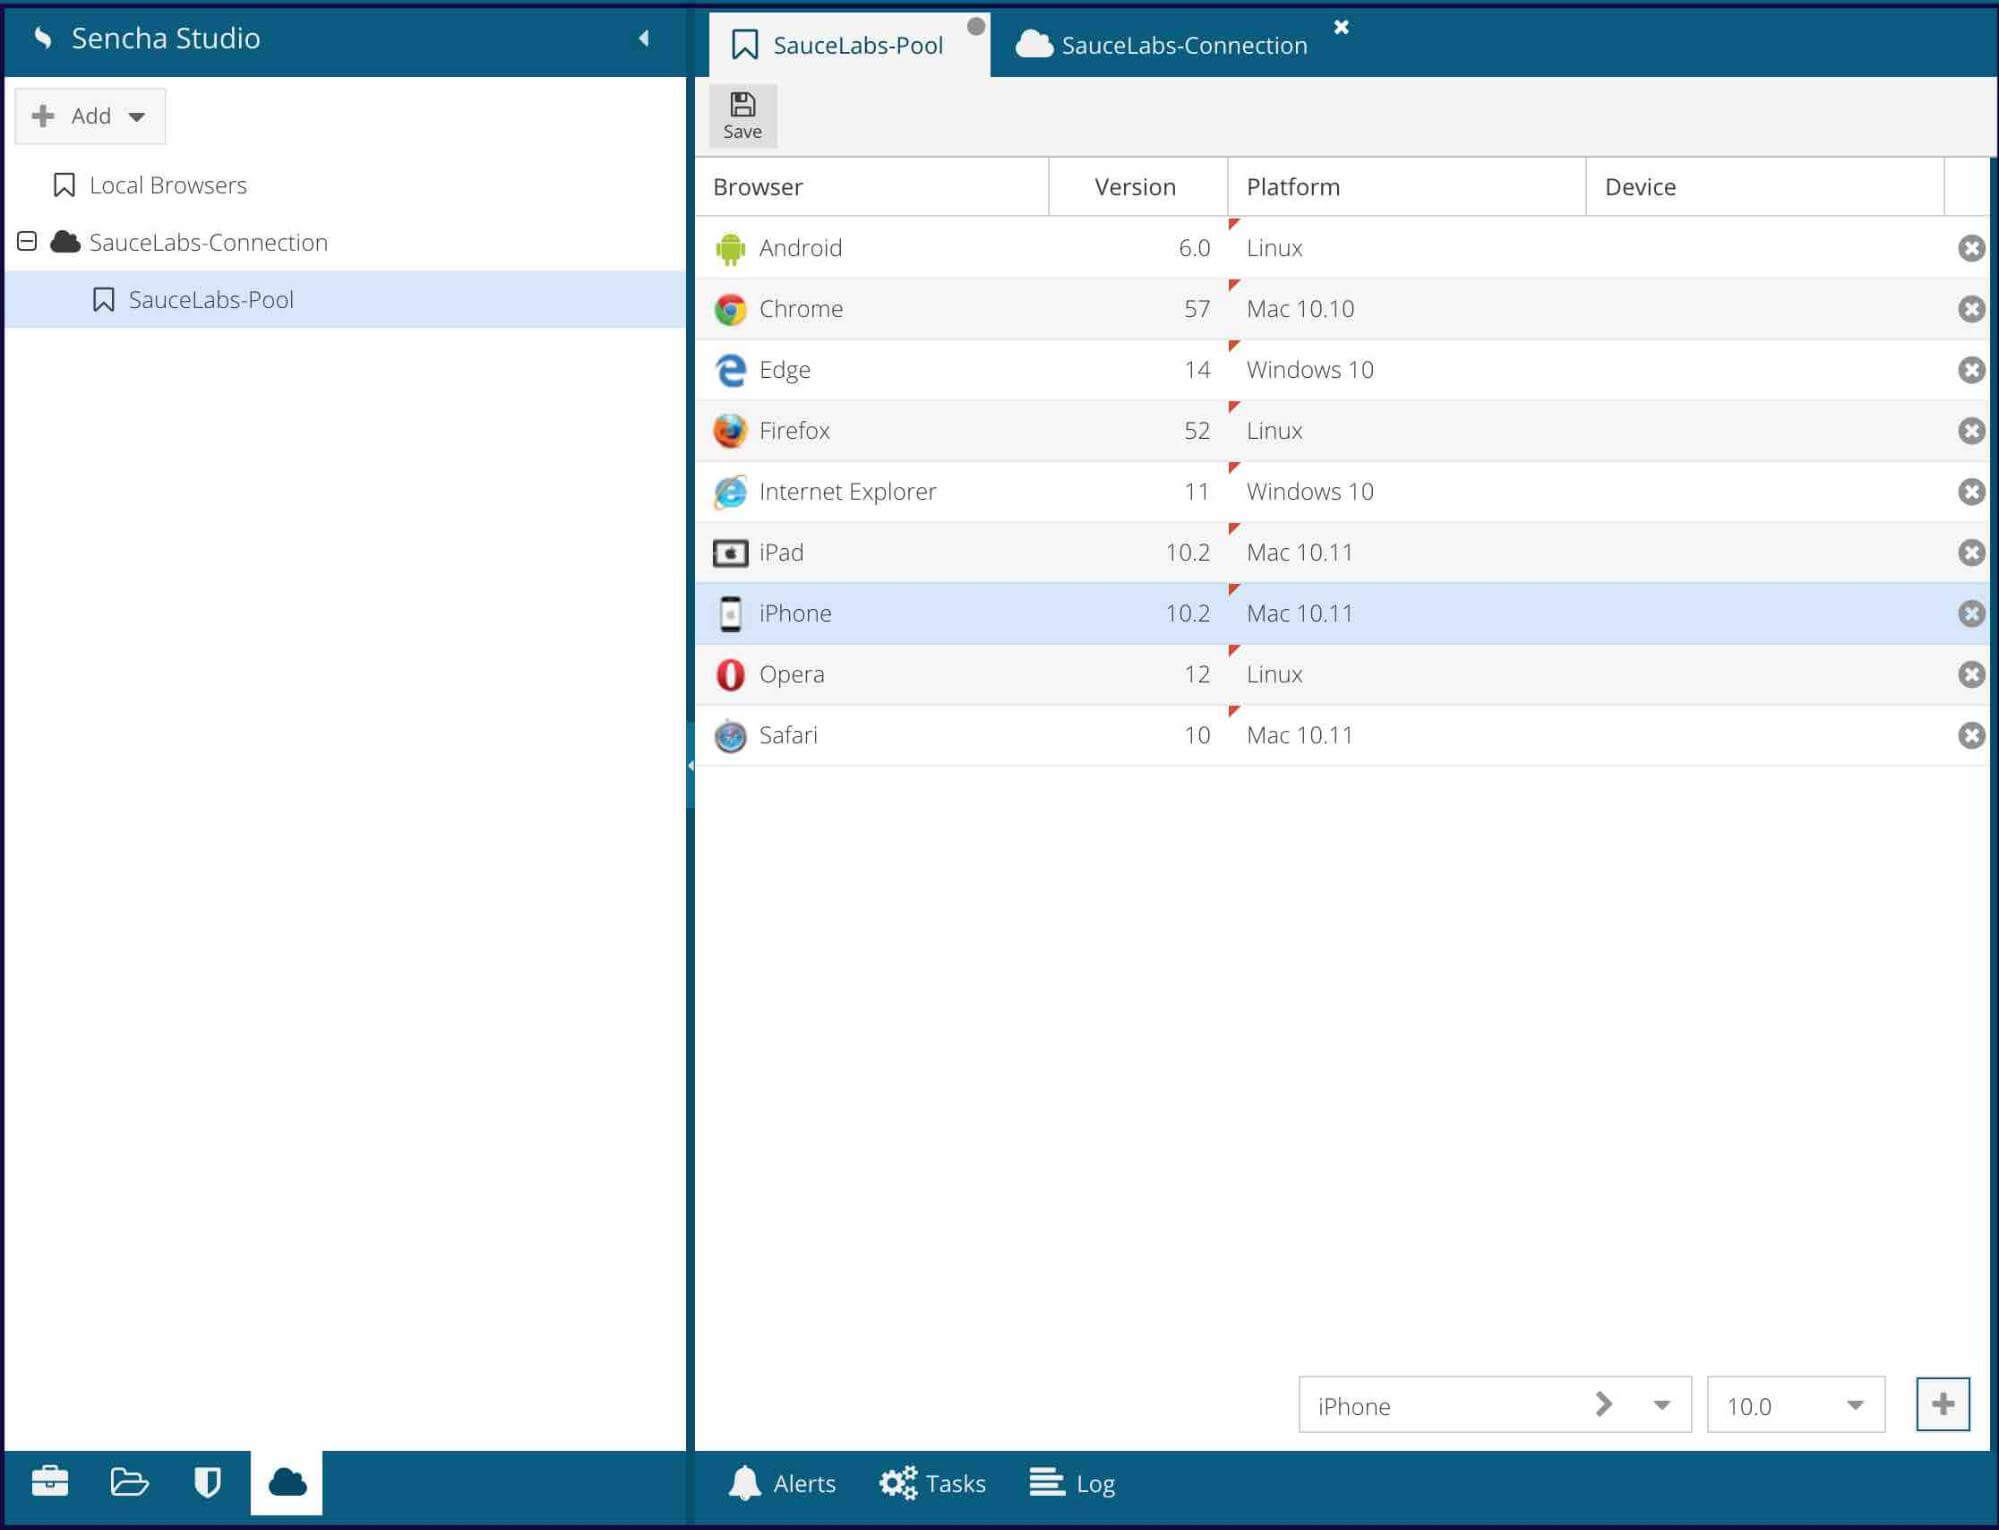
- Provide a name for the browser farm. In this case, we’re calling it “SauceLabs-Connection”
- A success message will be displayed
- Once the farm is created, click on it and a screen with user credential information will be displayed
- The default hostname and port for Sauce Labs will be prepopulated
- Enter the username and the access key from the Sauce Labs account details page
- Select the total number of virtual machines (VMs) to be spun up for test execution

Creating the Pool
Now that the farm is created, we need to select the browsers that we want to test against and create a pool. The pool name will be used for running tests from Sencha Studio Test Runner as well as Sencha Test Command Line Interface (CLI).
- Create a pool and make sure that it’s stored within the workspace
- Once the pool is added successfully, add browsers to the pool
- Provide some basic information about browsers that you’re selecting, e.g. browser version, operating system, etc.
- Click Save
- Add all the required browsers and save the config
A similar process can be used to set up a browser pool using BrowserStack.
Cross-browser test automation is very important, especially for consumer-facing applications. Sencha Test allows you to run the same test across multiple browsers without having to explicitly code browser-specific instructions.
Tip of the Week #3: How to Execute Tests Using Headless Chrome with Sencha Test
We’d like to share a useful tip written by one of the Sencha Test engineers. In this article, Marcelo shows you how to execute tests using headless Chrome with Sencha Test.
Next Steps
Download Sencha Test 2.1
We recently released Sencha Test 2.1. Here’s how to download it and get more information.
- If you’re an existing Sencha Test customer, you can download it from the Support Portal
- Download a 30-day free trial of Sencha Test
- Read our blog post to get all of the details on new features
- Watch the What’s New in Sencha Test 2.1 webinar
- Learn more about other Sencha Test APIs
Get More Tips
Sign up now to receive the Sencha Test Tip of the Week emails. Share your feedback and questions in the Sencha Test forum.
Happy Testing!
Did you find the content helpful?
 0
0

 0
0

Latest Content

Ext JS 7.8 Has Arrived!
The Sencha team is pleased to announce the latest Ext JS version 7.8 release. Following…
May 13, 2024
React Apps Development Using ReExt with Ext JS Components
The world is moving fast towards online businesses. Businesses are established online via social media,…
May 1, 2024

How to Write Unit Tests with Sencha Test
In modern software development, unit testing has become an essential practice to ensure the quality…
April 19, 2024


