Using Both Shared and View-Specific Code in an Ext JS 6 Universal App
In this blog post, I will show how to code an Ext JS 6 universal app that has controllers and view models that can be both view-specific and shared.
Want to learn more about Ext JS 6? Sign up for a training class.
The information in this blog post focuses on universal applications and cannot be used for a pure classic or a pure modern application. In particular, the app folder has a unique purpose in a universal application.
Background
You have probably heard the exciting news that Ext JS 6 merges Sencha Touch components into the library. This allows you to create universal applications that run on desktops, tablets, and smartphones using traditional desktop Ext JS and mobile Touch user interfaces.
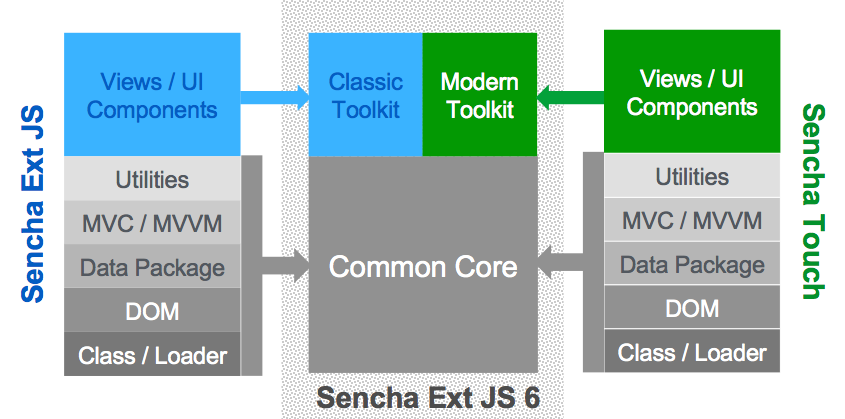
Sencha has placed those component families into two “toolkits” — calling them “classic” and “modern”. The classic toolkit is the Ext JS 5 component set, and the modern toolkit is the Sencha Touch 2 component set. The intent of each toolkit is to support classic or modern browsers. Classic supports older browsers, such as IE8, and modern is for modern browsers that more fully support HTML5 and CSS3.
By design, the classic and modern toolkits target different generations of browsers. If you write an application with both classic and modern user interfaces, the user sees one or the other, depending on the runtime environment. You cannot mix and match view components. But both toolkits do share core features, such as the class system, the data package, the view-controller-viewmodel architecture, etc.
Because of this, an Ext JS 6 universal application separates source code into three parts: classic, modern, and shared.
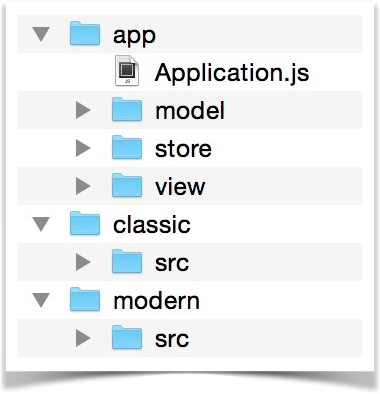
The classic folder holds classic components, record definitions, controllers, and anything else you want. Code in that folder can only reference classes in the classic folder, or code in the app folder.
The same is true for the modern folder. Code in the modern folder can only access classes in that folder, or code in the app folder.
The app folder holds any class you want shared between the classic and modern code. You use the app folder for record classes, view models, controllers, and any other common classes. (You should be very cautious about loading or creating component classes in the app folder.)
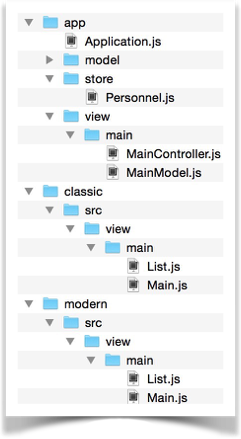
You can see an example if you use Sencha Cmd 6 to generate a universal application. Open a terminal window, and navigate to your Ext JS 6 folder and enter:
sencha generate app MyApp path/to/MyApp
The starter app places a shared store class in app/store/Personnel.js. The class has an alias. Both the classic and modern views require the class and create their own instance using the alias. There’s also a shared controller in app/view/main/MainController.js and a shared view model in app/view/main/MainModel.js. These classes are required by the main view in both the classic and modern folders.
View-specific Controllers
If you look at MainController.js, you’ll see that it has an onItemSelected method that shows an alert when the user selects an item. This method is run in either the classic or modern view, when you tap on an item in the grid.
What if you wanted to do one thing in the classic view and a different thing in the modern view? Let’s change the code to use an Ext.Msg.alert() in the classic view, and an Ext.toast() in the modern view.
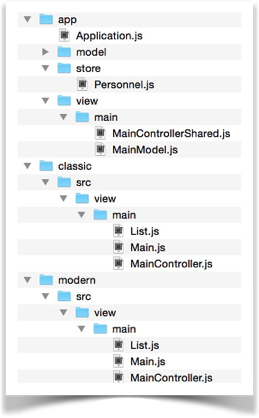
This can be accomplished by creating view-specific controllers, and have each extend the shared controller.
To do this, you would rename the shared controller in the app folder to MainControllerShared. Then create two new controllers — one in classic and one in modern. These need to extend the shared controller.
As a result, the classic main view requires the controller in classic, and the modern main view requires the controller in modern. Each of those controllers has an alias and each extends the shared controller. Then, remove the methods and alias in the shared controller and implement the view-specific versions.
Because the name MyApp.view.main.MainController is the same, but its location in the file system has changed from the app folder to the classic and modern folders, it’s a good idea to perform a sencha app refresh so the microloader figures that out.
The three controllers should end up looking like this:
//app/view/main/MainControllerShared.js:
Ext.define('MyApp.view.main.MainControllerShared', {
    extend: ‘Ext.app.ViewController'
});
//classic/src/view/main/MainControllerShared.js:
Ext.define('MyApp.view.main.MainController', {
    extend: 'MyApp.view.main.MainControllerShared',
    alias: 'controller.main',
    onItemSelected: function(sender, record) {
        Ext.Msg.alert('Star Trek', record.data.name);
    }
});
//modern/src/view/main/MainControllerShared.js:
Ext.define('MyApp.view.main.MainController', {
    extend: 'MyApp.view.main.MainControllerShared',
    alias: 'controller.main',
    onItemSelected: function(sender, record) {
        Ext.toast(record.data.name);
    }
});
You no longer have shared controller logic, but you are free to put shared event handlers back in the shared controller, or implement an initViewModel method and put whatever logic you need there. If the sub-classed controllers need initViewModel methods, make sure the first statement of those methods is this.callParent(arguments); to ensure that the ancestor’s method is run.
View-specific View Models
Now that you have seen how to do both shared and view-specific controllers, how can you do the same for view models?
First, take a look at the shared view model. It has two data properties: name and loremIpsum. Those are used by both views.
Let’s replace the Users tab of the classic view with a grid that uses a store which is only used in the classic view. That means we need a store that’s exclusive to the classic view.
First, change classic/src/view/main/Main.js to have the second tab configured like this:
{
    iconCls: 'fa-user',
    xtype: 'grid',
    title: 'Beatles',
    columns: [{
        text: 'Name',
        dataIndex: 'first',
        flex: 1
    }],
    bind: {
        store: '{beatles}'
    }
}
The code creates a grid bound to a view model store named {beatles}. That store doesn’t exist yet.
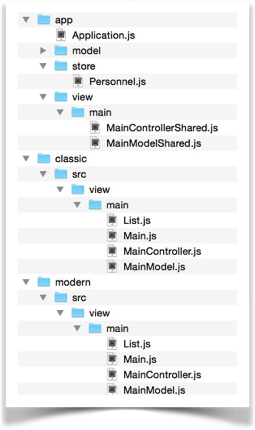
Now rename the shared view model class and create view-specific view model classes, just like you did for the controllers. Leave the data property (with name and loremIpsum) in the shared view model because those properties are still used by both the classic and modern views.
The new beatles store is only used by the classic view, so we don’t really need a view model for the modern view, but we might as well do things consistently.
As before, because you’ve moved the location of some classes, it is a good idea to do a sencha app refresh.
Now add the store to the classic view model:
Ext.define('MyApp.view.main.MainModel', {
    extend: 'MyApp.view.main.MainModelShared',
    alias: 'viewmodel.main',
    stores: {
        beatles: {
            autoLoad: true,
            data: [
                {first: 'John'},
                {first: 'Paul'},
                {first: 'George'},
                {first: 'Ringo'}
            ],
            proxy: {type: 'memory'}
        }
    }
});
If you run the app, you’ll see the beatles store being used in the classic view. The store is only used by the classic view – yet both the classic and modern views still use the shared view model properties name and loremIpsum.
Conclusion
Using the fantastic Sencha class system, it is easy to code your views and have both shared and view-specific controllers and view models.

We’re excited to announce the official release of Rapid Ext JS 1.0, a revolutionary low-code…

The Sencha team is pleased to announce the availability of Sencha Architect version 4.3.6. Building…

Sencha, a leader in JavaScript developer tools for building cross-platform and enterprise web applications, is…


