

 Rapid Ext JS


Using Push Notifications for Web Applications
August 31, 2017
186 Views
Progressive Web Applications have become a viable alternative to native applications: they can be installed, used to work offline, and have access to the device hardware. In this article, I’ll show you how to make your existing web applications even better than before by adding native-like notifications. I’ll explain the concept of Web Push Notifications and show you how to add them to your existing web apps. Last, I’ll cover the state of specifications and browser support.
Web Push Notifications Protocol
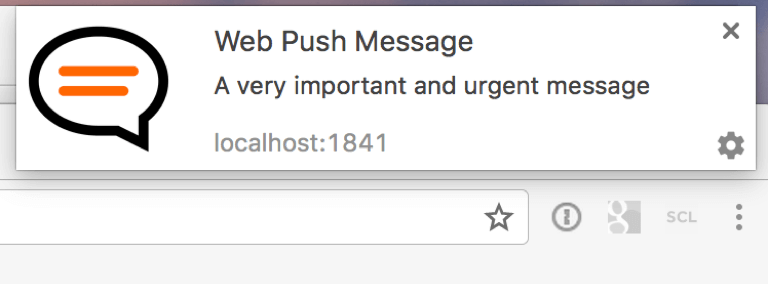
The Web Push Notifications protocol is relatively new. It gives web applications the ability to act as native applications and receive messages pushed to them from a server at any time even when the web app is not active or not currently loaded in a browser. This lets you engage users with urgent and relevant notifications when they are not using your application and motivate them to return to the application.
It makes clear the commercial value of implementing Web Push Notifications in your web apps. It increases user engagement. The overall value of your application increases too, because push notifications make your application more useful for your users. This improves the usability of web applications and moves us closer to developing a single web application for all platforms instead of having to develop a native application for every platform.
Web Push vs Web Sockets
Before going into the details of the technology, I would like to talk a bit about the differences between Web Push and Web Sockets. First, here is what they have in common. Web Push and Web Sockets are designed to implement real-time communication between the web application and application server, and to send real-time data and updates from the application server to your web application.
Here are the differences:
- Web Sockets can only be used when a web page is loaded and active. But the opposite is true of Web Push Notifications which can be used at any time, including when the application is active, inactive, or not loaded, and when the browser is not active or even closed.
- Data sent using Web Push must be encrypted, and there is a size limit per message (it must not be larger than 4Kb). There’s also a count limit for the number of messages you are allowed to send (the exact limit value depends on the browser). Some browsers (for example Chrome) may also require that a notification be displayed to the user every time a message is received. You don’t have any of these limitations when you use Web Sockets: you can send any number of unencrypted messages of any size and handle them as you want; and you may display a notification or silently update the data in your application or even do nothing at all.
- The general rule is to use Web Sockets for sending ordinary data updates to your web app when a user is interacting with the application. Use Web Push Notifications for sending urgent and important messages to a user that have to be received immediately, whether or not the user is working with your application at that moment.
Technical Concepts
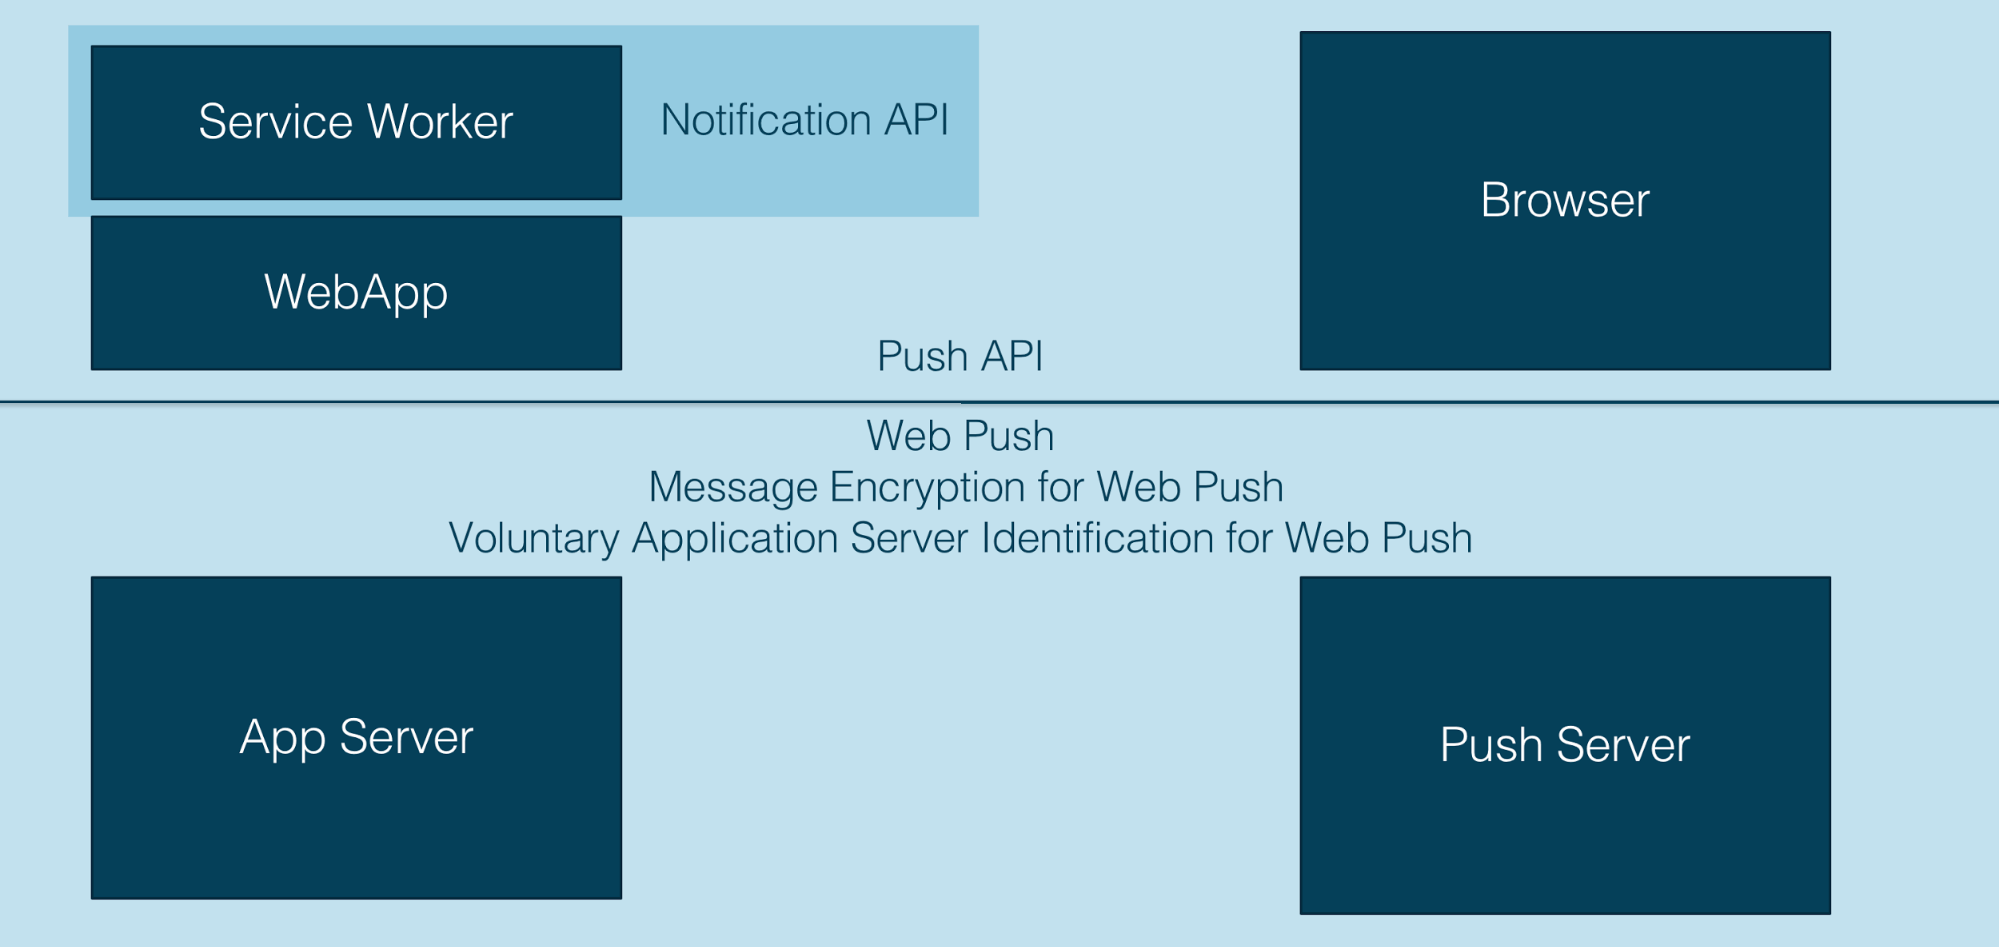
Let’s move to the technical details of the technology. I would like to explain the details using a game with special rules, players, and rounds. I’ll start by describing the players of the game. There are 5 players involved in this game called Web Push Notifications:
- Web Application
- Service Worker
- Browser
- Application Server
- Push Server
Push Server is a service that is implemented by the browser vendor; it is a communication bridge between your application server and a browser. It is responsible for delivering messages from your application server to the browser.
Using a Game to Demonstrate Web Push Notifications
Using a game, I’ll demonstrate how you can add web push notifications to your apps. The rules of this game are defined by several specifications provided by the World Wide Web Consortium and the Internet Engineering Task Force:
- Communications between the Browser and the web application or service worker associated with this application are described in the Push API specification.
- Displaying different types of Notifications as well as Notification handling are described in the Notifications API specification.
- Communications between the Application Server and the Push Server are defined in the Web Push Protocol specification.
- There are also additional specifications describing push message encryption and application server identification that let your application server prove that it is allowed to send messages to your user.
Game Rounds
I have split the game into four rounds and will explain the concept and target of every round. Then, I’ll show you how you can implement every round in your application.
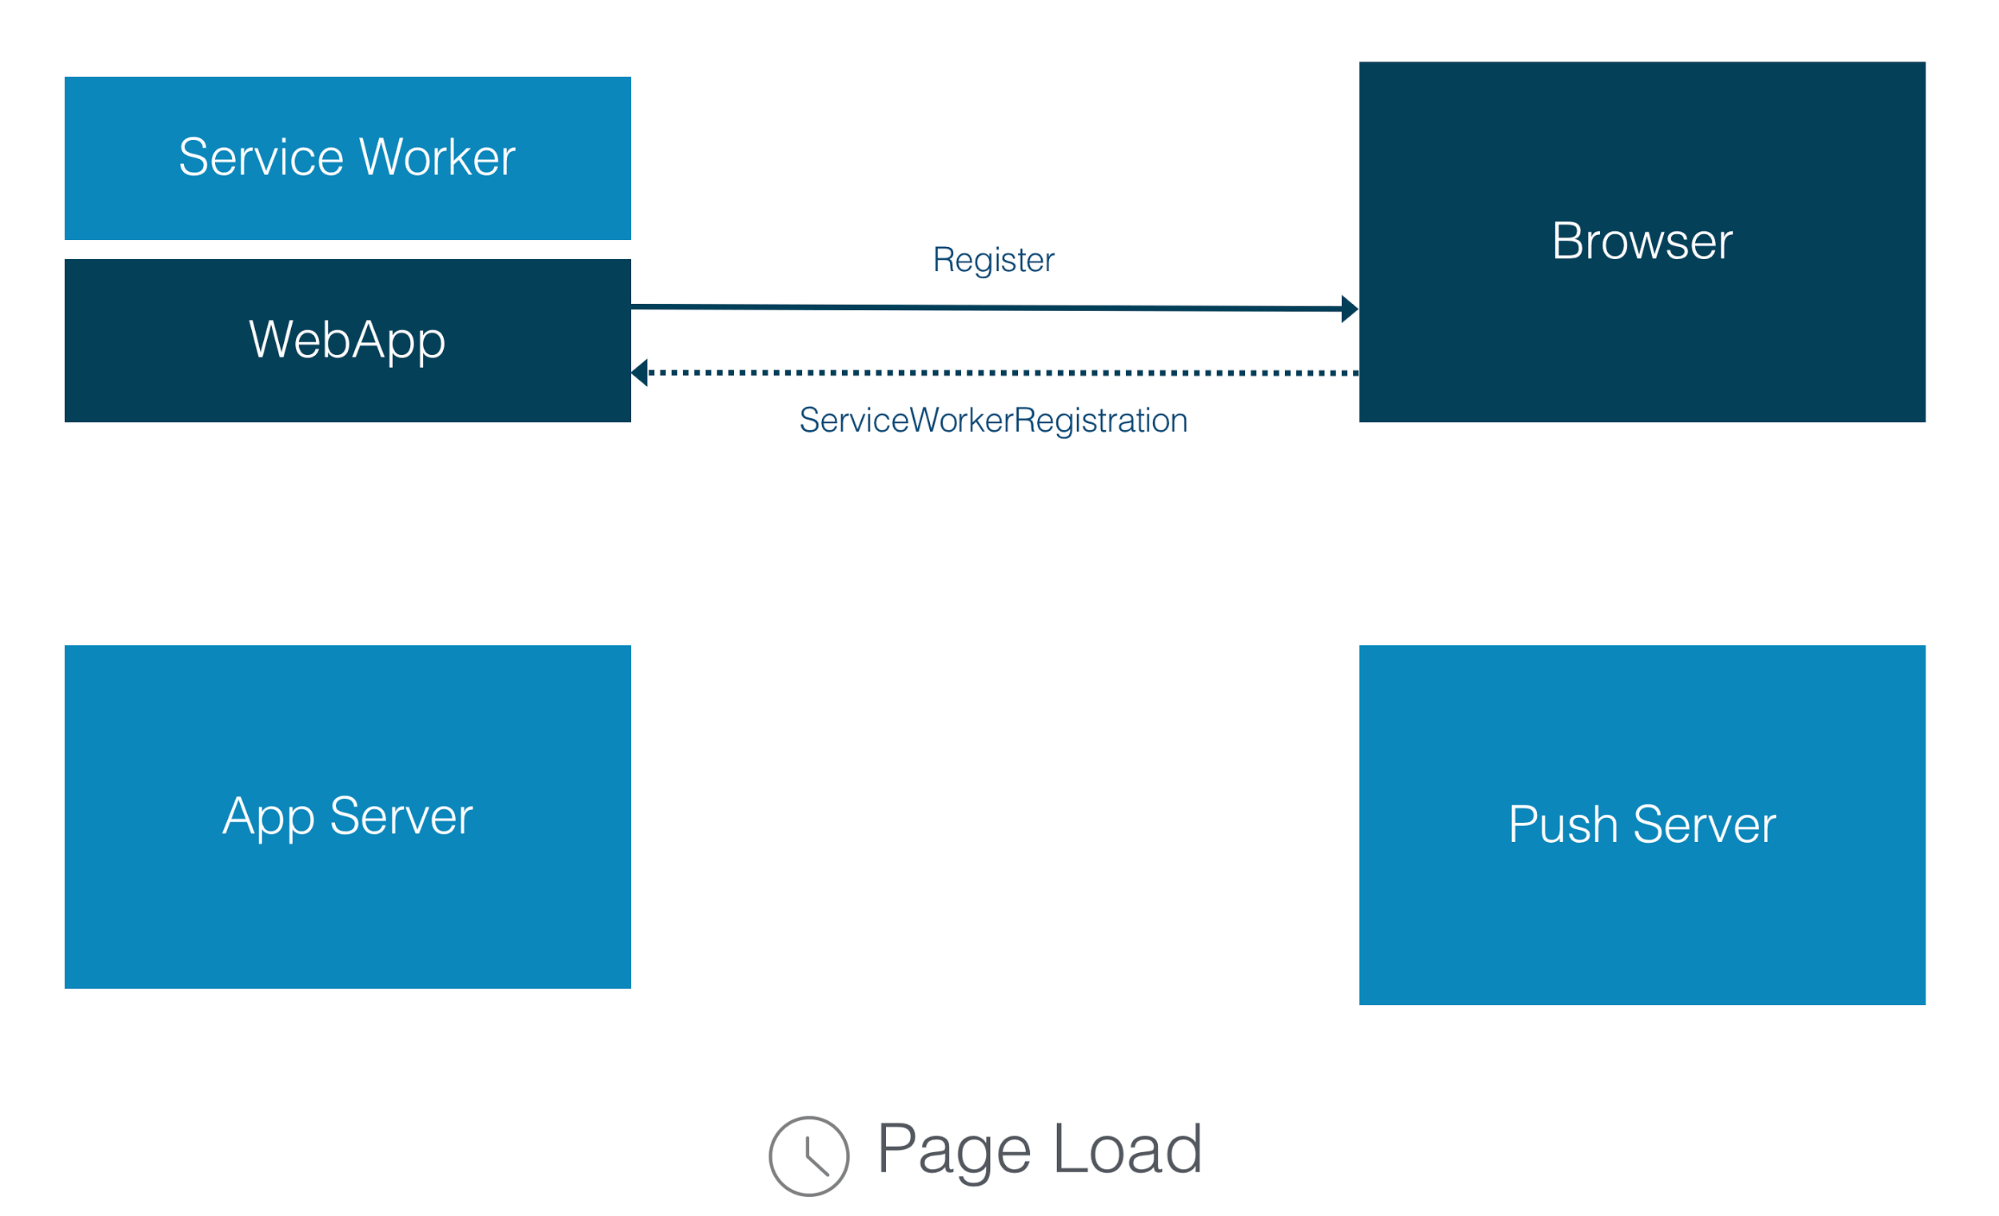
Round 1: Service Worker Registration
Web Push Notifications require Service Workers to handle push messages, so the first round will be to register your service worker. Only your web application and the browser are involved in this round. And this round occurs at the page load.
The web application sends a request to a browser to register a Service Worker and the browser replies with the SeviceWorkerRegistration object if the Service Worker was
registered successfully.
To implement this round, you need to add the following code to your web application:
if ('serviceWorker' in navigator) {
  if ('PushManager' in window) {
    navigator.serviceWorker.register('ServiceWorker.js').then(function(registration) {
      //state initializing
    })
    .catch(function() {
      //error handling
    });
  } else {
    //error handling
  }
} else {
  //error handling
}
First, we need to check if the browser supports Service Workers. Then, we need to check if the browser supports web push notifications. As browser support is growing, it’s always a good idea to add both checks.
If both are supported, we register our service worker. For this step, we call the navigator.serviceWorker.register() method and pass the path to our Service Worker file as a parameter. After this step, the browser will download this file and run it in a service worker environment. The Service Worker file is a standard JavaScript file, but the browser will “give it access” to the service worker APIs, including push. If everything ran correctly and there were no errors, the promise returned by register() will resolve. If there are errors of any kind, the promise is rejected, and we need to handle this case as well as the case when the browser doesn’t support Service Workers. When register() does resolve, it returns a ServiceWorkerRegistration object that will be used in the next round.
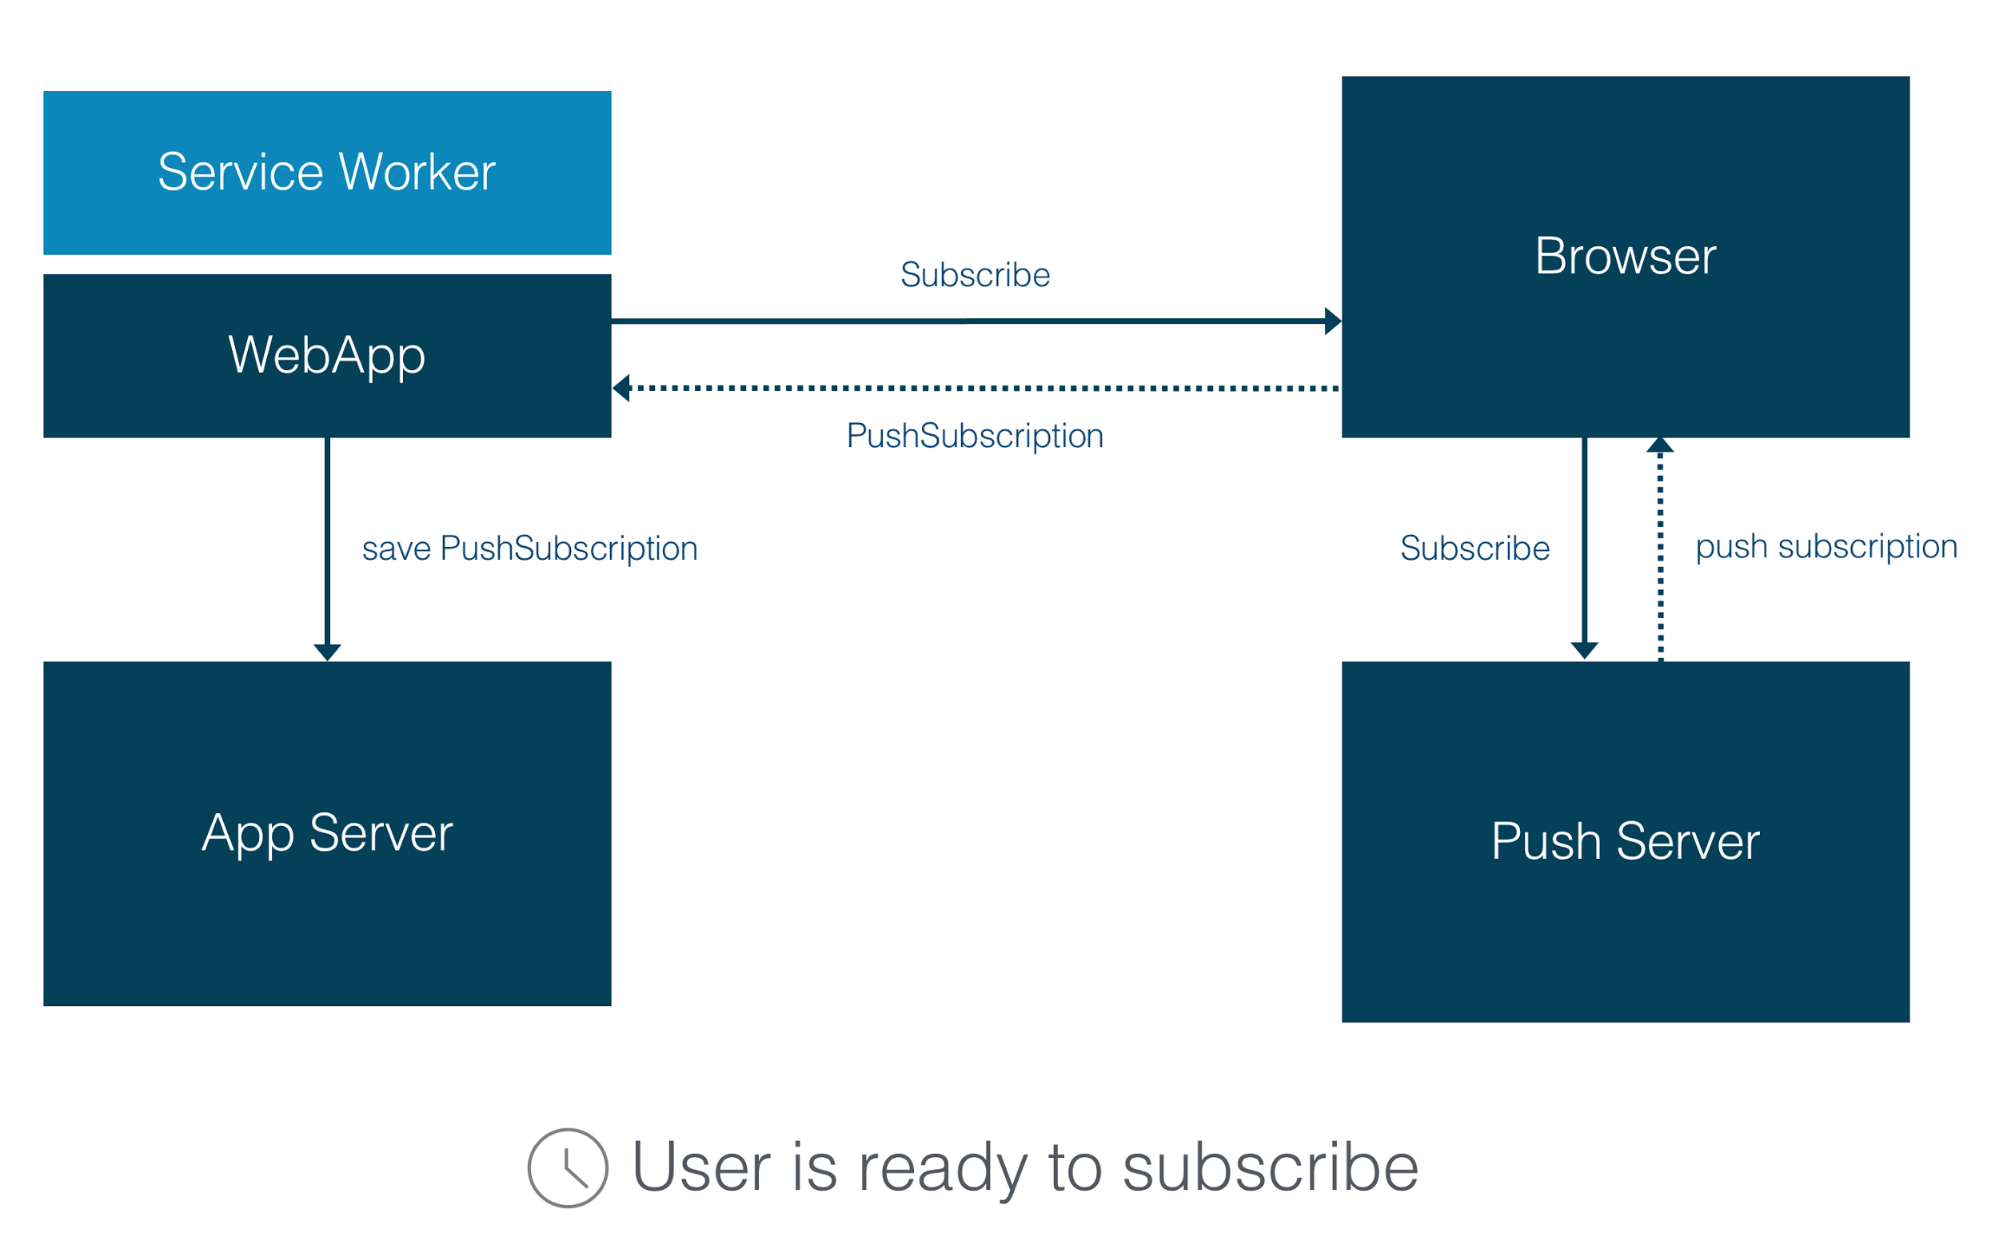
Round 2: Subscription
The second round handles subscription for Web Push Notifications. This is when you ask the user if he wants to receive Web Push Notifications from your application, and if he agrees, you subscribe him. This round involves more players – Web Application, Browser, Application Server and Push Server and more communications.
This round should be played when a user is ready to subscribe. You should ask him to subscribe only when you are sure that it is relevant and meaningful for him, because you will only have one chance to ask. If the user blocks the request, then the browser will not permit you to ask this question again later. The only way to unblock an application is to change it in the browser settings. And as you can imagine, almost no user ever does this. So, you need to explain to the user what kind of Notifications he will receive and why. You may also offer to subscribe the user using a custom in-page message, and once the user clicks yes, then show him a system browser request.
What happens in this round? Your web application asks the browser to subscribe the user to receive Web Push Notifications. If the user agrees, the browser sends a request to the Push Server to generate a push subscription. The Push Server replies to the browser with a push subscription object that the browser forwards to your web application. As the last step, your web application sends this push subscription object to your application server via an Ajax call, for example. And your application server saves it to use in the next round.
Your web application is the main actor in this round, so this code should be added to your web app:
navigator.serviceWorker.ready.then(function(registration) {
  registration.pushManager.subscribe({
    userVisibleOnly: true,
    applicationServerKey: urlBase64ToUint8Array('...')
  })
  .then(function(subscription) {
    // The subscription was successful
    savePushSubscription(subscription);
  })
  .catch(function(e) {
    //error handling
  });
});
Once the service worker is ready, we can subscribe a user by calling the registration.pushManager.subscribe() method of the Service Worker registration object that we received in the previous round. The browser requests permission to show notifications to a user. If the user allows it, the promise will be resolved with a subscription object. The subscription object contains necessary information for sending a push notification to a user. Now, you will need to save this object on your application server. I won’t go deeper into this process – it could just be a standard Ajax call to the server, or you could send this object as a JSON or a string and then the server would need to save this object in a database. I will not show this code, because it highly depends on how your App Server is implemented. If the user denies permission or any other error occurs, then the promise will be rejected and you need to handle this issue.
Permission Request
If your web app doesn’t have permissions to show notifications at the time of calling subscribe(), the browser will request the permissions for you. But there is another option – you can request permissions manually by calling Notification.requestPermission method directly. This method will return a promise that resolves with the permission picked by the user. Possible values for this are granted, denied, or default.
Notification.requestPermission(function(result) {
  if (result!== 'granted') {
    //handle permissions deny
  }
});
Subscription Parameters
Let’s look at the parameter object passed into the subscribe method:
reg.pushManagerpushManager.subscribe({
  userVisibleOnly: true,
  applicationServerKey: new Uint8Array([...])
});
- userVisibleOnly: If it’s set to true, it means that every push message will result in showing a Notification to the user. Silent push messages sent in the background, when the user isn’t notified, are not allowed in this case. Currently, Chrome only allows this option to be set to true because theoretically silent push could be used by a developer to do nasty things like setting up hidden geo tracking for example. Firefox supports a limited number of silent push messages. There might be changes in the specification regarding this rule.
- applicationServerKey: It’s the public part of a public/private key pair identifying your application server. The browser will send this application server key to the push server, and it will be used by the push server to identify that the application subscribing a user is the same application that is messaging that user. I will explain the identification process in detail in the next round.
Subscription Object
Let’s look at the PushSubscription object that is returned by resolving the promise. This PushSubscription object is associated with the Service Worker that we registered in the previous round. This Push subscription describes the delivery bridge for push messages.
interface PushSubscription {
  readonly attribute endpoint;
  // "https://{push_server_url}/{user_identifier}",
  function getKey();
  //auth - authentication secret
  //p256dh - key for encrypting messages
};
It contains two important parts:
- endpoint is a push server URl followed by a unique user identifier. This URL is used by the application server to send messages to the Push Server.
- getKey method returns two keys: auth is an authentication secret generated by browser and p256dh is a public P-256 ECDH key that can be used to encrypt push messages.
Both keys will be used by the application server to send message data to the service worker. The endpoint defines where to send push messages, and the keys define how to encrypt them. You need to send both values to your application server, and it’s completely up to you how you send them.
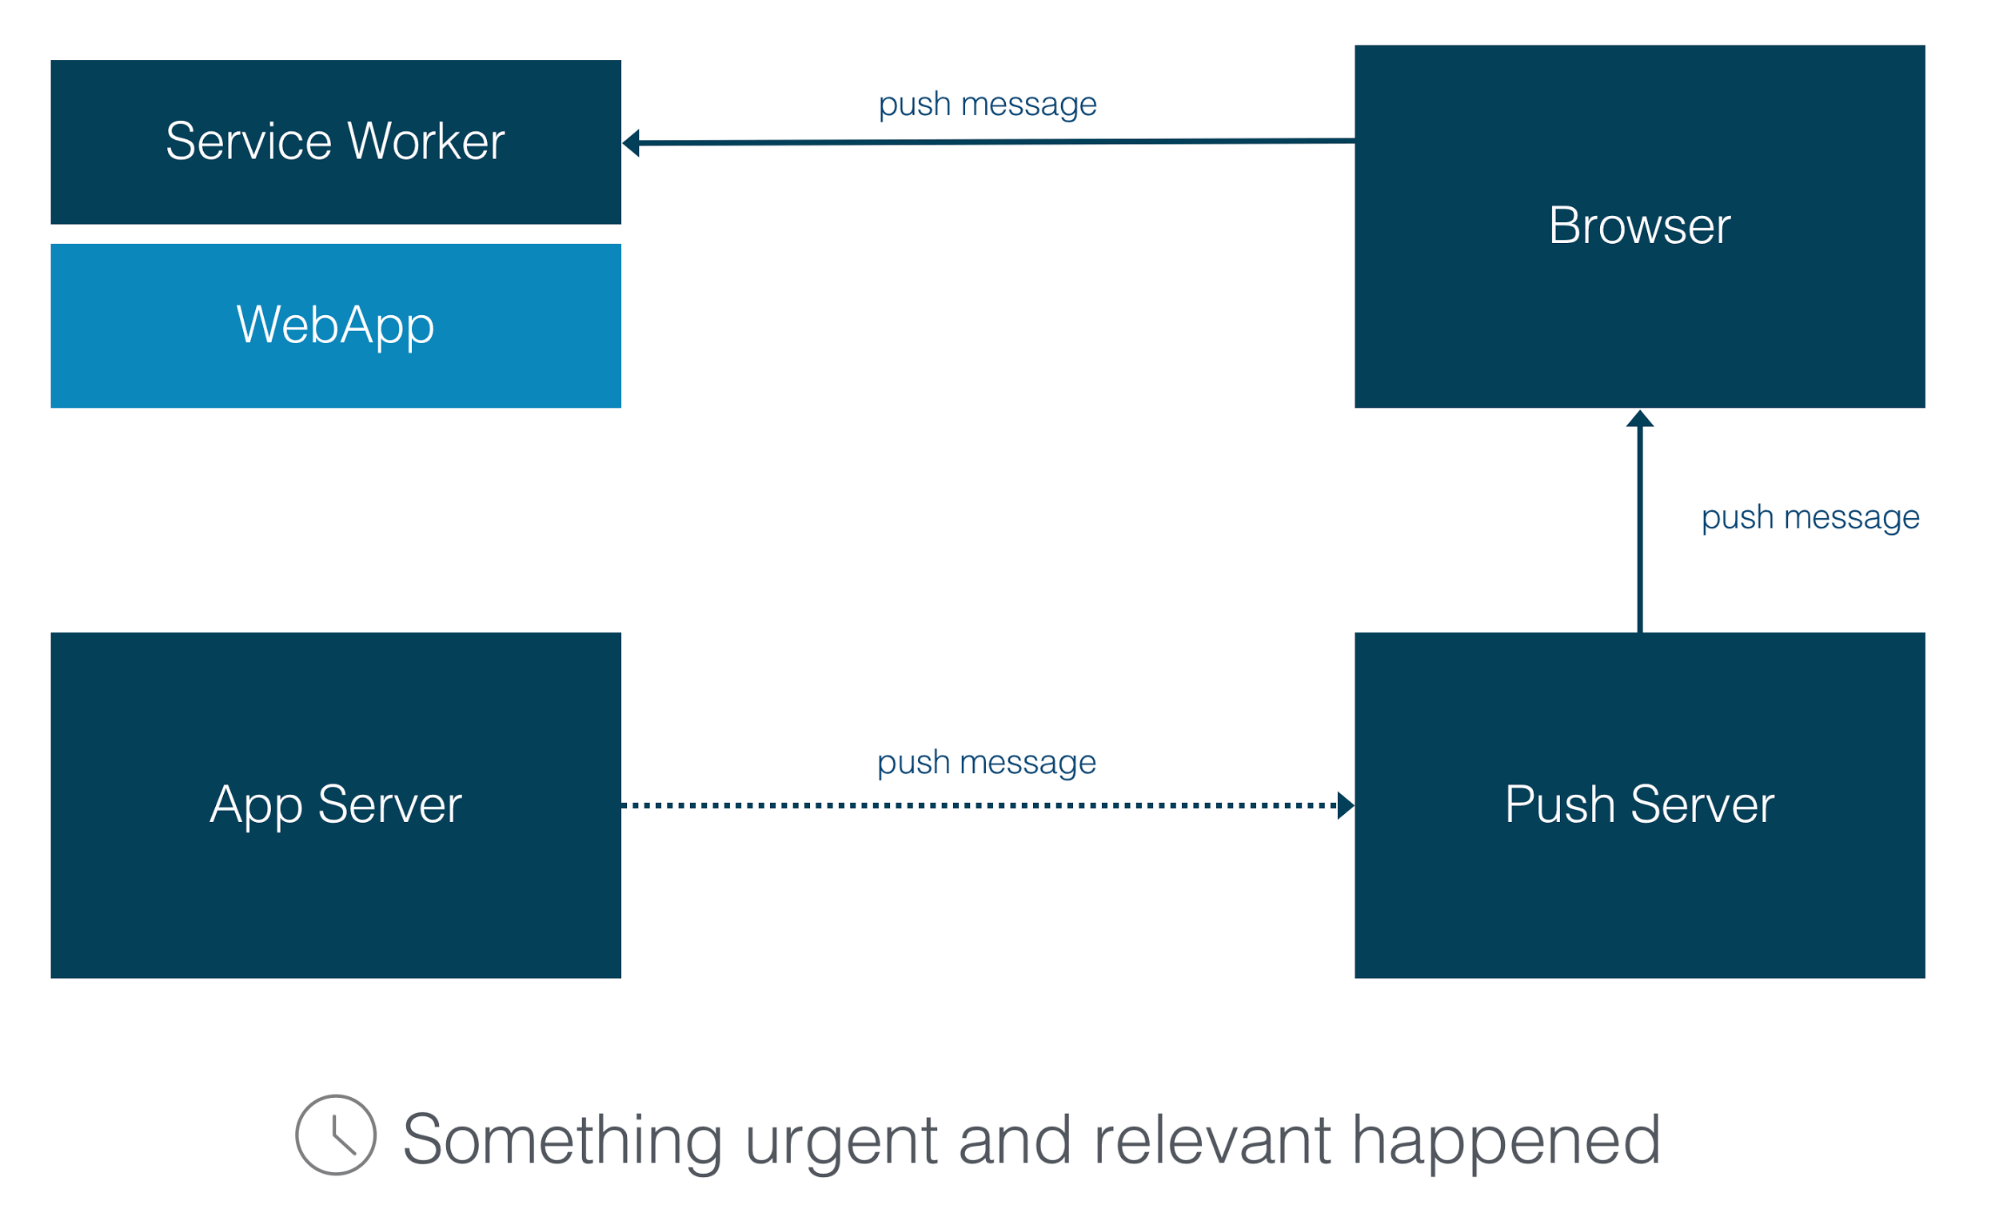
Round 3: Push Message
The third round is sending Push messages. This round occurs when something urgent and relevant happens that the user needs to know. For example, if the user’s flight is delayed or he received a new message in a chat.
Which parts of the game will be played in this round? The application server sends a push message to the push server. The Push server forwards this message to the browser when the browser is online. The browser wakes up the Service Worker associated with the push subscription used to send this message. And the Service Worker handles this message and shows a Notification to the user.
The first step in this round is done by the Application Server. The application server requests the delivery of a push message by sending an HTTP POST request to the push server using the push server URL and user identifier from the endpoint received from the web application in the previous round. The content of the encrypted push message is included in the body of the request. This request must use the HTTPS protocol. This protocol provides confidentiality and integrity protection from external parties for subscriptions and push messages.
When the Push Server receives this request, it replies with a response indicating that the push message was accepted and queues the message. This message will remain queued until the browser comes online and the push server delivers the message.
POST Request
POST /{user_identifier} HTTP/1.1
Host: {push_server_url}
TTL: 15
Content-Type: text/plain;charset=utf8
Content-Length: 36

{encrypted_message}
The Application server may add some additional headers to this request to tell the Push Server how to handle the message:
- Prefer: The application server can include the Prefer header field with the “respond-async” preference to request confirmation from the push server when a push message is delivered and acknowledged by the browser.
Prefer: respond-async
TTL: 15
Urgency: high
Topic: upd
Message Encryption
A Push message may not include any data at all. In this case, the POST request will have an empty body, and the service worker may need to fetch some necessary data before showing a Notification to the user. Or the application server can send some data called a payload along with the push message, so the service worker can avoid making the extra request. However, all payload data must be encrypted. It is an important point. HTTPS provides secure communication between the browser and the application server, because you trust your application server. However, the browser chooses which push server will be used to deliver the data, so you, as the application developer, cannot control it. HTTPS can only guarantee that no one can read or modify the message in transit to the push server. But once the push server receives it, it can theoretically re-transmit the data to third parties or modify it. To protect against this problem, you must encrypt the data to ensure that a push server can’t read or modify the payload data.
You must encrypt a push message using elliptic-curve Diffie-Hellman (ECDH) on the P-256 curve. The browser generates an ECDH key pair and authentication secret that it associates with each subscription it creates. The ECDH public key and the authentication secret are sent to the Application Server with other details of the push subscription and it’s used to encrypt the message data.
I highly recommend that you use a library for encrypting payload data and do not implement it manually. Although, you can find a detailed description of the encryption process in the Web Push Protocol, the standard may be changed, and then you would need to adjust and verify your implementation.
Here is the encryption library for Node.js developed by Google. There are also libraries for other languages.
Voluntary Identification of the Application Server
This is where our applicationServerKey that we sent to the subscribe method in the previous round plays its part. The Application Server needs to prove that it is allowed to send Notifications to the user and the Push Server needs to validate this step.
To do this, the Application Server adds an Authorization header, which contains information signed with the private key, coupled with its public key – applicationServerKey – shared with the Push Server when the PushSubscription was created. When the push server receives this request, it validates this signature, checks that the request was signed using the private key coupled with the applicationServerKey associated with the PushSubscription receiving the request. If the signature is valid, the push server knows that it is a valid push message from the authorized Application Server. It provides security protection that prevents anyone else from sending messages to an application’s users.
POST /{user_identifier} HTTP/1.1
Host: {push_server_url}
TTL: 15
Content-Length: 136
Authorization: Bearer
eyJ0eXAi...
Crypto-Key: p256ecdsa=BA1Hxzy...

{encrypted_message}
The Authorization Header contains a JSON Web Token (JWT). This token is a way of sending a message to a third party, so the receiver can validate who sent it. It includes the following claims:
- “aud” (Audience) claim in the token MUST include the unicode serialization of the origin of the push server URL. This binds the token to a specific push server.
- “exp” (Expiry) claim MUST be included with the time that the token expires. This limits the time that a token is valid. An “exp” claim MUST NOT be more than 24 hours from the time of the request.
- “sub” (Subject) claim in the JWT. The “sub” claim SHOULD include a contact URI for the application server as either a “mailto:” (email) or an “https:” URI.
There is an additional “Crypto-Key” header that includes the base64url-encoded ApplicationServerKey.
Handling the Push Message
The Application Server sent a push message to the user, the Push Server validated it and forwarded it to the browser. The Browser woke up the Service Worker and sent a push event to it. And the Service Worker handled this event and processed the push message.
The last step of this round is made by the Service Worker. This code should be added to your Service Worker:
self.addEventListener('push', function(event) {
  var data = event.data.json();

  event.waitUntil(self.registration.showNotification(data.title, {
    body: data.body,
    icon: data.icon,
    tag: data.tag
  }));
});
The Service Worker’s push event listener function receives an event object as a parameter. This event object includes push message data as a property. And the handler shows a Notification based on this data by calling a showNotification method. You need to pass a notification title and a Notification configuration object to the method. These config objects may contain different parameters defining the Notification: body for Notification text, icon, image, vibrate, and some others.
I would like to cover two important points:
- Firefox allows a limited number (quota) of push messages to be sent to an application without showing a Notification, and the limit is refreshed each time the site is visited. But Chrome requires that every push message shows a notification, and if you don’t show a Notification, Chrome will show a default notification.
- waitUntil method tells the browser to keep the Service Worker running until the promise that is passed to this method has been resolved. If you do not add this method, the Browser will shut down the Service Worker immediately, and the Notification will not be shown.
Handling the Notification Click
The Service Worker needs to handle a Notification click. One of the most common responses is to close a notification and open a window / tab to a specific URL. We can do this with the clients.openWindow() API.
self.addEventListener('notificationclick', function(event) {
  event.notification.close();
  event.waitUntil(clients.openWindow('http://mywebsite.com'));
});
Notifications with Actions
The Notification can also contain actions – buttons with some text. You can define them using an actions parameter of the notification config object. And then in the notificationclick handler, you can check which button was clicked.
self.registration.showNotification(data.title, {
  body: data.body,
  actions: [
    { action: 'ok', title: 'Yes' },
    { action: 'decline', title: 'No' }
  ]
});
…

self.addEventListener('notificationclick', function(event) {
  if (event.action == 'ok') {
    // do something
  }
});
Notification Close
And the last thing that you have to handle is a notificationcloseevent. It happens when a user doesn’t click any action button or notification itself, but does click the close button. It is a good place to perform some logging for example.
self.addEventListener('notificationclose', function(event) {
  //do something
});
There is one exception to the rule to always show a Notification. It is not mandatory to show a Notification when the user is actively using your application. But what if you still want to let the user know that an event has occurred? One approach is to send a message from the service worker to the page, this way the web page can show the user a notification or update, informing him of the event.
To handle this case, we can check if any window client is focused and send the message to every client using the postMessage method. This method is a common way to organize a communication channel between a Service Worker and the page. And if no client window is focused, we can show a normal Notification.
if (focused) {
  clients.forEach(function(client){
    client.postMessage({
      message: data.message
    });
  });
} else {
  return self.registration.showNotification(data.title, {
    body: data.message
  });
}
The third round is the most important round. It requires the most effort to implement. You need to manage the whole push message from the Application Server to the ServiceWorker and handle them in the ServiceWorker’s implementation.
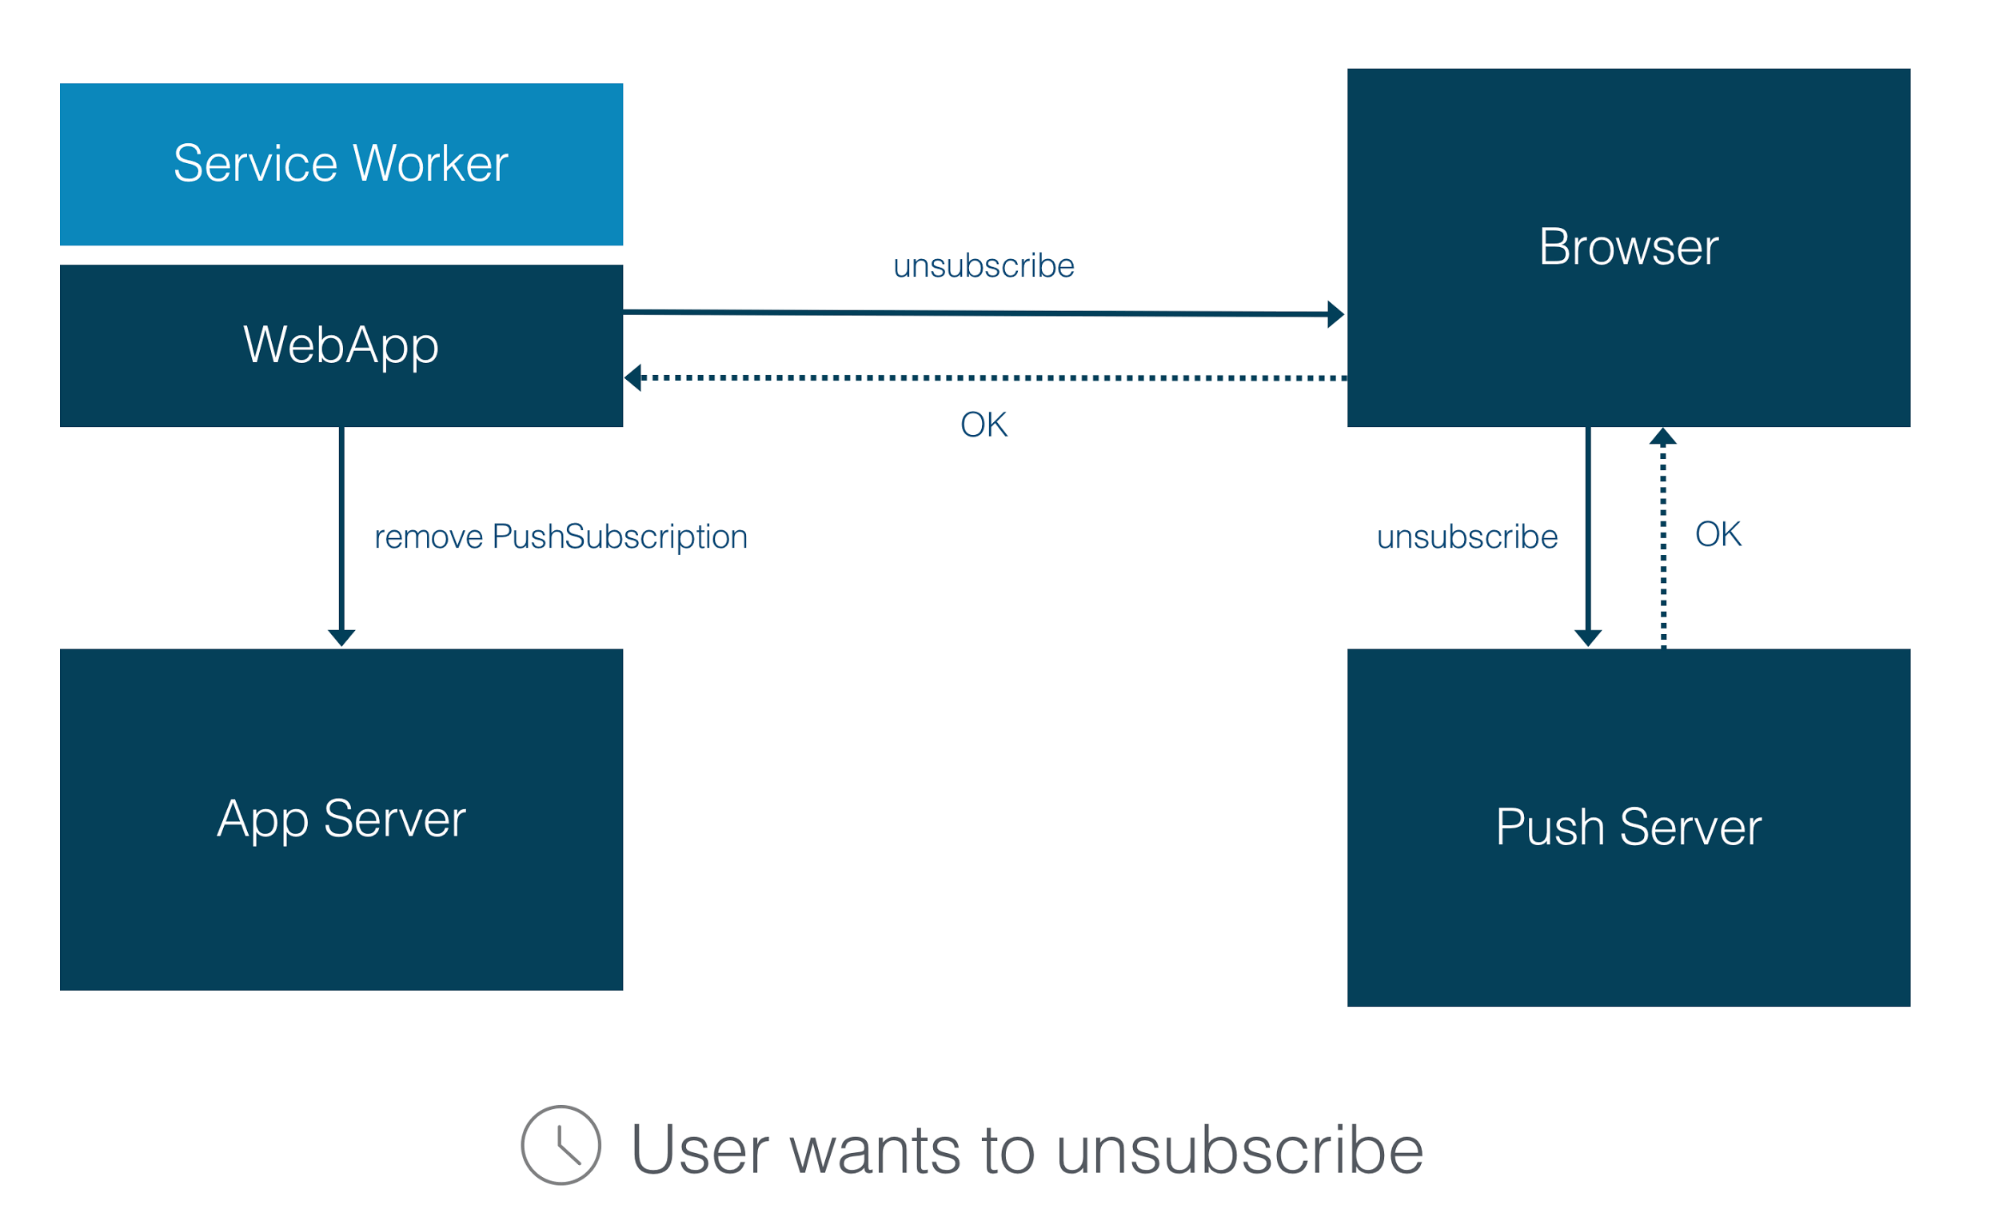
Round 4: Unsubscription
The fourth round is unsubscription from Web Push Notifications. It happens when a user doesn’t want to receive Web Push Notifications from your application anymore. This round involves the same players as the Subscription round – Web Application, Browser, Application Server, and Push Server.
The whole process is similar to the subscription process. Your web application asks the browser to unsubscribe the user from receiving Web Push Notifications. The browser sends a request to the Push Server to remove the push subscription. The Push Server replies to the browser with the confirmation and the browser forwards this confirmation to your web application. As the last step, your web application sends the confirmation to the application server. And the application server removes the subscription record from the database or other storage.
Your web application is the main player, and the code I will show you should be added to your Web App:
registration.pushManager.getSubscription().then(function(subscription) {
  if (subscription) {
    return subscription.unsubscribe().then(function(successful) {
      removePushSubscription(subscription);
    }).catch(function(e) {
      //error handling
    });
  }
})
.catch(function(error) {
  //error handling
})
We request a Subscription object from a pushManager, when the promise is resolved, we call an unsubscribe method of the subscription object. And if the subscription was successfully removed from the Push Server, we call a method that sends a request to the Application Server to delete this subscription.
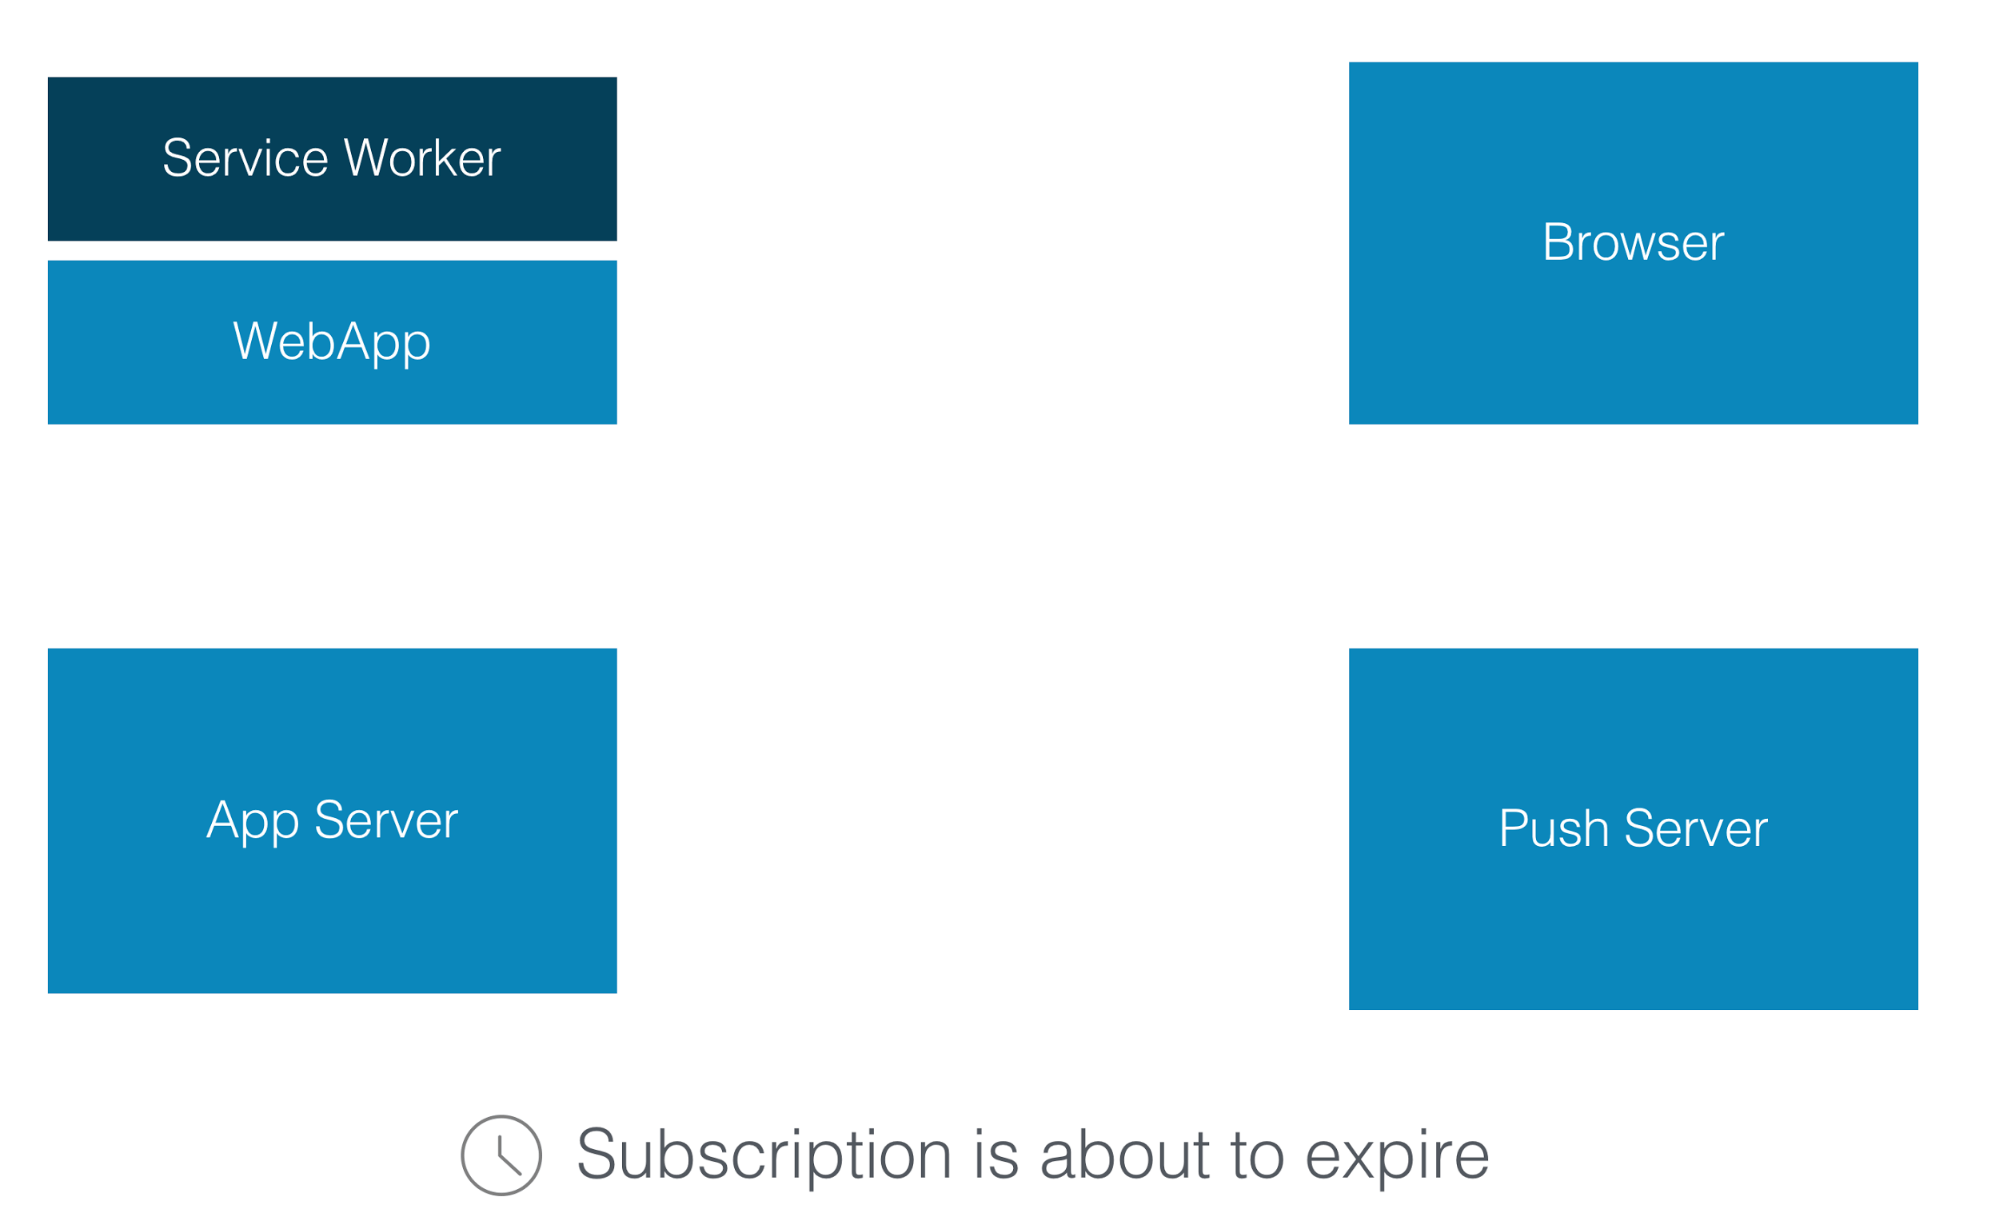
Additional Round: Subscription Expiration
There is also one additional round – Subscription expiration. It happens when the subscription is about to expire (the server gets overloaded, or if a user is offline for a long time). This is highly server-dependent, so the exact behavior is difficult to predict.
In any case, you can handle this situation by watching for the pushsubscriptionchange event in your Service Worker and providing an event handler; this event is fired only in this specific case.
self.addEventListener('pushsubscriptionchange',
  function(registration, newSubscription, oldSubscription) {
    removePushSubscription(oldSubscription);
    savePushSubscription(newSubscription);
});
In the event handler, you need to remove the old subscription passed as a first parameter from the Application Server and save the new one passed as a second parameter.
State of Specifications
This is the current state of the specifications describing the rules of all these rounds. Only the Notification API and Web Push specifications have states of living and proposed standards. The Push API, Push Message Encryption, and VAPID specifications are still drafts.
Specification |
State |
Push API |
Working Draft |
Notification API |
Living Standard |
HTTP Web Push |
Proposed Standard |
Push Message Encryption protocol |
Internet Draft |
VAPID protocol |
Internet Draft |
Browser Support
This is a list of browsers supporting this new functionality.
Browser |
Desktop |
Mobile |
Chrome |
Yes |
Yes |
Firefox |
Yes |
Yes |
Edge |
Beta |
Beta |
Safari |
Yes |
No |
Opera |
Yes |
Yes |
IE |
No |
No |
The browser support changes quickly. Only Chrome and Firefox are fully supporting this functionality. Opera started supporting it recently. Safari supports it on Mac OS but in a different way. Apple’s implementation differs from the official specification. They have the same players and the same basic concepts but it’s a slightly different API and technical implementation. For example, Notifications are stored in a MacOS Notification center.
In Edge, Web Push Notifications are available in the Windows Insider Preview release on desktop and tablets. And Microsoft announced that it will be available to all Microsoft Edge customers in EdgeHTML 14. IE doesn’t support web push notifications, but I guess no one would expect that.
The biggest missing piece currently is iOS. iOS doesn’t support push notifications, but it was mentioned in the 5 year plan at the WebKit contributors meeting in 2015. So, hopefully it will be supported one day.
Conclusion
Web Push Notification technology is ready to be used widely. It helps you to communicate with your users in a more efficient way, engages users by providing urgent and relevant notifications, and it makes web applications better in general.
Try it out in your applications. Sencha Cmd 6.5 supports the following progressive web app features: Add to Home Screen Banner and Caching with Service Workers. Read the Sencha Cmd docs to learn more.
Did you find the content helpful?
 0
0

 0
0

Latest Content

Ext JS 7.8 Has Arrived!
The Sencha team is pleased to announce the latest Ext JS version 7.8 release. Following…
May 13, 2024
React Apps Development Using ReExt with Ext JS Components
The world is moving fast towards online businesses. Businesses are established online via social media,…
May 1, 2024

How to Write Unit Tests with Sencha Test
In modern software development, unit testing has become an essential practice to ensure the quality…
April 19, 2024


