


Using Sencha Test with Jenkins and Selenium Grid
May 19, 2016
161 Views

We believe that Test Automation and Continuous Integration / Continuous Deployment (CI/CD) are critical to the success of a development project, especially one that involves complex enterprise applications. Automation shouldn’t stop with the developer phase; there should be end-to-end automation from development through delivery to your target audience. An automated process provides consistency and scalability that enables your team to focus on meeting business-critical needs while eliminating expensive manual steps that delay time to market.
In this post, we’ll talk about test automation and how it helps the Continuous integration and Continuous Deployment process. We’ll be using Sencha Test with Jenkins and Selenium (for deploying and running tests remotely) to demonstrate how you can test earlier and more frequently during your development cycle.
Background
Sencha Test is a comprehensive test automation solution for unit and end to end functional tests allowing developers and test automation engineers to create tests in JavaScript, adopting a behavior driven development strategy. Sencha Test includes Jasmine v2.4 as well as APIs that enable you to richly interact with Ext JS components in your application.
Adding automation to modern agile projects requires sophisticated testing and process tools that work together and can be integrated with your development process. A CI system like Jenkins helps to speed up test deployment and execution. It also helps ensure that tests are run consistently – especially important with morale-destroying, monotonous tests that might otherwise require 10 developer days. Distributed browser farms, whether an internal solution such as Selenium or cloud-based solution such as Sauce Labs, ensures that tests run on well-defined browser variants and can scale according to workload.
So what does such a system look like using Sencha Test?
Architecture
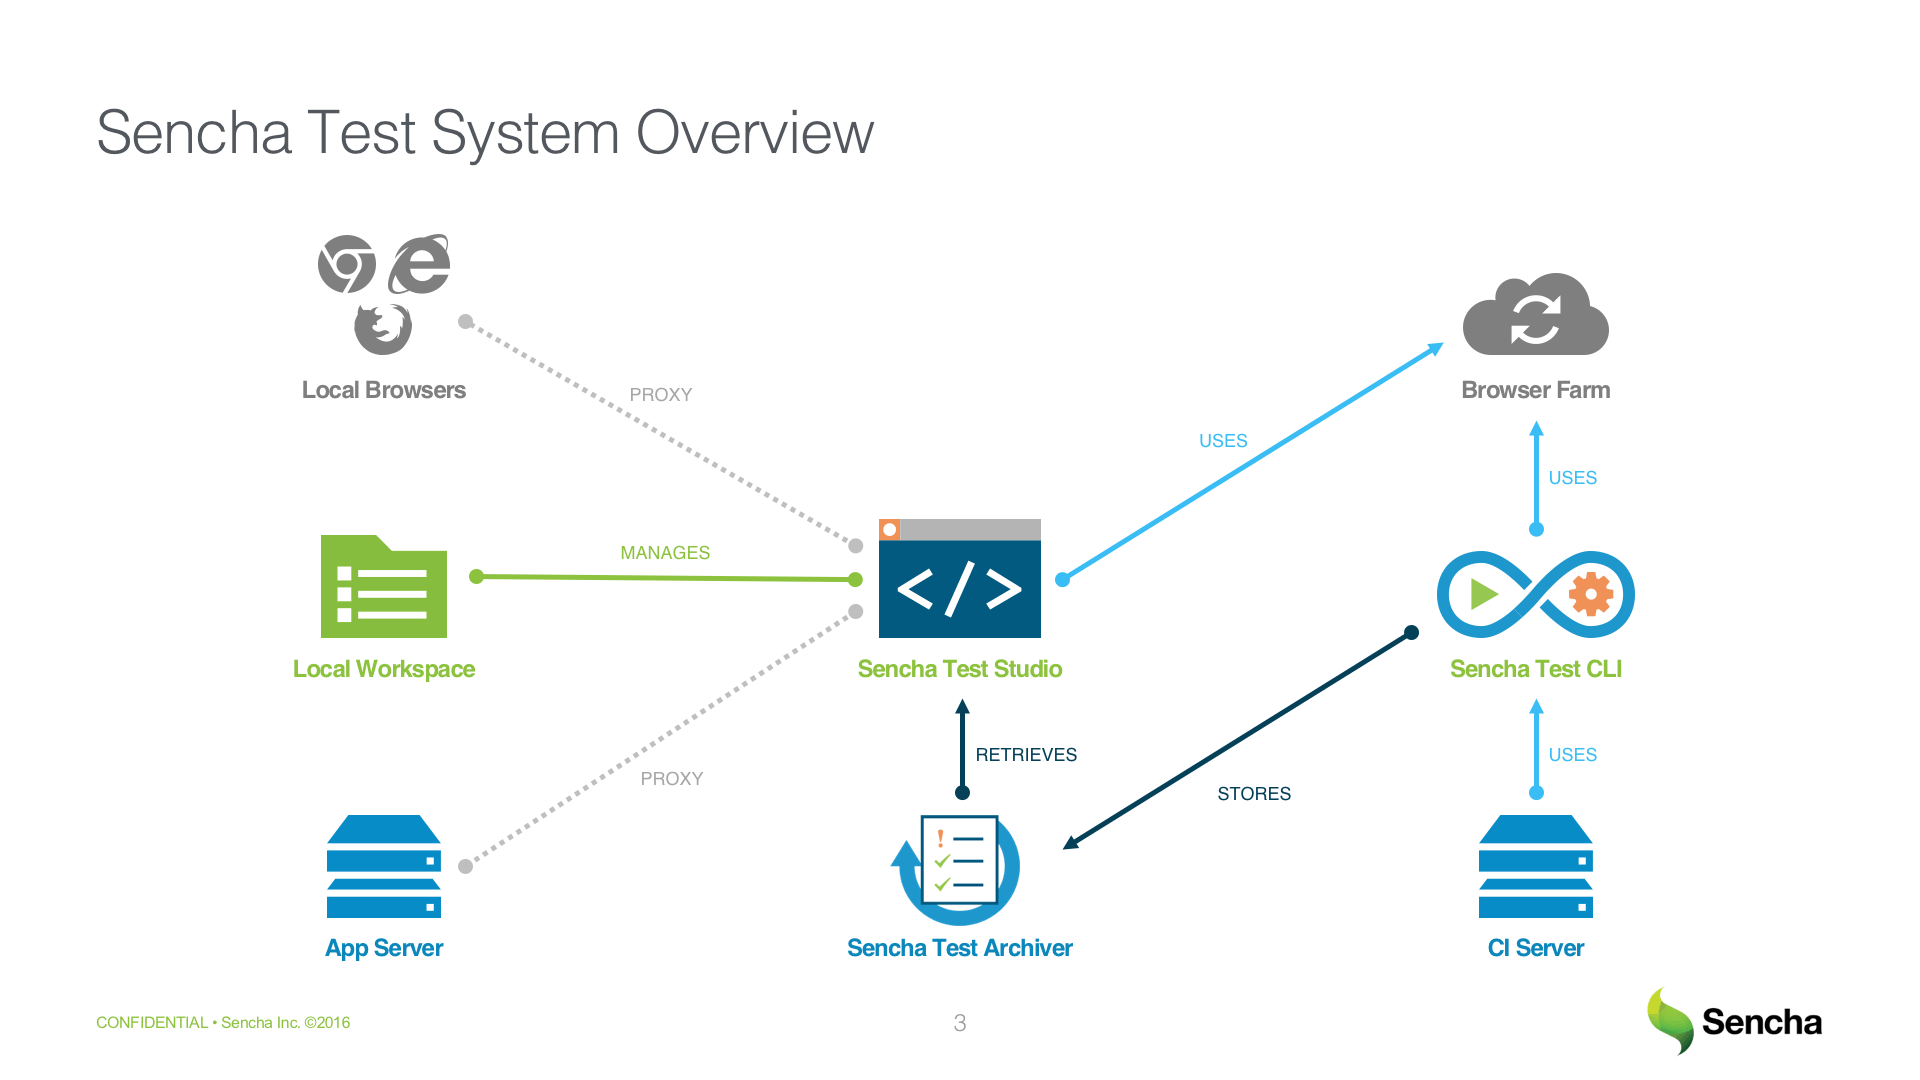
First, you’ll need a working Sencha application and ideally some existing tests that run under Sencha Studio. We’ll explain how to set up a Selenium farm where the tests will run, and how to configure your Jenkins server to run tests.
Setting Up Selenium
If you don’t already have a Selenium farm set up, it’s fairly simple to set one up using Docker containers. On a Linux machine, we use the following “docker-compose.yml” file to start up a farm consisting of one hub and two nodes: one each for Chrome and Firefox.
hub:
  image: selenium/hub
  ports:
    - "4444:4444"
firefox:
  image: selenium/node-firefox
  links:
    - hub
  expose:
    - "5555"
chrome:
  image: selenium/node-chrome
  links:
    - hub
  expose:
    - "5555"
We won’t go into the details of what each line does, but suffice it to say that the hub handles requests over port 4444, and the nodes have connections to the hub over port 5555. Starting the farm is simple – just run the following command from the directory where the docker-compose.yml file is located:
$ docker-compose up -d
(for those not familiar with Linux commands, the “$” is not part of the command)
At this point, Docker will download the appropriate Selenium images and start up your farm. You can modify the docker-compose.yml file to add more browsers or nodes. You can also grow your farm by registering remote nodes with the hub, such as for Windows browsers.
Note: when working with remote browser farms, it’s important to make sure that the remote browsers are able to reach the Sencha Test proxy where the test runner is running. That typically involves configuring the firewall to allow incoming network traffic to the Sencha Test runner, over the ports used by the proxy server (typically in the 87xx range). The browsers must be able to connect to the Sencha Test proxy server in order to run tests.
Configuring Sencha Test to Use WebDriver Server
Sencha Test is ready to work with a WebDriver-based farm such as Selenium Grid, out of the box. You don’t have to do anything special in your tests. You just need to configure your project, so it knows how to work with the farm. This consists of configuring the workspace with the location of the hub and creating a browser pool that describes the browsers you wish to test.
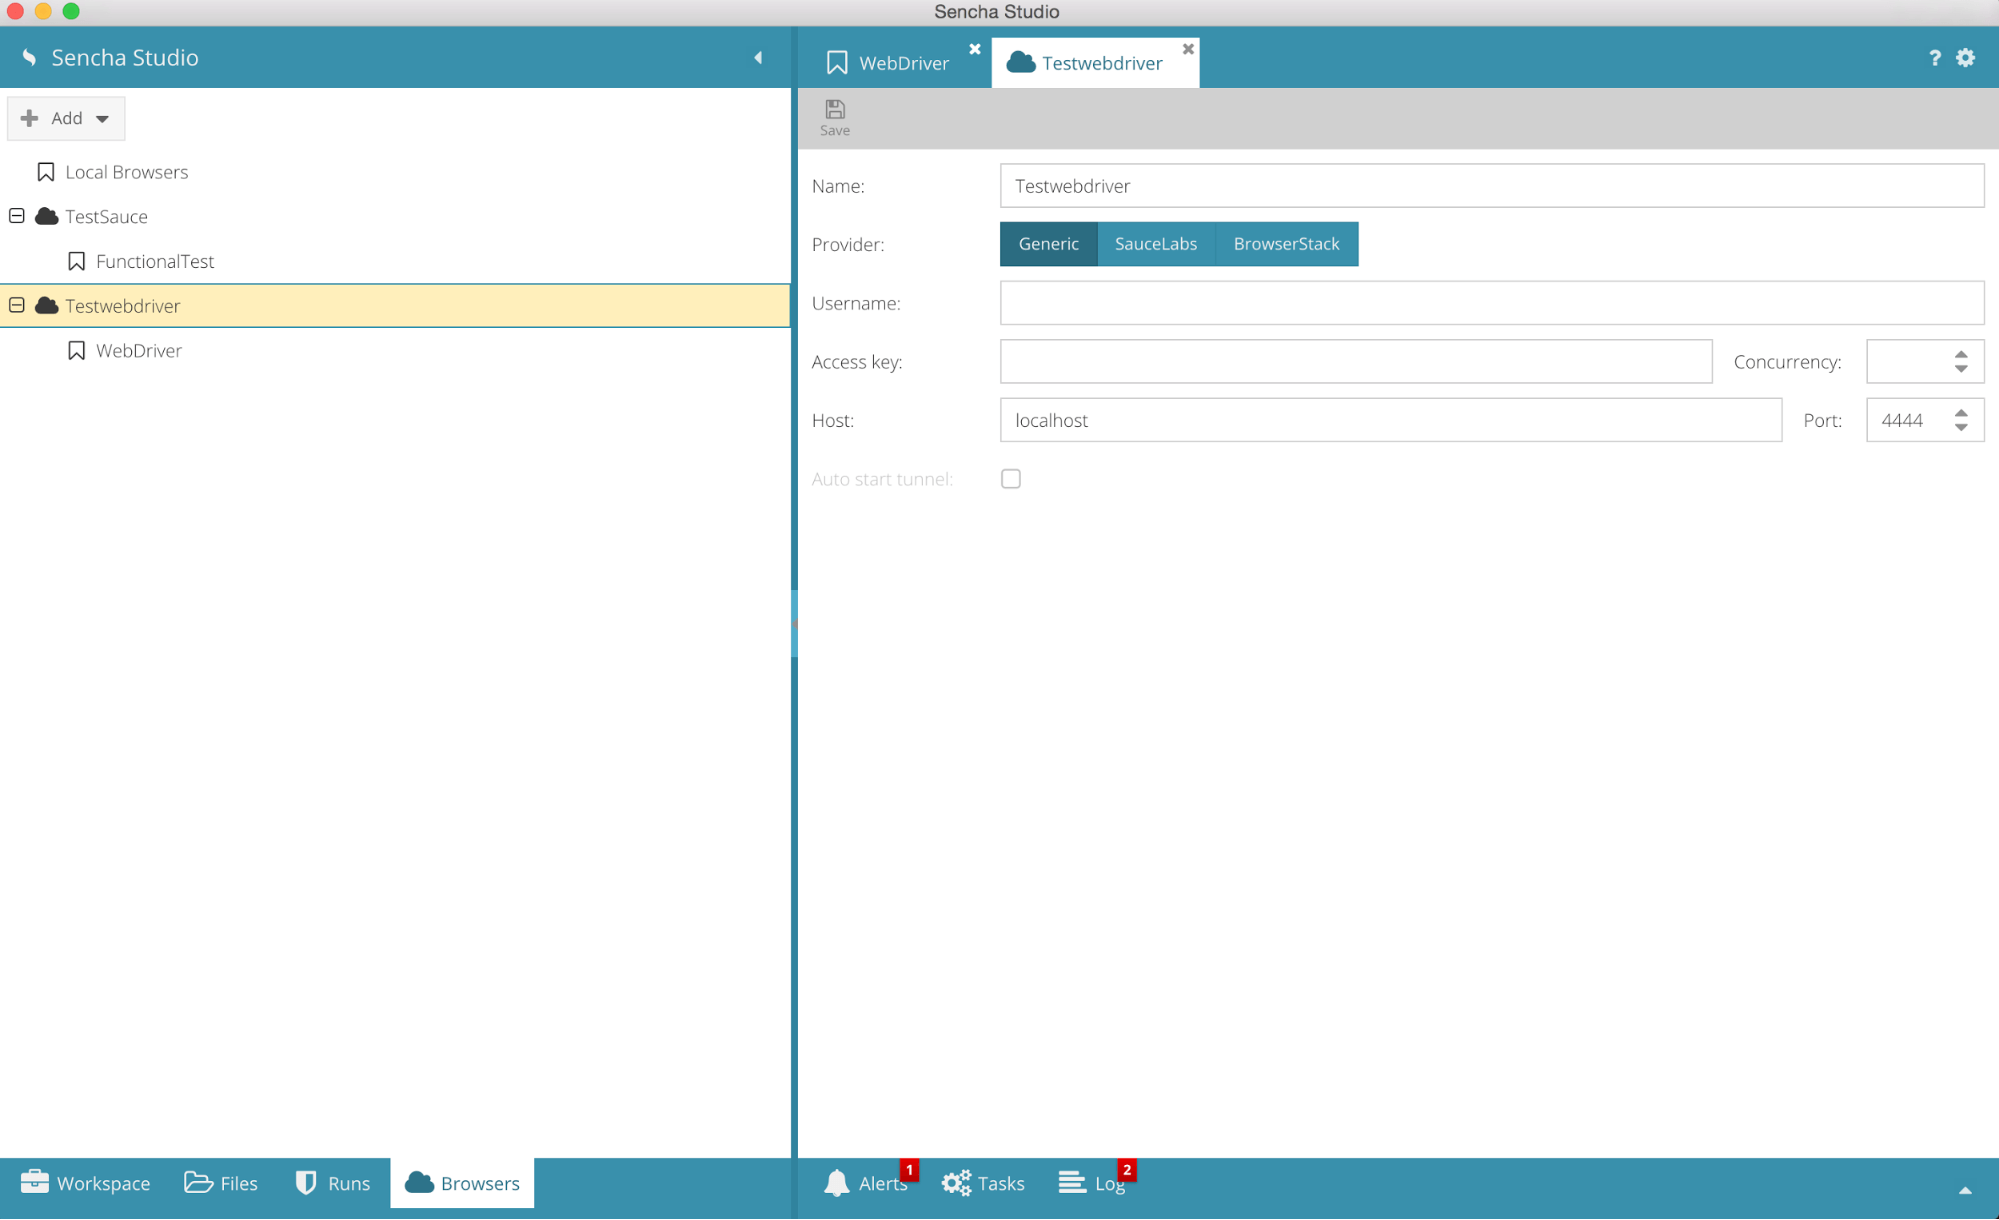
The browser pool configuration is stored in a file, which is normally saved in source control along with the workspace, making it available to all users and to the CI server.
Once you create the pool, the configurations are available to the test runner in Sencha Studio.
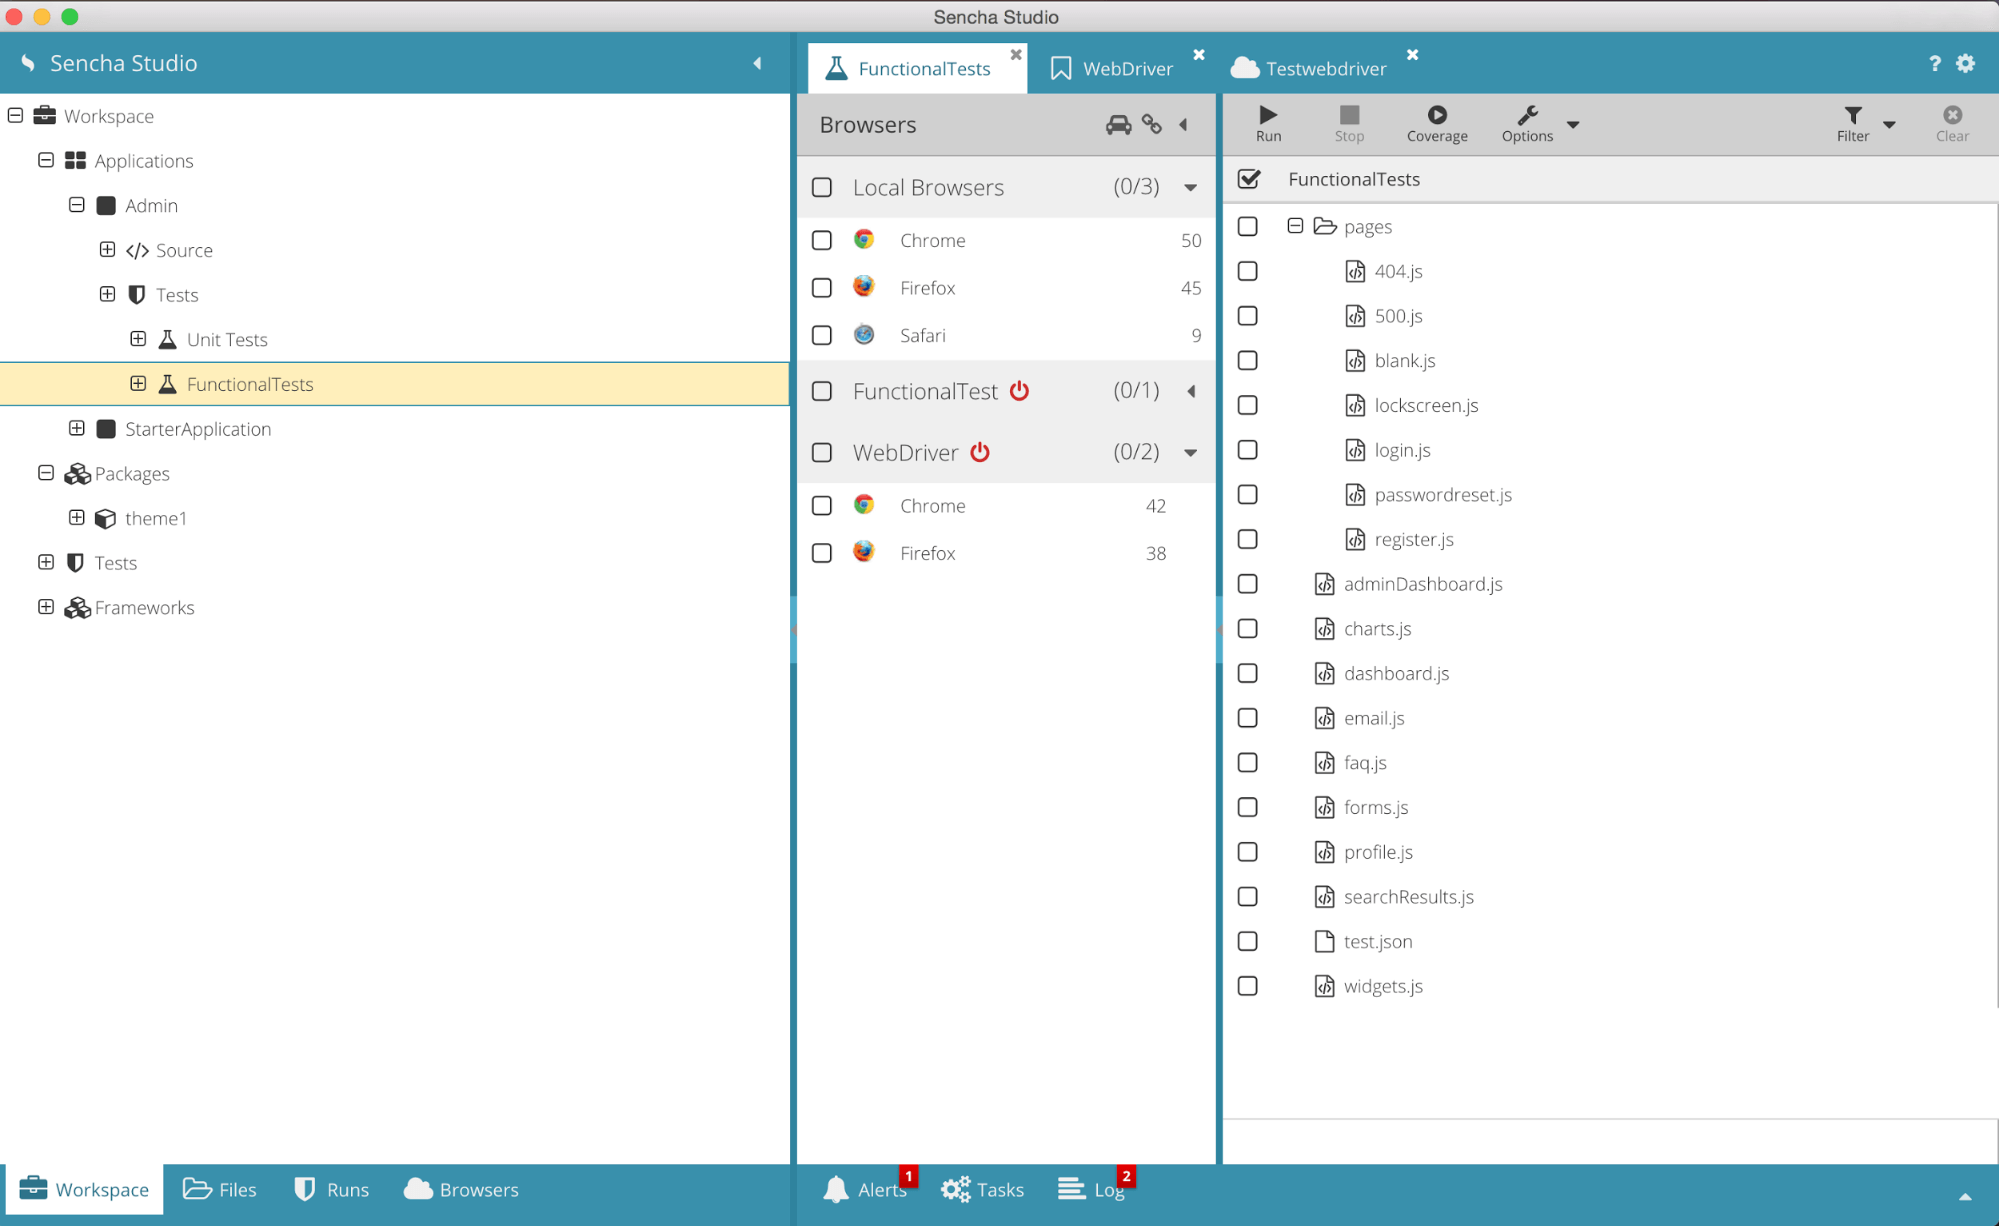
Now, you have the ability to execute tests on your WebDriver farm, directly from Sencha Studio like you are currently doing for local browsers.
To learn more, check out this video on Using a WebDriver Farm.
Running Tests from the Command Line
Running tests interactively from Sencha Studio does not fit into an automated process, so we need to learn how to run them from the command line, which can be easily invoked from unattended scripts and servers.
Sencha Test includes a utility called STC that invokes the test runner from the command line. STC is distributed as a ZIP file, which is included with the Sencha Test download. Normally, the file you download from your Sencha customer portal is a ZIP file that contains the Sencha Test installer and stc.zip.
Installing STC is easy. Just unzip the zip file. On Unix-based systems, you may need to give the “stc” script execute permission. You must have node.js and Sencha Command installed on all machines where STC will run.
Note: when you run tests from the command line, you probably want to also set up the Sencha Test archive server. This server organizes and stores test results for review and reporting purposes. The archive server is part of the STC package, and we’ll cover how to set up this server in the following section.
A typical stc command looks like this:
stc run \
      -p  \
      -s
      -o junit \
      -n  \
      -S  \
      -K
Additional information about the options:
|
-p |
The browser pool that you created for your WebDriver farm in Sencha Studio. |
|
-s |
Path to the test scenario that you want CLI to execute. |
|
-o junit |
Output test results in junit format so Jenkins can display the results. |
|
-n |
A reference number to be associated with the test run when the results are archived. Typically includes the build number from the CI server. |
|
-S |
URL to the archive server where test results will be stored. |
|
-K |
Storage key that allows you to specify a directory for storing your test results in the archive server. |
Setting up the Archive Server
When you run tests from Sencha Studio, you get a nice interface for reviewing test results. Command-line tests and unattended tests typically just log basic text output which is not easy to read. The STC tool includes an archive server that enables you to review test runs executed via STC, using the rich interface of Sencha Studio.
Because we’ve already installed STC, we don’t need to install anything else. To start the archive server, just create a configuration file in a new directory that shows how you want the results organized and then start the server.
Our configuration file looks like this:
{
  “futures”: {
    “path”: “/archives-futures”
  }
}
In this case, we have a key “futures” where test results can be stored. Results are available under the path “/archives-futures” for retrieval by Sencha Studio.
To start the server, cd into that directory and run:
$ stc server &
(you may want to redirect output if you’re going to continue working in this terminal)
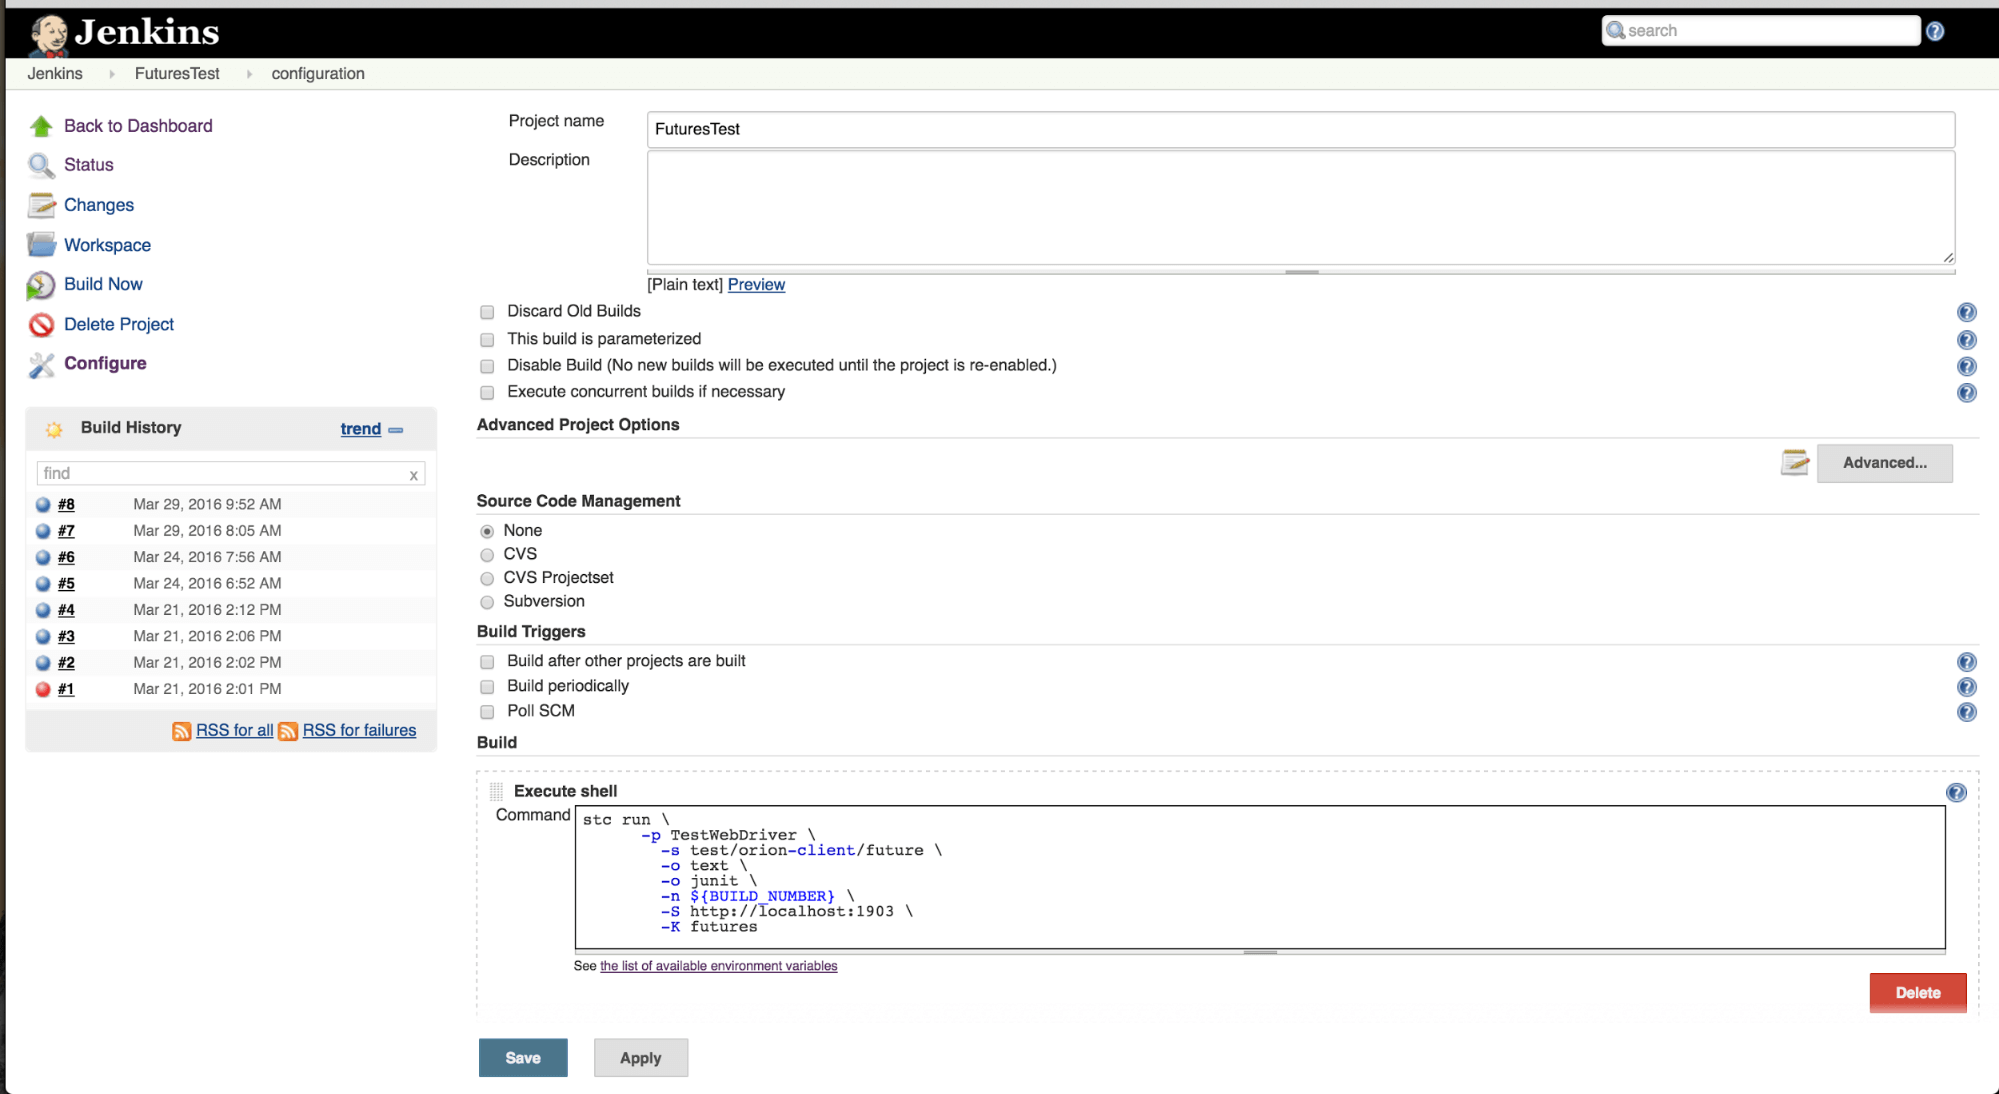
Setting Up Jenkins
Now that we have things set up, we just need to tell Jenkins how to run our tests. Jenkins leverages STC to kick off tests as a build task within Jenkins. You can add this as an extra build step on your existing jobs, or create new jobs to run the tests. Jenkins provides different options for triggering jobs based on the clock, SCM activity, and more.
Simply configure the build step with the STC command, including the appropriate pool and scenario information, archive server URL, and key. Jenkins users normally use the built-in variable ${BUILD_NUMBER} for the reference, so it’s easy to correlate archived results with Jenkins build logs.
You can also check out this video on Test Execution Using Jenkins.
Reviewing Test Results
Now that Sencha Test is being run automatically via Jenkins and leveraging the remote browser farm and archive server, users typically just need to periodically review test results. Depending on the frequency of your test runs and your development culture, you might want to configure Jenkins to email the job results when there are failures.
As mentioned before, Sencha Studio provides the best interface for test results. It’s optimized for easy comprehension, distilling the various tests and browser results into a simple, collapsible matrix view. All you have to do is tell Sencha Studio how to access the archive server and which results path to display.

Conclusion
And there you have it. Sencha Test is a powerful tool for improving your development and testing efforts. By leveraging external build farms and continuous integration servers, you can easily run automatic and unattended tests on your Sencha applications. You can test throughout the development process, quickly identifying and fixing problems as they arise. Your tests will also be more consistent, and you’ll reduce late-stage delays caused by unexpected test failures or long manual testing phases.
Did you find the content helpful?
 0
0

 0
0

Latest Content

Introducing Rapid Ext JS: The Ultimate Low-Code Editor for Ext JS Development
We’re excited to announce the official release of Rapid Ext JS 1.0, a revolutionary low-code…
August 21, 2024
Sencha Architect 4.3.6 Has Arrived!
The Sencha team is pleased to announce the availability of Sencha Architect version 4.3.6. Building…
August 20, 2024

Introducing ReExt: A Game-Changer for React Developers
Sencha, a leader in JavaScript developer tools for building cross-platform and enterprise web applications, is…
August 20, 2024


