

 Rapid Ext JS


Ext JS from Scratch – Part 2
January 23, 2018
185 Views
Welcome to part 2 of the Ext JS from Scratch blog series. In the part 1 blog post, we built up to a working application from scratch that focused on what we want our application to look like and what we want it to do; not HOW it is built from an HTML and CSS point of view.
As a reminder, we ended up with the application that you can see here:
https://github.com/mgusmano/ExtJSFromScratch/tree/master/Part02/01
In that application, you might have noticed that we ‘hard coded’ the needed files in index.html, specifically the .js and .css files on lines 5 – 7:
Ext JS From Scratch – Part 1, Demo 4
In an application that you build, those files will constantly be added to and will change over time. Files will be added with new functionality, for example, as we add new views. Also, files will change as we go from development to production, and from production to a testing build – so having some way to manage those files is a must.
With Ext JS, file management is achieved with a combination of something we call the micro loader and Sencha Cmd. A typical index.html file from a Sencha Cmd generated application does not include the files you need in index.html, but instead downloads them using the micro loader. A typical index.html file generated with Sencha Cmd looks like this:
FromScratch
But the micro loader has always been a mystery to most – what does it do? What files does it generate? When do I need to regenerate files? What regenerates files? Well, in typical Ext JS from Scratch fashion, lets build our own version of the micro loader!
As I mentioned, Ext JS applications that you generate with Sencha Cmd include only 1 file in the index.html – the micro loader. Here is an example:
This single file – bootstrap.js – is the bootstrap loader file, or the micro loader file. Note that this file has NOTHING to do with the bootstrap library that helps with html layout. I will show you in a future post how we can change the name of that file to avoid confusion, maybe to something more appropriate like microloader.js. For this post, we will use the name ‘bootsimple.js’.
It is also worth noting the micro loader does many things, which we will cover in future posts. For now we will focus on the file loading feature.
The micro loader works by reading the needed files from a manifest file – by default this file is bootstrap.json. The bootstrap.json file is populated by Sencha Cmd as you do things like add files to your project, change the theme, etc.
At a high level, here is what the micro loader does to load the necessary files for your application:
- Define the global Ext variable
- Read the ‘manifest’ file (bootstrap.json)
- Wait for manifest file read to complete
- Produce DOM elements for .js and .css files
- Add .css DOM elements to head tag
- Add first .js DOM element to head tag (Ext framework file)
- Wait for framework .js file to completely load
- Add remaining .js DOM elements to head tag
- When all files are loaded, call the the launch event in app.js
So let’s take a look at a simplified version of the micro loader. As I mentioned, I named this file ‘bootsimple.js’, and have included it in the index.html file. Each step above produces a console.log, so you can follow the logic of the simple version of the micro loader for yourself here: https://github.com/mgusmano/ExtJSFromScratch/tree/master/Part02/02
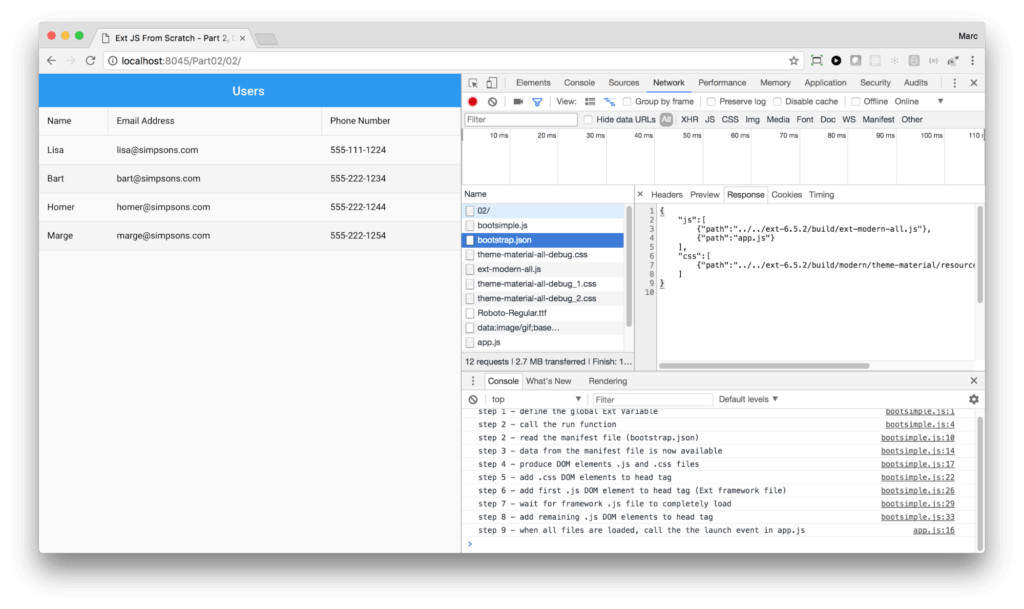
Watching our bootsimple.js in action – with console logging of the steps it takes to load our application files
With Ext JS, we manage the loading of files into the browser with a command line tool called Sencha Cmd. This is a free tool and, as you will see in this series, Sencha Cmd not only helps you scaffold and bootstrap an initial application, but is used in the entire lifecycle of your application development process with Ext JS. If you are not using Sencha Cmd, you are missing out on a lot of our best practices in regards to project structure performance and many other things.
Sencha Cmd is available to download here: https://staging.sencha.com/products/extjs/cmd-download/
Now we are ready to create our application with Sencha Cmd. To scaffold an initial application, run the following in a terminal window. You will need to replace with the location where you installed the Ext JS framework.
sencha -sdk generate app -modern -r -starter=false FromScratch ./03
When you take a look at the generated application folder, you will now see some familiar files: bootstrap.js and bootstrap.json (and bootstrap.jsonp, which is used for some cross domain situations). There are also several files produced by Sencha Cmd which we will discuss in future posts; workspace.json, build.xml, bootstrap.css, app.json, and the ext and app folders.
We have shown just a small part of what the micro loader does, including its ability to dynamically load files from a manifest file created by Sencha Cmd. In the next post, we will more fully look at Sencha Cmd and how you use it during your normal development efforts. Here are some of the other benefits of using the micro loader and Sencha Cmd when building your Ext JS application:
- Caching of files
- Disabling or enabling of caching
- Synchronous and asynchronous loading
- Normalizing of URL’s (creating canonical URL’s)
- Dealing with cross domain issues
- Setting platform tags
- Calling Ext.BeforeLoad for Ext JS 6 Universal applications
- Handling various IE issues
Sencha Cmd also has templates you can use to create your own starter application. We will look at that as well in the next post – stay tuned!
New to Ext JS? Join our Upcoming Webinar
If you are new to Ext JS or just getting started, we invite you to join our upcoming webinar, A Day in the Life of an Ext JS Developer, taking place February 15th at 10am PST. Join us and you will learn the benefits of using Ext JS as well as best practices for getting started. Register here.
Did you find the content helpful?
 0
0

 0
0

Latest Content

Ext JS 7.8 Has Arrived!
The Sencha team is pleased to announce the latest Ext JS version 7.8 release. Following…
May 13, 2024
React Apps Development Using ReExt with Ext JS Components
The world is moving fast towards online businesses. Businesses are established online via social media,…
May 1, 2024

How to Write Unit Tests with Sencha Test
In modern software development, unit testing has become an essential practice to ensure the quality…
April 19, 2024


