GXT Tips to Help You Build Rich, Data-Centric HTML5 Apps
Here are some great tips on using GXT. Be sure to upgrade to GXT 4.0.2 for the best experience. Customers can download from the Support portal. If you’re new to GXT, download a 30-day free trial.
Tip 1: Styling Grid Cells
If you’re looking to customize grid cells, columns, and rows, here are some quick examples. I suggest using a CssResource style name such as classname.
// Cell styles, using external or css resource selector names.
nameCol.setCellClassName("myCssResourceStyleName");
nameCol.setColumnHeaderClassName("myCssResourceStyleName");
nameCol.setColumnTextClassName("myCssResourceStyleName");
nameCol.setColumnStyle(SafeStylesUtils.forFontSize(14, Unit.PX));
nameCol.setColumnTextStyle(SafeStylesUtils.forFontWeight(FontWeight.BOLD));

// Horizontal and vertical layout
nameCol.setCellPadding(false);
nameCol.setVerticalAlignment(HasVerticalAlignment.ALIGN_MIDDLE);
nameCol.setHorizontalAlignment(HasHorizontalAlignment.ALIGN_CENTER);

Tip 2: Dynamic Grid Styling
Use the ViewConfig interface to style GXT Grid cells by cell, column, or row dynamically based on row index, column index, and/or model.
// Column and row styles. Stripe by index, or per model styling.
grid.getView().setViewConfig(new GridViewConfig() {
  @Override
  public String getRowStyle(Stock model, int rowIndex) {
    return "row-default";
  }
  @Override
  public String getColStyle(Stock model, ValueProvider<? super Stock, ?> valueProvider, int rowIndex,
      int colIndex) {
    return "col-" + colIndex;
  }
});
Tip 3: Aligning Widgets Together
If you want to align widgets, we’ve got a handy way to do it. Cast any GWT element to XElement and use alignTo. For example, this code will align a text field in the upper left corner of a list container:
AnchorAlignment align = new AnchorAlignment(Anchor.TOP_LEFT, Anchor.BOTTOM_LEFT, true);
XElement textBoxEl = textField.getElement();
XElement listEl = listContainer.getElement();
listEl.alignTo(textBoxEl, align, 0, 0);
Tip 4: Textfield Input Attributes
If you’re working with modern browsers and you need to set an attribute that GXT doesn’t have available, you can set it by drilling into the input element.
TextField textField = new TextField();
InputElement inputElement = textField.getElement().select("input").getItem(0).cast();
inputElement.setMaxLength(5);
inputElement.getStyle().setTextTransform(TextTransform.UPPERCASE);
Tip: 5: Number Fields
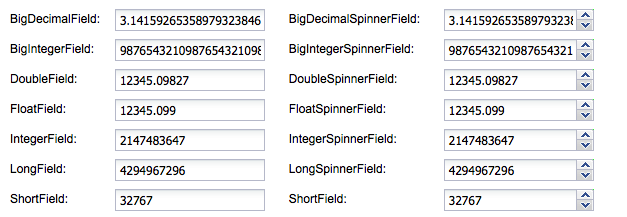
Don’t forget about all the nifty number fields that are available. Each number field fits a specific number data type, which makes it easy to constrain what data can be entered in the field.
BigDecimal, BigIntegerField, DoubleField, FloatField, IntegerField, LongField, ShortField.
Check out all the field options.

Tip 6: JsInterop Wrapping
JsInterop is an effective way to wrap native and third-party JavaScript APIs, so you can access the JavaScript from Java. Here is a quick example of how you would write some JsInterop integration with Ext JS Toolbar.
// Defining an Object literal is done with a JsType annotation. Remember to always use Object when you need to wrap a literal object of properties.
@JsType(isNative = true, namespace = JsPackage.GLOBAL, name = "Object")

// Define a wrap to overlay a JavaScript API.
@JsType(isNative = true, namespace = JsPackage.GLOBAL)
public static class Ext {
  @JsProperty(name = "isChrome")
  public static native boolean isChrome();
  @JsMethod()
  public static native Object create(String className, Object config);
}

// Define a property object literal for configuring the ExtJs API. Not all the methods for the ExtJs API have been wrapped. More methods can be found here for this config.
@JsType(isNative = true, namespace = JsPackage.GLOBAL, name = "Object")
public static class ToolbarConfig {
  @JsProperty
  Object renderTo;
  @JsProperty
  String width;
  @JsProperty
  Object[] items;
}

// Define an Javascript object wrapper
@JsType(isNative = true, namespace = "Ext.toolbar")
public static class Toolbar {
  @JsMethod
  public native void add(Object o);
}
See a full working example of both JsInterop and JSNI.
Tip 7: Timing
Sometimes it’s necessary to defer a DOM operation or other command to the next run of the JS event loop. You can do that using scheduleDeferred() like this. This is super effective if an Appearance is rendering something, and you want to change it after it’s finished rendering.
// This will schedule and run in the next event loop.
Scheduler.get().scheduleDeferred(new ScheduledCommand() {
  @Override
  public void execute() {
       System.out.println("I'm next");
  }
});
Learn more about scheduleDeferred.
Tip 8: Debugging layouts
Debugging layouts can be wild. If you need a little visual help, add some color around each container, so you can see what is going on visually.
contentPanel.getElement().getStyle().setBorderColor("red");
contentPanel.getElement().getStyle().setBorderStyle(BorderStyle.SOLID);
contentPanel.getElement().getStyle().setBorderWidth(1, Unit.PX);
Tip 9: ThemeUtils
You can obtain CSS properties generated by any GXT theme at runtime like this:
ThemeDetails themeDetails = GWT.create(ThemeDetails.class);
FontDetails fontDetails = themeDetails.panel().font();
String family = fontDetails.family();
Learn more about theme utilities.
Tip 10: Layout Resizing
If you’re using programmatic resizing layouts and you add a child that has layout data which accepts sizing to one of them, call gxtContainer.forceLayout() to reflow or recalculate the container sizes.
gxtContainer.forceLayout()

We’re excited to announce the official release of Rapid Ext JS 1.0, a revolutionary low-code…

The Sencha team is pleased to announce the availability of Sencha Architect version 4.3.6. Building…

Sencha, a leader in JavaScript developer tools for building cross-platform and enterprise web applications, is…


